...
Analysts and end users can launch a Bomgar Remote Support session from a ticket in Cloud Intelligent Service Management. This allows interaction through secure chat and screen sharing. This integration helps reduce time to resolution and improve customer satisfaction by seeing the customer issue and even taking control to resolve the issue.
Integration Points:
From a ticket in Cloud in Intelligent Service Management an analyst can trigger an email to the requester and launch a Bomgar Remote Support chat session. The requester will receive an email with a link to download the Bomgar Remote Support client and begin the secure chat session with the analyst and optionally allow the analyst to take control of their machine.
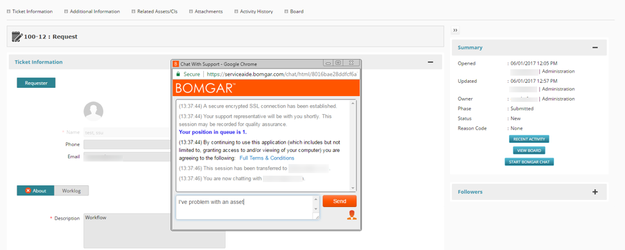
Self-service users can initiate a chat session with the Service Desk directly from a ticket in self-service. They will be added to the chat queue and any available analyst can take the request and begin the chat and screen sharing session.
Upon completion of the remote support session, the Bomgar remote support client is automatically deleted from the user's machine and a full log of the chat and a video recording (.mp4 file) of the screen sharing session are linked to the activity history of the ticket.
...
The Bomgar Remote Support integration requires configuration within the Bomgar portal as well as within Cloud Intelligent Service Management.
Bomgar Portal Integration Setup
...
- Enter the Name of the account
- Give full permission to command API
- Select all check boxes under Reporting API to give full permission
Copy the OAuth Client ID and OAuth Client Secret field values to a text file for later use. These values are used in the ServiceAide Cloud Serviceaide Intelligent Service Management Integrations module.
Add the account.
...
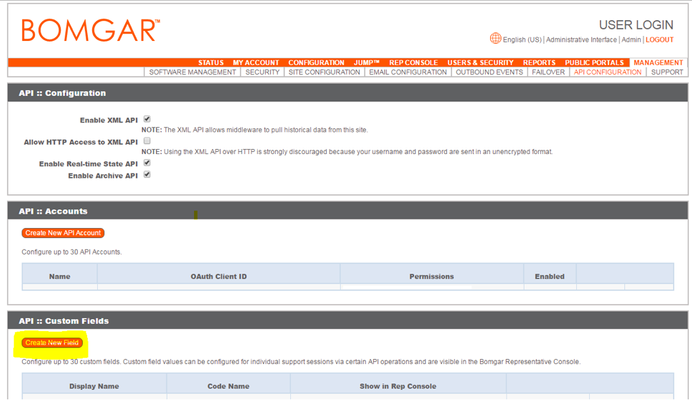
On the API :: Configuration page go to the API :: Custom Fields section and click Create New Field as shown in screen below:
Step 6
Create a new custom field with the following values:
...
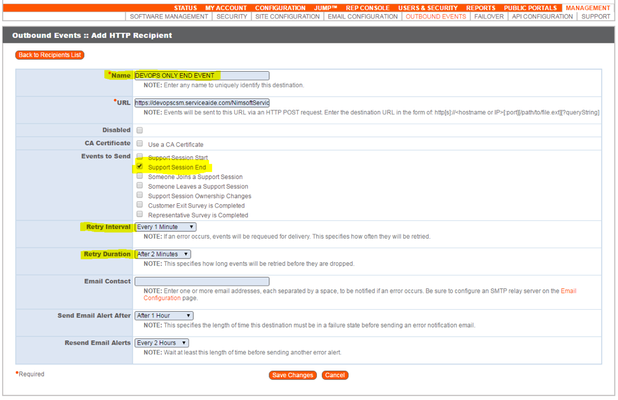
- Name: <name of event> Enter any name for the event, you could use CSM_Session_Response as an example.
- URL: https:// <csm url>/NimsoftServiceDesk/servicedesk/odata/integrationListener?slice=<slice>&$format=JSON
Need to provide the values of token <csmurl> and <slice> in above url. - Check on event Support Session End
- Provide Retry intervals as shown below
- Retry Interval: Every 1 Minute
- Retry Duration: After 2 Minutes
- Save Changes
Step 9
Next you need to create a user account for every Cloud every Intelligent Service Management user that will also be using Bomgar. For example if you have 10 analysts that will be taking chat requests, you need to create all 10 of them in Bomgar.
...
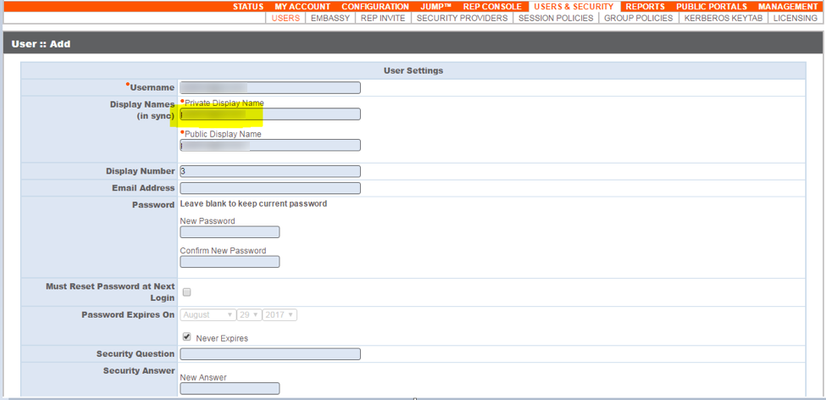
- Username: <user name>
- Private display Name: <This must match the Username of the Cloud the Intelligent Service Management Analyst, otherwise there will be an error in BOMGAR session sharing scenarios>
- Public display name: <public display name in Bomgar>
The configuration from the Bomgar portal side is now complete.
...
Intelligent Service Management
...
Portal Integration Setup
Step 1
Login as an Administrator in Cloud in Intelligent Service Management and navigate to MENU > MANAGE > TOOLSTools.
Step 2
Scroll down to locate the Integrations workspace from the Tools list or use the search bar on to search for “Integrations”. Open the Integrations Workspace.
...
Once you have the domainURL and OAuthToken populated you can test the integration.
If the Cloud the Intelligent Service Management properly authenticates to Bomgar, you will receive a message "Authentication Successful".
...
Agent initiates a session with the requester of a ticket
Step 1
Login to Cloud to Intelligent Service Management as a user who has the Bomgar Remote Support integration configured for their Cloud their Intelligent Service Management username. See step 9 and 10 under the Bomgar Portal configuration above.
...
When you are properly logged into the Bomgar representative console, an email notification will be sent to the Requester of the ticket with a link to open a secure chat session directly with the agent.
Step 3
...
The email sent to the requester of the ticket will have the subject "Request for BOMGAR session" and will have a URL to download the Bomgar Client.
By clicking on the URL an executable will be download based on the requester's operating system.
Once the download completes, the requester needs to click on the executable to complete the installation.
Once the Bomgar client is ready, the requester will be directly linked to the agent who sent triggered the request for the session from the ticket.
Step 4
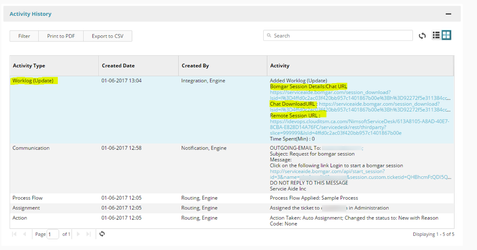
Once the session completes, the details of the Bomgar session will be stored in the activity history of the ticket as worklog update. This includes links to the chat session and a video recording of the screen sharing session.
Self Service Initiated Session
...
When clicking on this button a Bomgar chat screen will appear. The user will be added to a chat queue where an agent will automatically be assigned based on the currently online Bomgar agents.
This chat session can be converted to a screen sharing or remote control session based on a request from the Bomgar agent. The self-service user must accept the request before the session proceeds.
Once the session completes, the Bomgar client software is removed from the self-service user's machine. All session details are captured and added as a worklog update in the activity history of the Cloud the Intelligent Service Management ticket that this session was initiated from.
...
