...
| Info | ||
|---|---|---|
| ||
Intelligent Service Management (ISM) supports Status and Conditional type follow-ups. Other ITSM Connectors only support Conditional type follow-ups. |
The following options are available for configuration:
...
- Enter the new follow-up Name.
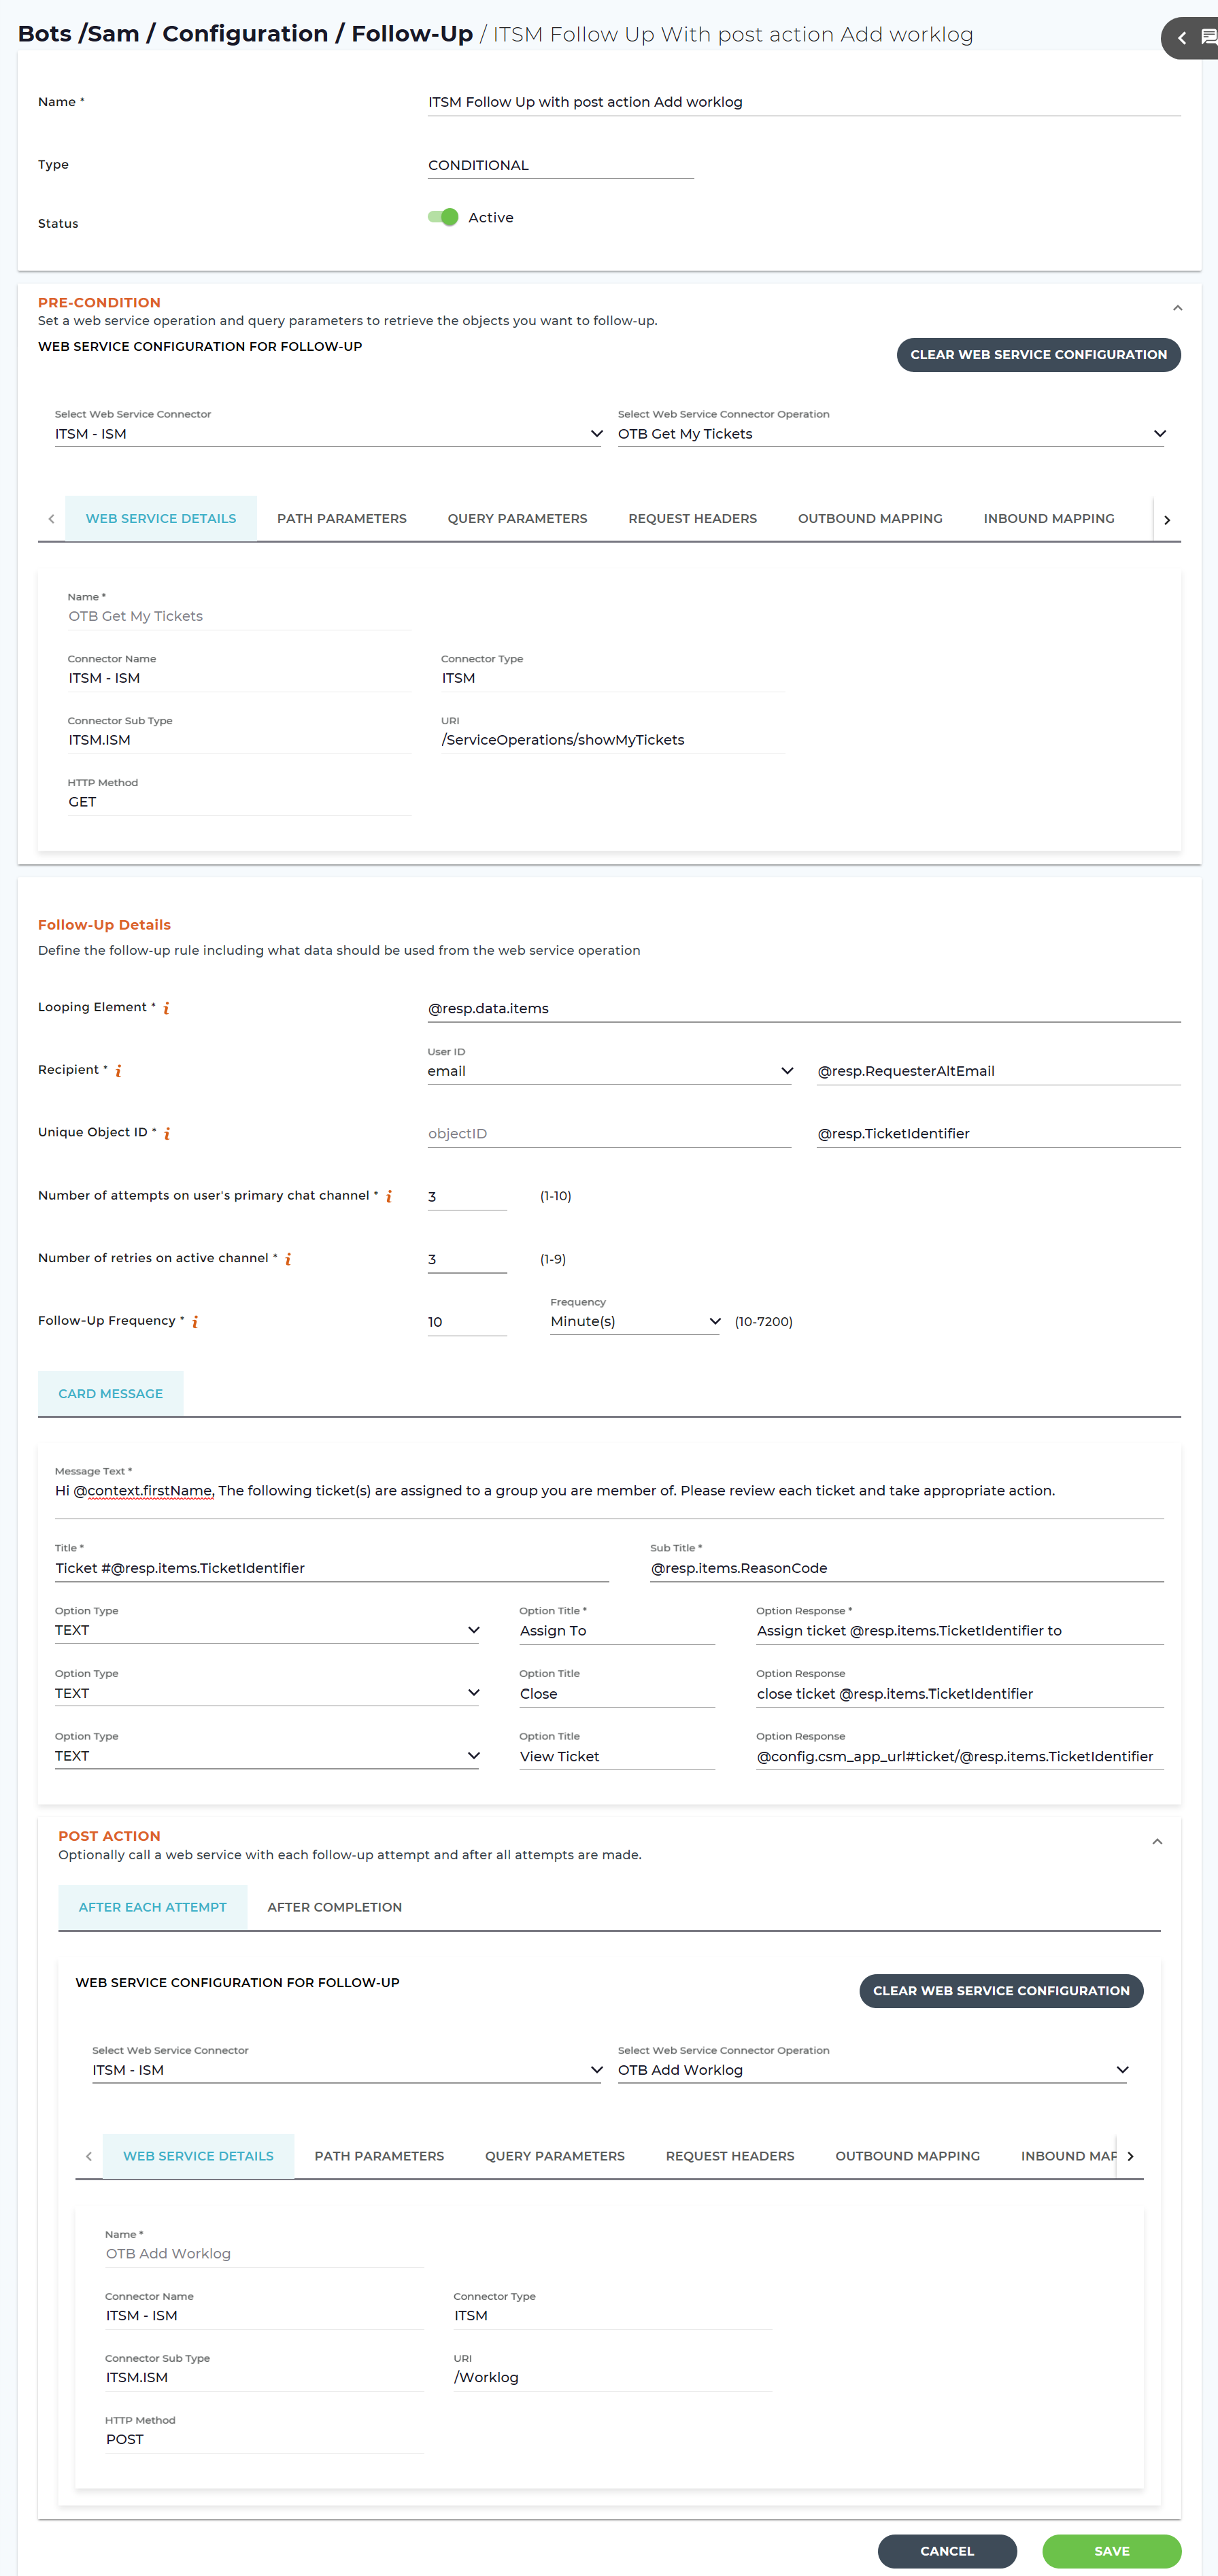
- Select the Type as Conditional.
Set the follow-up Status as Active or Inactive using the toggle button.
Active: If the follow-up configuration is set to Active state, then the configured task is executed.
- Inactive: If the follow-up configuration is set to Inactive state, then the configured task will not be executed.
- Pre-Condition: Set a web service operation that you want to follow-up in order to retrieve the objects. For example, you can create a web service operation to fetch the open tickets.
- Under Web Service Configuration, Select Web Service Connector and Select Web Service Connector Operation. Complete the web service configuration details by referring to Creating Create a New Web Service.
- Follow-up Details: Define the follow-up rule including what data should be used from the web service operation.
Enter the Looping Element, which is the element node used for looping to fetch the Unique Object ID. The looping element is the JSON path representative of the web service output. For example, from the web service output below, you can use the looping element (data.items) to fetch the TicketIdentifier, which is 100-2. The following web service is only a representative, and in an actual scenario, there may be several ticket details, from which you may need to fetch unique details such as the ticket number, priority, ticket closed date and so on.
Code Block title Web service linenumbers true { "data": { "items": [ { "rootCause": "", "CreationTimestamp": "1546507474000", "Impact": "Medium", "Source": "LUMA", "TypeName": "Service Request", "Priority": "Medium", "AssignedTo": "Reid4, Donald | RPC Data Director Application Break-Fix Support", "TenantId": "72468294", "RequesterOrgID": "1", "RequesterOrgLevel": "1", "RequesterOrgName": "lumaqa1t1007", "RequesterUserID": "1", "RequesterUserName": "lumaqa1t1007, admin", "RequestedForAltEmail": "admin@lumaqa1t1007.com", "RequestedForExternalUserID": "ac531f70-684d-4fe6-9778-e4d0945c121d", "RequestedForID": "1", "ResolvedDateTimestamp": "", "RequesterExternalUserID": "ac531f70-684d-4fe6-9778-e4d0945c121d", "CreationGroupName": "Administration", "CreationUserName": "lumaqa1t1007, admin", "RequestedForUserID": "1", "RequestedForUserName": "lumaqa1t1007, admin", "RequestedOrgID": "1", "RequesterAltEmail": "admin@lumaqa1t1007.com", "TicketIdentifier": "100-2" }, } ], "totalCount": 1 }, "error": null, "status": "OK" }- Select the Recipient User ID from the list, and then enter the recipient details. The recipient should be a unique Luma User ID used to send the follow-up to the user. In the User ID field, first select the value that you want to match the user on, the second field includes that data in the web service response. For example, if the value you want to use to identify the user is email, select that from the dropdown and then enter the variable from the web service response that has the user's email address, such as @resp.RequesterAltEmail.
- Enter the Unique Object ID, which is the unique identifier used to track the object and ensure that duplicate attempts are made. This identifier is retrieved from the web service. For example, in the above web service, to obtain the ticket identifier, you can use the unique identifier as @response.TicketIdentifier to retrieve the ticket number from the web service response. For more details on using response variables, (also referred to as @resp,) refer Conversation Variables.
Enter the Number of attempts on user's primary chat channel.
This value determines how many times Luma will reach out to the user on the last chat channel they used to communicate with Luma. For example, if the value was set to 3, Luma will reach out 3 times to the user on Slack, which is the channel they used with Luma last. The allowed values are from 1 to 10. By default, system automatically displays the value as 3, which can be changed.
Enter the Number of retries on active channel.
If a user is active in a conversation on their primary chat channel, Luma will wait and try again later. This setting defines how many times Luma should retry during each attempt. The allowed values are only between 1 to 9. By default, Luma will retry three times, which can be changed.
Info title Note Follow-ups are only sent to 1 chat channel even if the user is using multiple channels. It will use the last active channel through which they sent a message to the bot.
Enter the Follow Up Frequency and select the frequency duration from the drop-down list.
- The follow-up frequency defines the time between follow-up attempts. Once per day is a best practice.The allowed values are between 1 to 5 days. By default, system automatically displays the value as 1 day, which can be changed to Hours and Minutes. If you select Hours, you can select the frequency duration between 1 to 120 Hrs. If you select Minutes, you can define the frequency duration between 10 to 72000 Mins.
- In the Card Message section, enter the follow-up skill Message Text.
The message text informs the user about the tickets they need to act upon when a follow-up is made. You can configure the text for the user, along with the actions to be taken during the follow-up attempts. - Enter the follow-up skill Title and Sub Title.
- Select the follow-up skill Option Type as Text or URL from the drop-down list and enter the Option Title and Option Response. If you select URL, you can provide the URL to a page, while text allows you to provide the follow-up text for the Skills Builder. For example, you can select the Option Type as URL, specify the Option Title as View Ticket and the Option Response as @config.csm_app_url#ticket/@resp.items.ticket_identifier. This provides the Self-service user with a URL to view the ticket.
If you select the Option Type as Text, specify the Option Title as Add Comments and Option Response as Add comments for @resp.items.ticket_identifier; this allows you to add comments for a given ticket. - Post Condition: Optionally call a web service with each follow-up attempt and after all attempts are made. It consists of two tabs: After each attempt and After Completion.
For example, you can set a web service operation in After each attempt to add the worklog details after each follow up. Likewise, you can set a web service operation in After Completion to close the open tickets after a pre-configured number of follow ups. - Under Web Service Configuration, Select Web Service Connector and Select Web Service Connector Operation.
- Complete the web service configuration details by referring to Creating Create a New Web Service.
- Click Save to save the new follow-up skill, else click Cancel to discard the process.
...