As part of user management, this article deals with the following topics:
Table of Contents
Skills Builder allows you to add, edit, delete and deactivate users so that they can create, edit and test bots and skills in the Skills Builder UI, as well as leverage the Agent Chat Console and chat with Luma. If the Intelligent Service Management (ISM) or CA Service Desk Manager (SDM) Connector is configured, users are synced to the Luma platform automatically. Administrator can manage and add Luma specific roles such as Administrator, Developer, Analyst and Self Service User. Each role has specific permissions to use the Skills Builder. For details, see the Define Roles and Permissions page. To reduce the effort spent by the Administrator on creating users and assigning them skills, Administrator can assign the users to groups and then assign the common skills to the groups. For details, see /wiki/spaces/CloudITSM/pages/935363056.
As the Skills Builder Administrator, if you want to add some Luma specific users, you can manage their roles and permissions in the Skills Builder. Skills Builder Administrator can modify the roles and permissions of users synced from the ITSM system. The modified user roles remain the same in the Skills Builder irrespective of the roles and permissions defined in ITSM. For example, if an Analyst user role changes to Administrator in Luma, then it will not be synced back to the connected ITSM system. In case the user's name changes in ITSM, then the change reflects in Luma as well, when it syncs with the ITSM system. However, if the user's name is changed in Luma, it will be overridden during the next ITSM user sync. For more details on syncing the ITSM users with Luma, visit Synchronize Users from CA SDM and ISM. On the Settings page, click the User Management tab to manage users. The User Management list appears as shown below.
...
Items per page: From the drop-down list, select the total number of items you want to view per page, for example, 5, 10, 25 or 100. Click the arrows to navigate to the next or previous pages.
Find Users
You can search for existing users in the User Management list. To search for a user:
...
Create New Users
Administrators can add new users in Skills Builder and assign a role to them. To add users, do the following:
- On the User Management page, click Add User.
The Create User dialog box appears as shown below.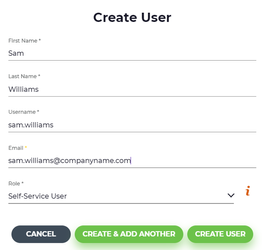
- Enter the First Name and Last Name of the user.
- Enter the Username used to login to Luma. For example, sam.p.
- Enter the valid Email ID of the user. For example, companyname.com
Select the user Role from the drop-down list.
Info title Note The following roles are available for a user:
- Administrator
- Developer
- Analyst
- Self-Service User
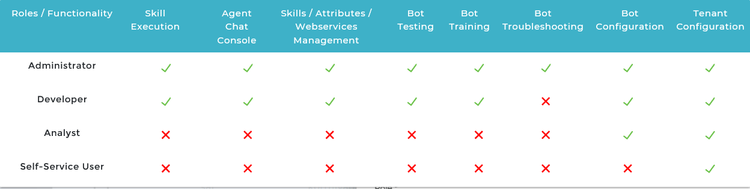
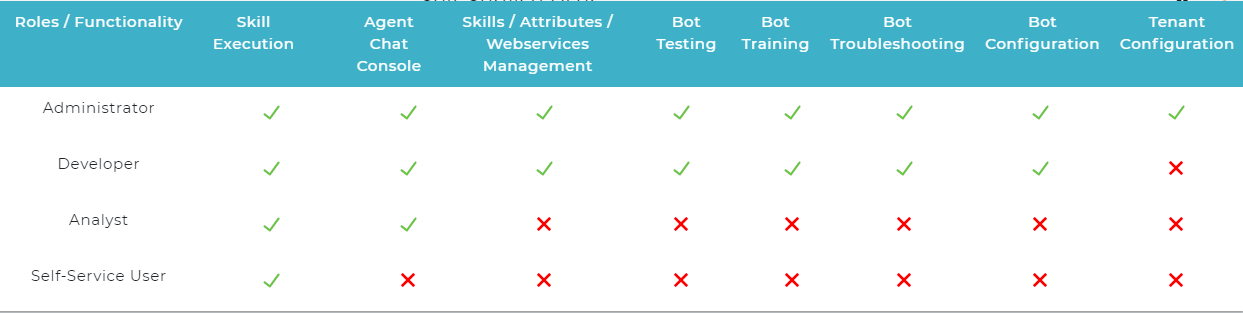
By default, the Self-Service User role is automatically selected. Only one role can be associated to each user. Each role has different permissions in Luma, so ensure that you select the appropriate user role. For more details on roles and their permissions, visit Define Roles and Permissions.
Following is a high level overview of the various roles and their respective permissions in the Skills Builder.
Click Create User to create the user, else click Cancel to discard the process.
To create the user and add another user, click Create & Add Another.
The Create User dialog box appears again to add another user.Info title Note Once the user is created, the user is automatically activated, and the user details are listed in the User Management list.
Import Users
Administrator can import and create multiple users in Luma by importing the data from an Excel spreadsheet. This is done when Luma or Skills Builder specific users need to be created, who may not be users in the connected ITSM system. To do so:
...
| Info | |||||||||||||||
|---|---|---|---|---|---|---|---|---|---|---|---|---|---|---|---|
| |||||||||||||||
While importing users, Luma updates the existing users if the ID, user name or first name and last name matches (in the same order) with any existing record. For example, in the following table, the imported values will override the original values.
|
Edit Users
Administrators can modify the role and also update the user parameters if required. To edit existing users following the below steps:
- On the User Management list, click the user row you want to edit.
The user details appear to be edited as shown below.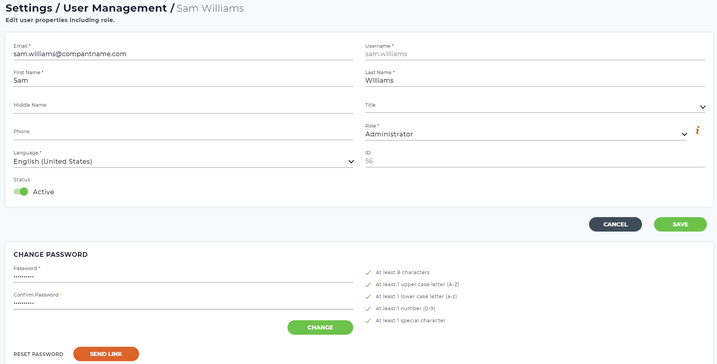
Make the required changes and click Save to save the changes.
Info title Note - The Username and ID cannot be edited.
- The reset password section appears only for Administrator users.
Reset Password for Administrator and Developer Roles
Administrator and Developers can reset their password on the edit details page. To edit the password, do the following:
Navigate to the edit user details page and type the new Password in the Change Password section.
Info title Note The new password should include:
- At least 8 characters
- At least 1 uppercase letter (A-Z)
- At least 1 lower case letter (a-z)
- At least 1 number (0-9)
- At least 1 special character
- Type the same password again in the Confirm Password field. Ensure that the same password is mentioned in the Password and Confirm Password fields, otherwise you cannot reset the password.
- Click Change to change the password. Alternatively, you can also choose to receive a link in your email, to reset the password.
Click Send Link to receive a link to the Luma registered email ID in order to reset the password.
Info title Note If you do not see the email in your Inbox:
- Check your Spam/Junk folder.
- Ensure email address: donotreply@serviceaide.com is not blocked; or ensure all emails from this email are always delivered.
- If that still does not work, try contacting the Serviceaide support team. They are most likely blocking outside emails from being delivered.
...
Administrator users can activate or deactivate users. Activating or deactivating Luma users does not impact their actions in the underlying third party ITSM systems. To activate or deactivate users in Luma:
Navigate to the edit user details page, and select the Status as Active or Inactive.
Info title Note - Inactive users cannot login to Skills Builder or execute any skills through a chat with Luma.
- Ensure that any given time, at least one active Administrator user is available in Skills Builder.
- Click Save to save the changes.
Delete Users
Administrator can delete any users from Luma. To delete the users:
In the user management list, click more options
 icon and then click delete
  icon.
icon.
System prompts to confirm the delete action.Click Delete to continue, else click Cancel to discard the action.
Info title Note - Deleted users are not listed in the User Management list within Skills Builder. Deleted users will not be able to access Luma.
- Ensure that at least one active Administrator user is available before deleting the Administrator user.
Assign Skills to Users
An Administrator can assign skills to individual users. This gives them user level access to execute those skills. Assigning skills to users is done when a user needs exclusive access to a skill. Note that skill execution depends on the user’s role and their assigned skills. Therefore a user may be assigned to a skill but not have the Role that allows skill execution, and vice versa; a user may be in the correct Role, but may not be assigned access to the skill.
When the Administrator assigns skills to a user, then the skill is removed from the Default Public Group. The Default Public Group is an out-of-the-box group that contains all skills and all users. All newly created skills are added to this group by default. This simplifies access by ensuring that everyone has access to the existing skills and any newly created skills. To learn more, see /wiki/spaces/CloudITSM/pages/935363056. New groups can be created for a set of users and the required skills can be assigned to all the users. However, sometimes only a few users from the group may need access to a set of skills. In such case, Administrator can assign the required skills to the users individually. To assign a skill to a user:
In the user management list, select the users to whom one or more skills need to be assigned as shown below.
a. You can search for the required user from the users list by entering the username, email ID or Name and press Enter.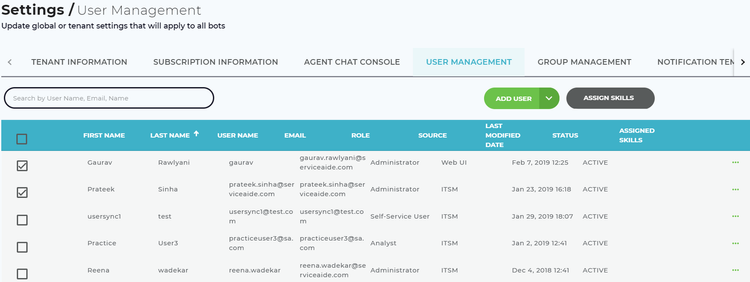
- Click Assign Skills.
The Assign Skills pop-up window appears as shown below.
Select the skills to be assigned to the user.
Info title Note Once a skill is assigned to a user, it is no longer available for selection.
- Click Assign to assign the skill(s) to the selected user(s).
...