The Process Designer provides you a graphical interface for creating process workflows. A process workflow allows you to configure how a ticket is treated when it is created. You can specify conditions for how a ticket that matches certain conditions is treated. Based on the conditions, the process automatically applies the criteria for ticket routing, ticket actions, and interaction with external applications. Before you configure a process, configure the building blocks of a process. These building blocks include the ticket routes, ticket actions, credentials for external applications, and operations available on the external applications. After the building blocks are created, you can view all such items in this workspace. You can select such entities, add them to your process, configure them, and validate them in the same workspace.
The workflow designer features include:
- Create new process workflows and improve the existing process workflows.
- Drag-and-drop feature to link steps of the process workflow.
- Provide an overall graphical representation of the process workflow.
- Copy, publish, and retire process workflows.
Lifecycle of Process Workflow
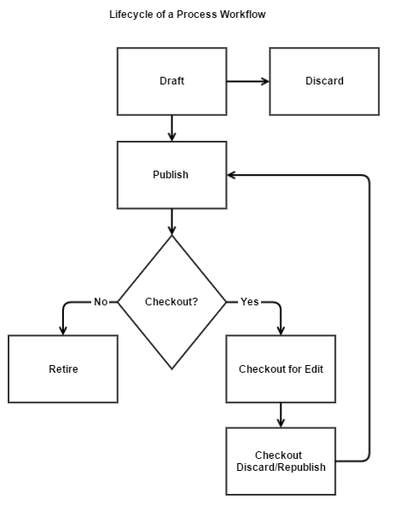
The following diagram displays the lifecycle of a process workflow:

- When you design a new process workflow, the default status is Draft. The draft status allows you to edit the process workflow according to your requirements.
Note: If you do not want to save the changes while editing or designing a process workflow, click Discard. - After the process workflow design is complete, Publish the process workflow and make it available to use. The process workflow is a sequence of steps and actions that are executed based on a defined criteria. When a ticket matches the entry criteria of the published process workflow, the configured actions are executed on the ticket.
- If modifications are necessary on a published process workflow, perform the following steps:
- Checkout the process workflow. The process workflow is available for editing.
Note: Checking out the process workflow to edit will not affect tickets that are already using it. - Edit the process workflow according to your business requirements.
- Save and republish the process workflow to use.
Note: The republished process workflow is applied only for the tickets are being created.
- If a process workflow is no longer required in your organization, you can Retire the process workflow. When the process workflow is retired, you cannot apply it on new tickets. However, the tickets that are already using the retired process workflow continue to use until the tickets are closed.
The following example explains how a process workflow works. Consider an incident process workflow for an issue that is related to network. To define the incident process workflow, follow these steps:
- Specify the entry criteria for the ticket to enter the process workflow depending on matching conditions. Considering the example, set the Categorization as Network.
- Assign the ticket to a group who is responsible for handling the network-related issues. Optionally, assign the ticket to more specific groups such as LAN SMEs or WAN SMEs by setting the assignment rules.
- Specify the ticket parameters, so that the parameter actions are performed on the ticket. Considering the example, Status is New and Assign Group is Network.
- Create a step to accept the ticket and assign to a particular group. When the ticket satisfies steps 1 to 3, the ticket is accepted and is assigned to the Network group for investigation.
- When the investigation is performed and a resolution is proposed, the ticked is set to close. If no resolution is found, the ticket is set to not resolved and is assigned to next level for further analysis.
- Repeat step 5 until a resolution is proposed.
- Optionally, create link tickets to this ticket such as Problem and Service Request.
Get familiar with the following concepts before creating a process:
- Ticket Management: Specifies the life-cycle of a ticket that includes activities that are performed toward resolving the request.
- Entry Criteria: Applies the routing rules to route tickets to appropriate Support Groups.
- Workflow Actions: Specifies a set of actions that are performed on tickets and guide tickets toward the closure.
- Ticket Approvals: Specifies a process of seeking the permission of designated approvers to proceed with an action that is requested.
- Request Catalog: Templates that are preconfigured for frequently raised requests.
- Communication Templates: Templates that are preconfigured for email, with the standard message subject and message body text.
- Support Groups and Roles: Contacts that are grouped based on their geographical locations, skill sets, or relative tasks.
SLA Targets and Thresholds: Provides a mechanism to monitor and control the quality level of the IT services that an organization provides.
Managing Assets: Provides an ability to create, update, and maintain the IT assets-related database.
Configuration Management: Provides an ability to create, update, and maintain the IT infrastructure-related database.
Automation Connectors: Helps you to automate routine, time consuming, and complex tasks that you perform frequently.
This section contains the following topics:


