Skype for Business (Online) Integration
Overview
This article explains how to connect the Skype for Business app to the Intelligent Service Management application. Skype for Business (Online) is one of the most commonly used platforms across organizations to collaborate with co-workers and clients.
Integrating Skype for Business with Intelligent Service Management provides the following benefits:
Instant Messaging (IM), voice, and video calls to initiate a quick chat between the analyst and the requester.
Minimizing the ticket resolution time.
Adding the 'requested for' to a conversation along with the 'requestor' and vice-versa.
Saving conversations for the records and keeping track of the progress.
Compatibility
Skype for Business (Online) feature is supported on the following browsers:
- Safari 8+
- Firefox 40+ (non Audio/Video functionality)
- Chrome 43+ (non Audio/Video functionality)
- Microsoft Edge
Process to integrate Skype for Business (Online)
To integrate Skype for Business with Intelligent Service Management, you must register the application in Microsoft Azure Active Directory. This ensures users to have secure access to the application.
These are the steps to set up the integration:
- Application registration in Microsoft Azure Active Directory
- Editing the Manifest
- Configuring Reply URLs
- Providing required permissions
- Granting permissions
- Activating Skype for Business in Intelligent Service Management
- Initiating chat using Skype for Business
Watch the video or follow the steps below to configure the integration.
Step 1
Registering the application in Microsoft Azure Active Directory
The below steps require Microsoft Office 365 user privileges:
- Log in to the Microsoft Azure portal (https://portal.azure.com/#dashboard/private/) using your Microsoft Office 365 User ID and Password. Microsoft Azure window is displayed.
- In the Microsoft Azure portal, navigate to Azure Active Directory> App Registrations> New Application Registration.
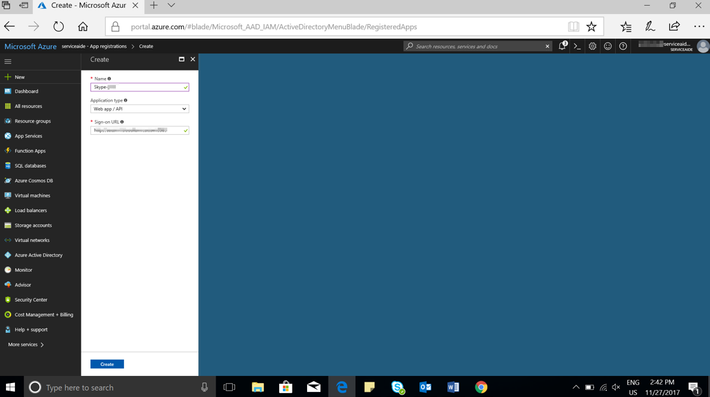
- Specify the application name in the Name field; such as 'Skype for CSM'.
- Set the Application Type to Web app/API. By default, the value is set to Web app/API.
- Specify your Intelligent Service Management login URL in Sign-on URL. For example, if you are using CSM3, configure the URL as https://csm3.serviceaide.com. If you are using CSM2, configure the URL as https://csm2.serviceaide.com.
- Click Create. Now, the app is registered and displayed in the list of applications in the App Registrations window. An Application ID is generated.
Note: The Application ID is required when you set-up the integration within Intelligent Service Management. Save the Application ID in a text file or copy it to your clipboard for future use.
Step 2
Editing the Manifest
These are the steps to edit the manifest:
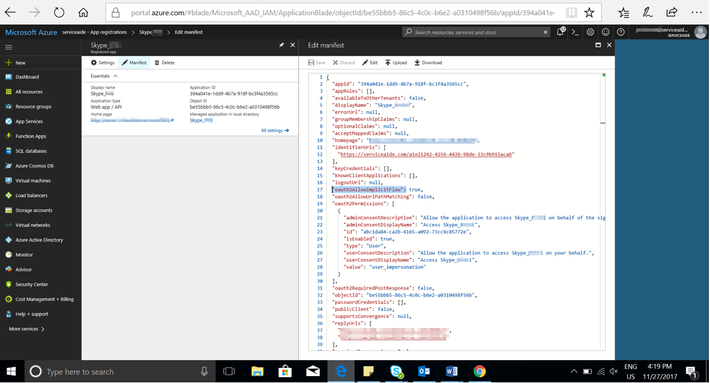
- In the App Registrations window, select the app which you just created. For example, "Skype for CSM".
- Click Manifest.
- In the Edit Manifest text editor, set the "oauth2AllowImplicitFlow" to “true”.
Note: By default, the value is set to False.
- Click Save.
Note: To enable multiple domain support set the "availableToOtherTenants" to "true"
Step 3
Configuring Reply URL/s
To configure the reply URL/s, follow the below steps:
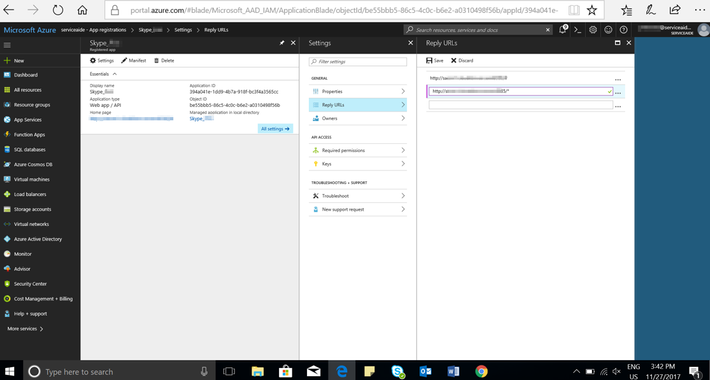
- In the App Registrations window, select the app which you have created.
- Select the Settings tab.
- Click Reply URLs. The Reply URL window is displayed.
- Specify the Reply URL. You can specify one or more URLs based on the requirement.
For example, https://csm3.serviceaide.com/* or https://csm2.serviceaide.com/*.
Note: If you are using the log in URL as https://direct-csm2.serviceaide.com or https://direct-csm3.serviceaide.com, you must also prefix 'direct' to the Reply URL. For example, https://direct-csm3.serviceaide.com/* or https://direct-csm2.serviceaide.com/*.
Step 4
Providing required permissions
Follow these steps to provide the required permissions that you must enable in Skype for Business:
In the App Registrations window, select the app which you have created.
- Navigate to Settings> API Access> Required Permissions.
- Click Add.
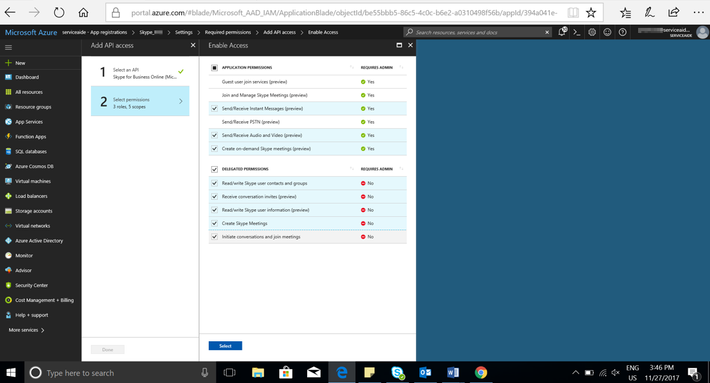
- Click Select an API.
- In the Select an API window, select Skype for Business Online (Microsoft.Lync).
- Click Select.
- Click Done.
- Click Select Permissions from the Add API Access menu.
- Click and enable the following options:
- Send/Receive Instant Messages (Preview)
- Send/Receive Audio/Video (Preview) *
- Create on-demand Skype Meetings (Preview)
- Select all the options in the Delegated Permissions section.
*Note: Audio and Video calling features are only supported on the following browsers:
- Apple Safari 8+
- Microsoft Edge
- Microsoft IE 10+
10. Click Select.
11. Click Done.
Step 5
Granting permissions
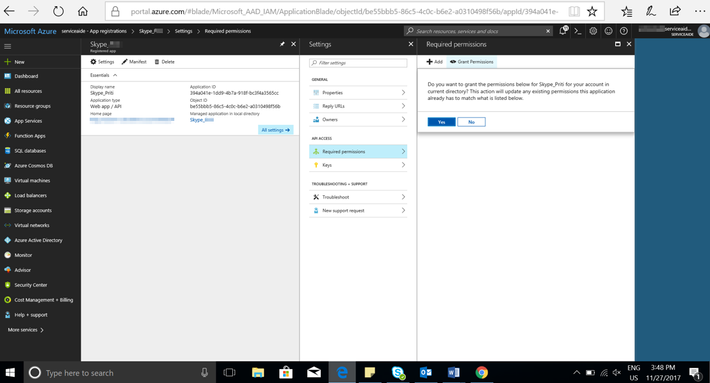
To grant permissions, you may require Office 365 Administrator privileges. Follow these steps to complete the registration process:
- On the Required Permissions window, click Grant Permissions.
- Click Yes to complete the process.
Step 6
Enabling Skype for Business (Online) in Intelligent Service Management
After registering Skype for Business in Microsoft Azure Active Directory, you must follow these steps to configure the integration in Intelligent Service Management:
- Log in to Intelligent Service Management and navigate to MANAGE> Tools> Integrations.
- In the Integrations workspace, on the left panel, click Skype for Business.
- Specify the application ID which you have generated while registering the app in Microsoft Azure Active Directory. The ID should be in the following format, 1fa27414-c9c9-4f8d-8cdc-5fa4ededfb5c. See, Step 1 above to see how to get the Application ID.
- Click the
 button to set it to Active and click Save. Skype for Business is now active in your environment.

Step 7
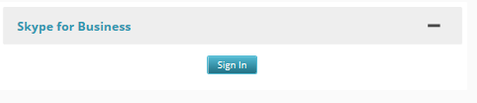
Initiating chat using Skype for Business
After you activate Skype for Business in Intelligent Service Management, you can see the Skype for Business Sign In prompt on the right panel, on a ticket, in the Ticket Center. You are required to log in as an Analyst to initiate chat using Skype for Business.
© 2019 Serviceaide 1-650-206-8988 http://www.serviceaide.com info@serviceaide.com