This article describes the features and configuration for the integration with Bomgar Remote Support.
Overview
Analysts and end users can launch a Bomgar Remote Support session from a ticket in Cloud Service Management. This allows interaction through secure chat and screen sharing between analysts and end users. This integration helps reduce time to resolution and improve customer satisfaction.
Integration Points:
From a ticket in Cloud Service Management an analyst can trigger an email to the requester and launch a Bomgar Remote Support chat session. The requester will receive an email with a link to download the Bomgar Remote Support client and begin the secure session with the analyst.
Self-service users can initiate a chat session with the Service Desk directly from a ticket in self-service. They will be added to the chat queue and any available analyst can take the request and begin the chat and screen sharing session.
Upon completion of the remote support session, a full log of the chat interaction and video recording (.mp4 file) of the screen sharing session are linked to the activity history of the ticket.
Configuration
Bomgar Portal Integration Setup
Step 1
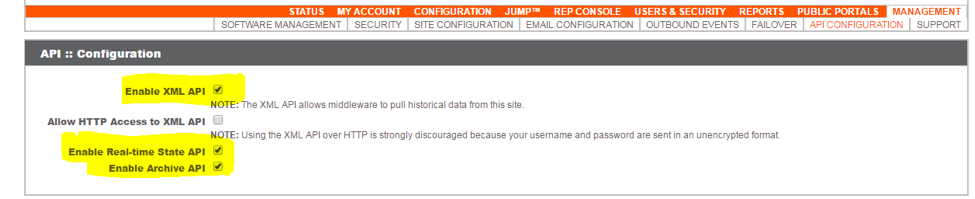
Login with admin credentials to the Bomgar portal and click on MANAGEMENT and then on API CONFIGURATION

Step 2
Once Clicked go to API :: Configuration section and enable following options as shown in following screenshot.
Step 3
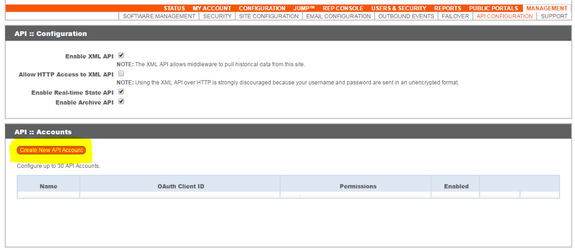
In the same screen in section API :: Accounts click on create new API Accounts
Step 4
Once clicked following screen will appear. Perform following actions
- Provide Name
- Give full permission to command API
- Give full permission to reporting API

Copy OAuth Client ID and OAuth Client Secret to a text pad. They will be needed to put in service aide CSM in Integrations module.
Step 5
In the same screen in API :: Custom Field click on Create New Field as shown in screen below:

Step 6
Create a new custom field with
a. Display Name as ticketId
b. Code Name as ticketid (Make sure in the code name ticketid should be lower case)
c. Check the checkbox (Show in Rep Console).
Step 7
On the top menu click on MANAGEMENT and then click on OUTBOUND EVENTS
Once the screen renders then in the section “Outbound Events :: HTTP Recipients” click on Add new HTTP Recipient.

Step 8
Add a new recipient, with following details
- Name: <name of event>
- URL: https:// <csm url>/NimsoftServiceDesk/servicedesk/odata/integrationListener?slice=<slice>&$format=JSON
Need to provide the values of token <csmurl> and <slice> in above url. - Check on event Support Session End and provide reentry intervals as shown below

Step 9
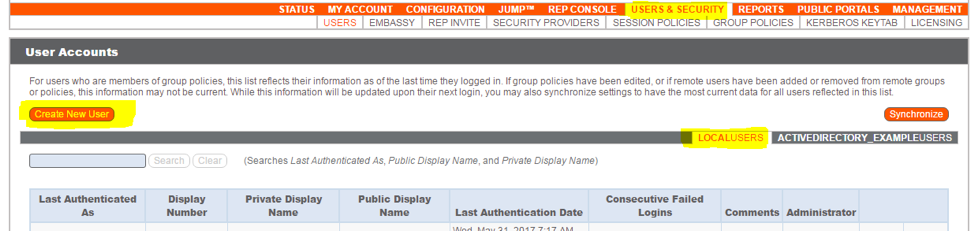
Click on USERS & SECURITY and then click on Create New User
Step 10
Once the create new screen appears provide the following details:
- Username: <user name>
- Private display Name: <This must be the user name of the “Service Aide CSM agent” otherwise there will be an error in BOMGAR session sharing scenarios>
- Public display name: <public display name in Bomgar>
The configuration from the Bomgar portal side is now complete.
Cloud Service Management Portal Integration Setup
Step 1
Login as an Administrator in Cloud Service Management and navigate to MENU > MANAGE > TOOLS.
Step 2
In the search bar on the Tools workspace search for “Integrations”
Step 3
Select Bomgar from the list of integrations. Provide the following values for the integration:
- domainURL: This will be the URL of the bomgar portal e.g. https://<DEMOORG>.bombar.com
OAuthToken: The value of this field will can be obtained from Step 4 of BOMGAR Portal Integration.
The OAuthToken value is combination of OAuth Client ID and OAuth Client Secret to be provided together separated by a colon(:) for example:ExampleOAuth Client ID:OAuth Client Secret b8696ab9d2asfdasfasfdasdfasdfasf:asdfqrasdfqasdfSDEDSfsd2134SDSsds
Step 4
Once done you can make this integration active by clicking on the active slider on the top and test the integration with “Test Integration” Button.
Add Comment