For this first skill we will focus on having Luma answer a user's question with a test response. This skill is extremely useful to use for common FAQ questions such as communicating Support office hours, holiday schedules, key business phone numbers or email addresses and so on. For this example we walk through the full process to create a Skill that communicates the guest WiFi network information to self-service users.
| Info | ||
|---|---|---|
| ||
|
Navigate to Skills
To navigate to Skills, do the following:
...
The details tab is where you define how the user triggers the skill as well as the conversation itself. This tab displays a list of sections that you need to configure:
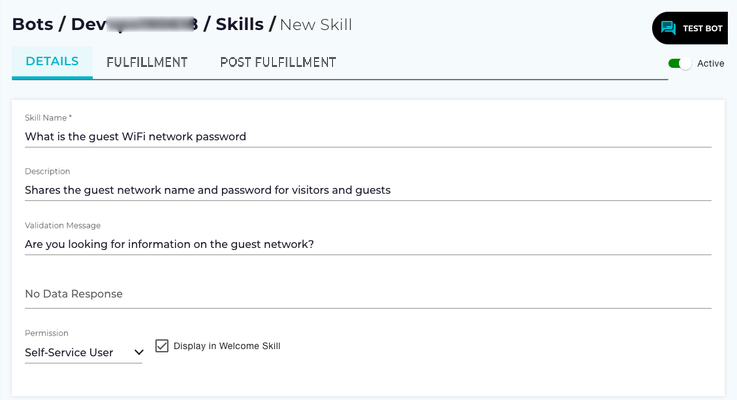
Skill Name: Specify the name for your skill name in this field. Keep this name customer friendly as it may be shown in the Welcome Skill or in the validation message to a user when chatting with Luma. In this example, let us name it "What is the guest WiFi network password".
- Description: Specify the description of this skill. Use user-friendly terminology, as it will be shown if this skill is part of the Welcome Skill. Note that Luma supports a maximum of 1000 characters only.
Validation Message: If the user enters a phrase to trigger this Skill but it doesn't meet the Natural Language Processing (NLP) engines matching threshold, this message will be shown to the user along with a Yes/No prompt to ensure that this is the skill they want. Keep the message in the user's terminology, for example "Are you looking for information on the guest network?"
No Data Response: If your skill triggers a web service call during fulfillment that retrieves data from another system, this is the message the user will receive if no data is returned from that call. In this example, we are returning text to the user and not performing a web service call, therefore this field can be left blank. If you were calling a web service that returns data, you should provide a detailed message to the user about what occurred.
Permission: From the Permission drop-down list, you define what type of Service Management user can access this skill - Administrator, Developer, Analyst, Self-Service User or Guest. In Intelligent Service Management, an analyst is any user with a Concurrent or Named license which includes Managers and Administrators and a Self-Service user is an employee or customer that is not part of the support team. Using Guest permission, admin can create the skills particularly accessible to the anonymous users.
Since this example Skill is aimed at helping employees find information, let us select Self-Service User here.Note
Analyst users can trigger both Analyst and Self-Service User skills. But, Self-Service User can only view trigger Self-Service skills.
- Display in Welcome Skill: Select this check box if you want this Skill to be shown to users when they enter "hello" or "what can you do". The Welcome Skill is based on the user's role, so a Self-Service user will see a different Welcome skill than Analyst users.
Image URL: As an Administrator you can add an image to each skill you want to show in the welcome skill to provide a nice welcome experience to the user. Type the image URL. Ensure the Display in Welcome Skill check box is selected. All the image types are supported. For example, Jpeg, Png, Gif, Pdf, and more.
Info title Note Ensure that for Google Hangouts:
- While creating a skill which can be set as a Welcome Skill, you must specify a value in the Description field for the image to appear in Google Hangouts.
Ensure that for Web Widget:
- Recommended image size for Web Widget is 280px for width and 165px for height.
For other chat channels:
- The image dimensions are channel-specific.
Phrases
Phrases are a set of phrases used to train the bot’s Natural Language Processing engine. Phrases help the bot link the skill to the different ways a user asks for that skill. It is important to create phrases for how technical and non-technical users will ask for a skill. For example, a user may say "guest network password" or "visitor wifi access". Each of these is different and valid ways to trigger the same skill. It is recommended that you talk to different users and ask them how they would ask for a skill so that you can build better phrases and make your bot more effective.

To add phrases to your skill start typing in the Enter text here text box in the Phrases section. To add your phrase to the Skill click the Add ![]() icon. Enter all the different ways you think users will ask for this Skill.
icon. Enter all the different ways you think users will ask for this Skill.
| Info | ||
|---|---|---|
| ||
|
...
| Info | ||
|---|---|---|
| ||
Case is ignored by the Natural Language Processing Engine. |
Parameters
This is the section of the Skill that defines the conversation with the user and also allows setting any values that you want in the Action or fulfillment of the Skill.
From the Select Attribute drop-down list, choose the required attribute and click on Associate Attribute to display it in Parameters section. You can also enter the first character of the attribute name to scroll down the list to that letter. All the new Attributes must be defined in Attributes menu item. For further details please refer to Attributes section.
...
Click Save to reflect the changes in Luma bot or click Cancel.
| Info | ||
|---|---|---|
| ||
Skills may take several minutes to update in the Natural Language Processing engine. Therefore a new or updated Skill will not be immediately available to users after save. |
Fulfilment
To retrieve data from external system, use Select Web Service. Skill names can be used as context variables in skill fulfilment as listed below.
| Key | Value |
|---|---|
| Skill Name | @context.SkillName |
Select Web Service from the drop-down list. For further details refer to Web Services section.
...
| Info | ||
|---|---|---|
| ||
Inactive skills cannot be tested using the test bot from the skill builder. However, the Administrator or Developer can set the permission and test the skills before rolling out to the Analysts or Self-service users. |
Inbound Mapping
Context attributes set in the Inbound Mapping webservice in an action will be available during skill fulfilment. For example, @context.created_id Key can be used during the skill fulfilment.