This article explains you the process to install CSM the Serviceaide Intelligent Service Management app in Salesforce. Using the Salesforce app you can With this integration you view, create, and edit CSM tickets. You can also access Salesforce contacts.update Intelligent Service Management (ISM) tickets directly inside Salesforce. This gives your sales, marketing and customer success teams the ability to monitor a customer's support tickets directly from the Account page inside Salesforce.
How to Install
...
the Serviceaide Intelligent Service Management app in Salesforce
To install CSM ISM in Salesforce, you need to perform the following steps:
Step 1: Installing Salesforce App
- Login to Salesforce Appexchange with your Salesforce credentials.
- Type Cloud Service Management in the Search bar to look for CSMISM, until we have the App published in the Appexchange use the below link to get the App.
- https://appexchange.salesforce.com/appxListingDetail?listingId=a0N3A00000EJHP8UAP
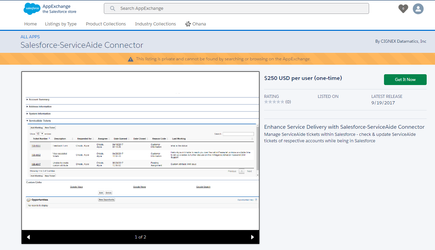
- Select the app and click Get it Now
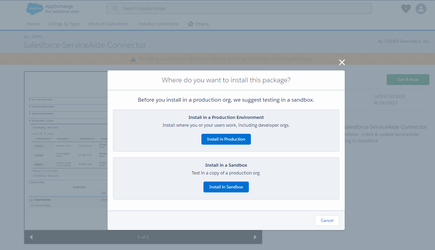
- Click Install in Production or in Sandbox
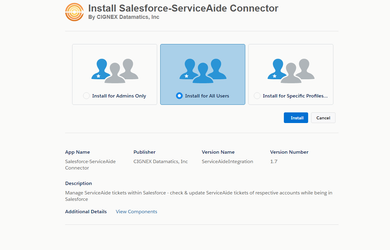
- Depending on your requirement, you can choose to install CSM ISM for everyone or only for the Administrators. You can also choose specific profiles to whom ISM tickets must be displayed.
- Confirm the installation after agreeing to the terms and conditions, Continue with the Installation, You will be redirected to the Log in window to log in to your corresponding Salesforce account.
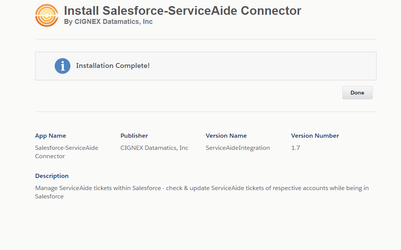
- Verify the Installation complete message.
Step 2: Configuring CSMISM
- After the installation is complete, you will be redirected to the Installed Packages page.
...
On the left panel, from the Administrators menu, click Security Controls> Remote Site Settings
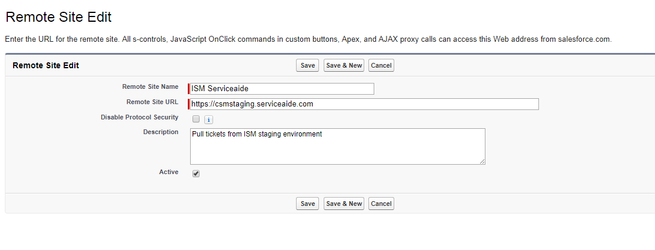
- Create a new remote site and specify the information about your CSM ISM account such as URL and Name and then save.
- Enter your CSM ISM URL and credentials to configure your account.
- Select to Allow Edit Worklog, if all users need the option to add worklog
- Select the columns to hide from the ticket section
Step 4: Creating Page Layouts
- Click Setup.
- On the Build menu, navigate to Customize> Accounts> Page Layouts.
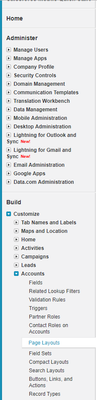

- In the layouts listed, click Edit next to Account Layout.
2. Drag and drop Section present in the Account Layout window, below Address Information as shown below
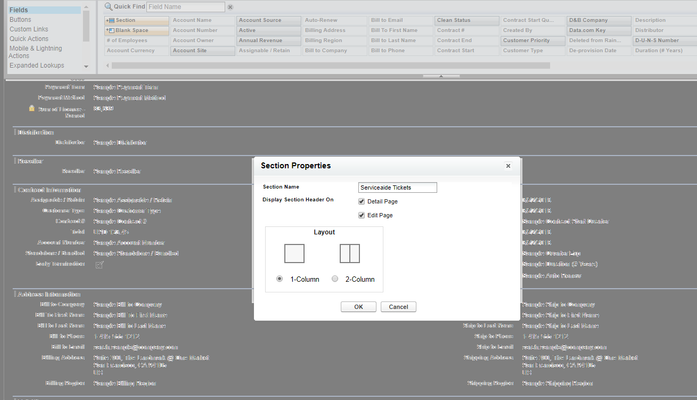
3. Name the section as Serviceaide Tickets and specify the layout

4. Now, drag and drop ServiceAide Tickets available under Visualforce Pages on the newly created section.

5. Click the Save button in the Account Layout window.
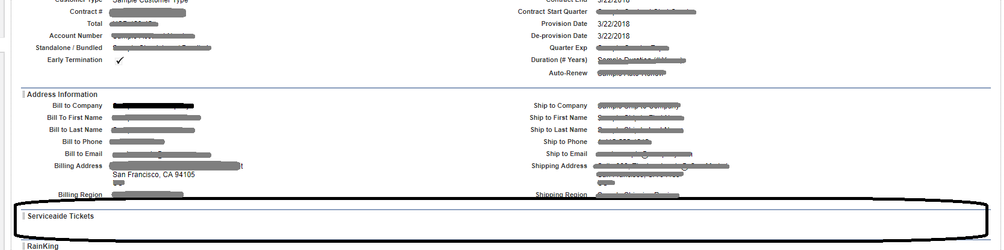
- Now, in your Account page, you can see the tickets created in ISM by your Accounts.

- To view or edit the ticket, click on the individual ticket Number, the Ticket will open up in another tab.
- Select the Ticket to add a worklog comment from Salesforce to the ticket.
- Click New Ticket to create a new ticket for the account in ISM.