| Table of Contents | ||
|---|---|---|
|
...
This workspace is designed to give Analysts a high-performing and flexible page dedicated to managing their queue of tickets. Advanced Ticket Center, like regular Ticket Center, displays all tickets the user has permission to view. You can also use Views to personalize their backlog of tickets into easily organized groups. For example, an analyst could have a View for high-priority Changes and a separate view for an important Organization and so on. Views can be further configured using temporary filters for priority, assigned user, date range, and more. The ticket details are displayed in a grid with customizable columns and sorting, enabling the users to personalize the grid based on their needs. According to your preference, you can edit the width of all columns in a view in the edit mode and save. This can be unique to each view.
The dashboard lets you visualize your organization’s data in the simplest graphical forms, track performance metrics, monitor unassigned tasks, and helps enhance future decision making. To learn about the Dashboard feature in the Advanced Ticket Center, see Dashboard.
Key features in Advanced Ticket Center include:
- View Dashboard that provides you a a comprehensive snapshot of your service desk.
- Create multiple personalized Views with custom matching conditions for unlimited personalization and filtering. Save these Views for fast access to frequently used queries.
- A count of the number of tickets in each of your Views.
- Improved performance when loading and searching for tickets.
- The ability to add custom fields to the ticket grid; enabling users to view additional information without opening the tickets
- Adhoc or temporary filters to further slice and dice data in a View including new filter options such as Related Projects
- Search tickets by custom attributes
- View Announcements in the workspace to be alert on new outages, and important organizational events.
- To leverage a larger width on the screen to view the issues, a minimum number of three columns can be included in the View.
| Info | ||
|---|---|---|
| ||
Filters created and saved in Ticket Center are not available in Advanced Ticket Center. Additionally, Advanced Ticket Center Views are not currently available in the Serviceaide Mobile App |
...
- Navigate to the Advanced Ticket Center page under the WORKSPACES navigation menu.
- When you open the Advanced Ticket Center page, you cannot see any Views. All tickets based on your permission will be displayed.
- Create your first view by clicking the CREATE VIEW button on the left side of the screen.
- On the right side of the screen, you need to name your View.
- Specify the ticket type. It helps to create a view for a specific ticket type such as service request view or change request view. By default, all ticket types are selected.
- Define the matching criteria. The Matching Criteria allows you to select a standard ticket attribute and set a matching value using equal (=), not equal (!=) or Like depending on the type of the attribute. A lookup option is also available to find valid values for specific fields without having to type it manually. Select a custom date using the calendar to view tickets opened in the last 7 days, tickets that will breach their SLA in 3 days, and so on.
...
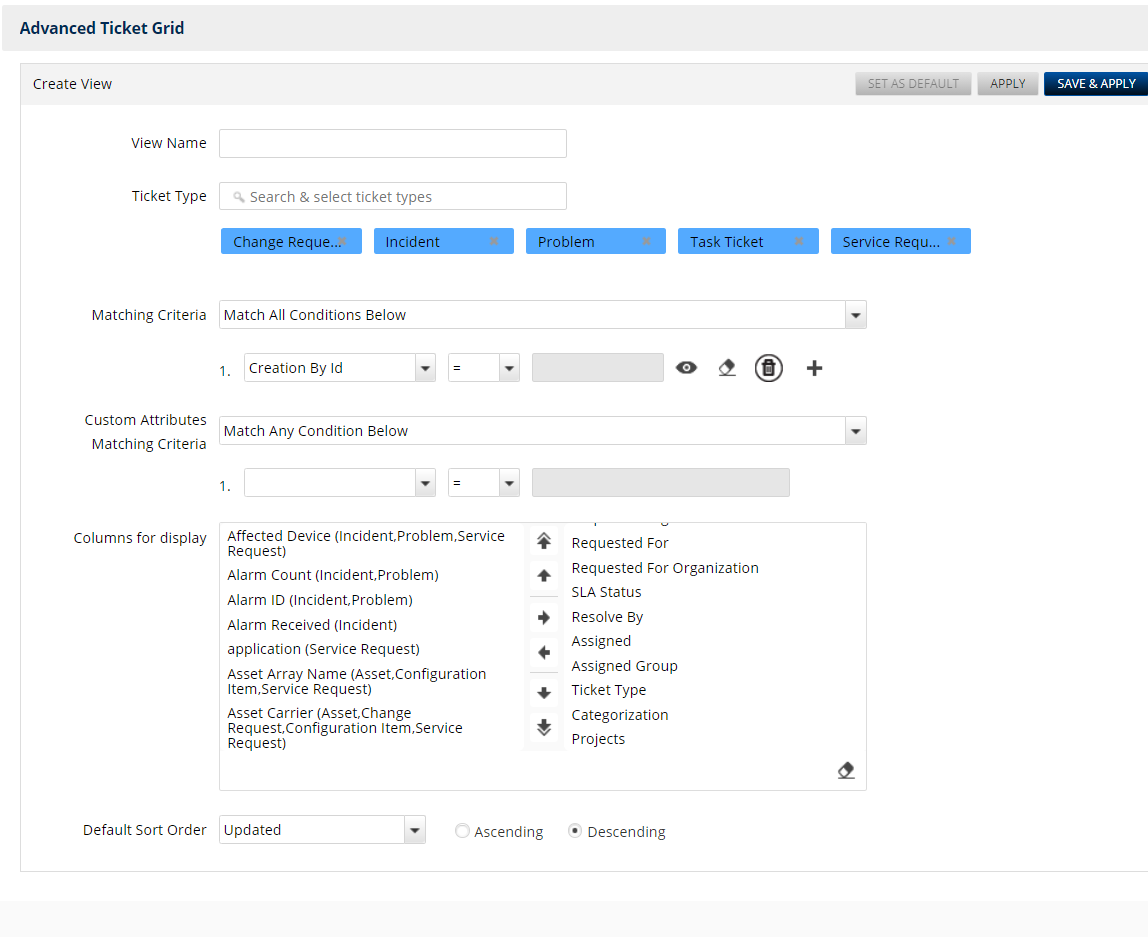
- Use multiple criteria with Match Any Condition (OR), Match All Conditions (AND), or Custom (for ex: 1 AND (2 OR 3)) to define exactly what tickets should be returned.
- Similarly, you may also add one or more matching criteria based on Custom Attributes.
- Click the APPLY button to update the grid below to ensure the matching criteria meets meet your requirements.
- You can adjust the displayed columns in the grid by clicking the right side of any column header. This will show you all available standard ticket columns. You can show/hide the columns using this menu. You can also drag and drop columns to adjust the order from left to right. Note that these changes are not stored with the View. You must put the View in edit mode and save the changes to persist them.
- You can also add Custom Attributes to the grid (see the steps below)
- Set your sort order by clicking on a column header and click again to adjust the ascending/descending order.
- Click SAVE & APPLY to Save the View and hide the editing section. The View will now be shown in the Views panel on the left side of the screen.
- You can make this view as your default view by clicking the Set as Default button in the Edit View section. By default, this view is displayed when you open the Advanced Ticket Center workspace next time.
| Info | ||
|---|---|---|
| ||
|
Define a Custom Set of Display Columns
Intelligent Service Management (ISM) allows you to configure a custom set of columns to display for each of your Views. This allows you to personalize a View and show standard or custom fields based specifically on that view. For example, a View focused on tickets assigned to the Network Group could have custom attributes related to network issues displayed as columns in the grid.
...