Overview
New
Advanced Ticket Center has been greatly enhanced as part of the June 2018, August 2018, November 2018 and February 2019 releases. Please encourage your analysts to use it for improved performance and endless personalization of their backlog.
This workspace is designed to give Analysts a high performing and flexible page dedicated to managing their queue of tickets. Advanced Ticket Center, like regular Ticket Center, displays all tickets the user has permission to view. You can also use Views to personalize their backlog of tickets into easily organized groups. For example, an analyst could have a View for high priority Changes and a separate view for an important Organization and so on. Views can be further configured using temporary filters for priority, assigned user, date range and more. The ticket details are displayed in a grid with customizable columns and sorting, enabling the users to personalize the grid based on their needs. According to your preference you can edit the width of all columns in a view in the edit mode and save. This can be unique to each view.
The dashboard lets you visualize your organization’s data in the simplest graphical forms, track performance metrics, monitor unassigned tasks and helps enhance future decision making. To learn about the Dashboard feature in the Advanced Ticket Center, see Dashboard.
Key features in Advanced Ticket Center include:
- View Dashboard that provides you a comprehensive snapshot of your service desk.
- Create multiple personalized Views with custom matching conditions for unlimited personalization and filtering. Save these Views for fast access to frequently used queries.
- A count of the number of tickets in each of your Views.
- Improved performance when loading and searching for tickets.
- The ability to add custom fields to the ticket grid; enabling users to view additional information without opening the tickets
- Adhoc or temporary filters to further slice and dice data in a View including new filter options such as Related Projects
- Search tickets by custom attributes
- View Announcements in the workspace to be alert on new outages, and important organizational events.
Note
Filters created and saved in Ticket Center are not available in Advanced Ticket Center. Additionally, Advanced Ticket Center Views are not currently available in the Serviceaide Mobile App
Note pertaining to Pearl Release Upgrade
If a View created prior to the Pearl Release, February 2019, is not displaying correctly, just open the View in Edit Mode (by clicking on the pencil icon) and then Save & Apply again. There are some underlying changes made to Advanced Ticket Center that may require to re-save certain Views. This applies only after the Pearl release upgrade.
Tickets highlighted based on Priority
A visual indicator of a ticket's priority makes it easier for analysts to identify what needs to be worked on quickly.
Following are the list of color codes available to display the relative importance of tickets in both the list and grid views in the priority cell in Advanced Ticket Center:
- Critical: Red
- High Priority: Orange-Red
- Medium: Orange
- Low Priority: Yellow
- Custom: Gray
- None: Blank
Creating a View
Views are a great way to quickly get to the tickets you are looking for as an analyst or a manager. Create Views for common groups of tickets that you want to access frequently. You can define custom matching conditions and associate columns including custom attributes to that view. You can also view the number of tickets available in it.
Let's walk through how to create your first View.
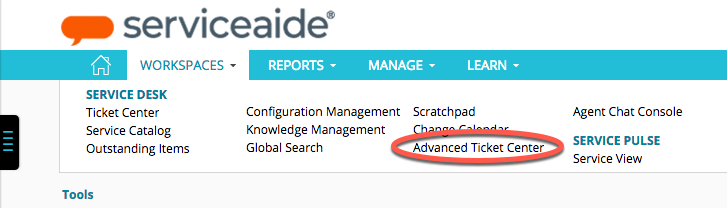
- Navigate to the Advanced Ticket Center page under the WORKSPACES navigation menu.
- When you open the Advanced Ticket Center page, you cannot see any Views. All tickets based on your permission will be displayed.
- Create your first view by clicking the CREATE VIEW button on the left side of the screen.
- On the right side of the screen, you need to name your View.
- Specify the ticket type. It helps to create a view for a specific ticket type such as service request view or change request view. By default all ticket types are selected.
- Define the matching criteria. The Matching Criteria allows you to select a standard ticket attribute and set a matching value using equal (=), not equal (!=) or Like depending on the type of the attribute.

- Use multiple criteria with Match Any Condition (OR), Match All Conditions (AND) or Custom (for ex: 1 AND (2 OR 3)) to define exactly what tickets should be returned.
- Click the APPLY button to update the grid below to ensure the matching criteria meets your requirements.
- You can adjust the displayed columns in the grid by clicking the right side of any column header. This will show you all available standard ticket columns. You can show/hide the columns using this menu. You can also drag and drop columns to adjust the order from left to right. Note that these changes are not stored w
- You can also add Custom Attributes to the grid (see the steps below)
- Set your sort order by clicking on a column header and click again to adjust the ascending/descending order.
- Click SAVE & APPLY to Save the View and hide the editing section. The View will now be shown in the Views panel on the left side of the screen.
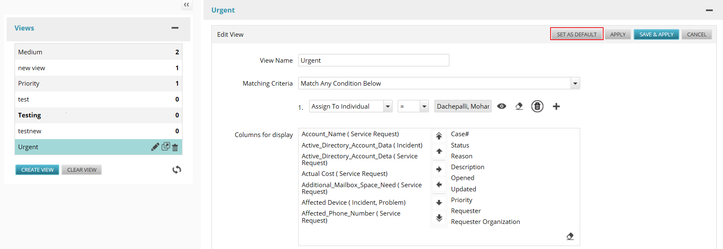
- You can make this view as your default view by clicking the Set as Default button in the Edit View section. By default, this view is displayed when you open the Advanced Ticket Center workspace next time.
Define a Custom Set of Display Columns
Intelligent Service Management (ISM) allows you to configure a custom set of columns to display for each of your Views. This allows you to personalize a View and show standard or custom fields based specifically on that view. For example a View focused on tickets assigned to the Network Group could have custom attributes related to network issues displayed as columns in the grid.
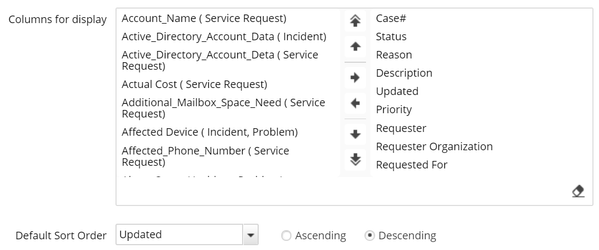
Following are the details of the features available in Columns for Display pane:
- Use Columns for Display pane to select the columns for which the details are required in the view.
- Use
 icon to move the predefined attributes to the top of the predefined attribute. This will be the first attribute in the grid.
 - Use
 icon to define the order of the column in the grid towards the left
 - Use
 icon to add a new predefined attribute to the grid.
 - Use
 icon to remove existing predefined attribute from the grid.
 - Use
 icon to define the order of the column in the grid towards the right.
 - Use
 icon to move the predefined attributes to the bottom of the predefined attribute. This will be the last attribute in the grid.
Set a Custom Sort Order per a View
Each View can have it's own sort order defined based on a number of out of the box fields. This sets the default sort order for each time you open the View. You can do adhoc sorting on different columns in your View or change the default sort order later.
Select the Default sort order to define the tickets sort order view in an ascending or descending order. The following Ticket attributes can be used to set the Default Sort Order:
- Case #
- Status
- Reason
- Description
- Opened
- Updated
- Priority
- Requestor
- Requestor Organizer
- Requested For
- Requested for Organization
- SLA Status
- Resolve By
- Assigned
- Assigned Group
- Ticket Type
- Categorization
Define Column Width per a View
You can also define unique widths for each of the columns in your view. To do this go into edit mode for a View, adjust the column widths by dragging them to the required size and then click the Save & Apply button. This stores the column widths for this View. The next time you open this view you should see your column widths as you saved them. Any changes made to column width without saving will not be stored with the View.
Managing Views

Edit a View
Edit any existing View by selecting the View from the Views list on the left side of the screen and then clicking the icon. You can adjust the name, matching criteria, displayed columns and default sort order of your View here. If you frequently use a View, you can set it as default instead of searching it from the list. Be sure to save your edits before moving away from the view.
Copy a View
To simplify creating a new View, click the  icon to copy it. This creates a new View with the matching criteria, columns and default sort order from the previous View. Edit the View as necessary, including changing the name, and save it to create your new View.
Delete a View
Delete a view by clicking the icon after the View is selected on the left side of the screen. This will permanently delete the View and there is no way to undo this action.
Hide the Views Panel
To have more space for the tickets grid click the icon above the Views panel. This will hide the Views Panel until you need it again. Click the same icon to expand it.
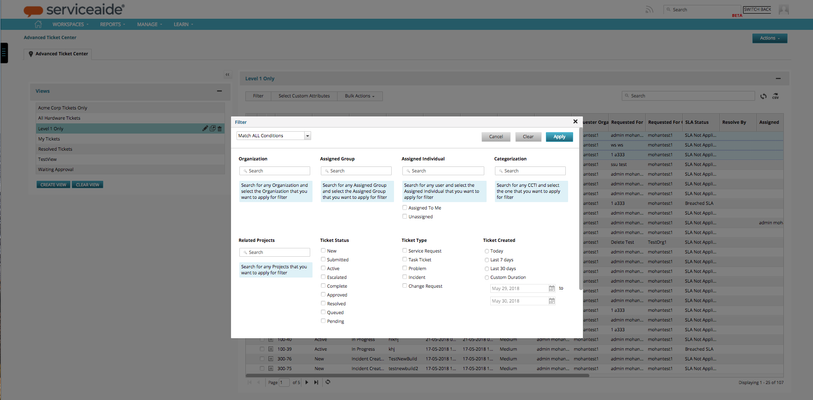
Adhoc Filters
The Filter button provided within a View allows for adhoc filtering on top of your View's custom matching conditions. This allows you to quickly adjust the tickets returned in the grid without having to create a new View.
These filters are temporary and are not saved to the View. The filters go away when you close a View, select another View or navigate to another workspace.
Search Using Attributes
You can search tickets using custom attributes and ticket attributes such as status, description, requester, and organization. By default, the search will look at all text within the grid. This allows you to quickly search for a status like "Active" without having to set the filter. This is also useful if you were looking for a value in a custom attribute such as "64gb", if you searched for "64gb" it would return all instances of "64gb. You can search tickets using your local language only if the ticket description is specified or contains local terms that matches the search term.
Using Custom Attributes
If you are looking for a more explicit search of a field that is not available in the filter, you can either search tickets based on the custom attribute name or the complete value as explained in the following example:
For example: Custom attribute name followed by the custom attribute value.
custom_attributes.name:"Module" AND custom_attributes.value:"mod_proxy_fcgi
In case of local languages, the attribute name and value needs to be in local terms. You can specify it as: custom_attributes.name:"(Module in local term) And custom_attributes.value:"(mod_proxy_fcgi, to be specified in local terms)
Using Ticket Attributes
You can search the required object using ticket attributes, which also supports localized values.
For the attributes that are listed below, following are the examples based on which the English and Non-English users can perform a search:
- For English users, you are required to append ".key" to the attribute. For example, while searching for tickets with the Status "New", you are required to type the string as ‘ticket_status.key:New'
- For Non-English users, you are required to type the attribute followed by the strings as follows:
For Example, for Deutsch users, the string should be 'ticket_stauts.de_DE'
-For Spanish: '.es_ES',
- For French: '.fr_FR',
- For Italy: '.it_IT',
- For Portuguese: '.pt_BR',
- For Finnish: '.fi_FI',
- For Swedish: '.sv_SE',
- For Russian: '.ru_RU',
- For Simplified Chinese: 'zh_CN',
-For Japanese: '.ja_JP'
For more information on the various search options, see Global Search.
Export Data
Click the icon  on the right above the ticket grid to export all data from the View to CSV. This exports data across all pages of the grid and includes data from all displayed columns in the grid.
The CSV file can be opened in spreadsheet programs such as Microsoft Excel and Google Sheets.
Take Action from Advanced Ticket Center
Add a Worklog to a Ticket
Expand any row within the ticket grid to add a worklog. This is a fast way to add notes and update the user without opening the ticket in a new tab.
Perform Bulk Actions on Multiple Tickets
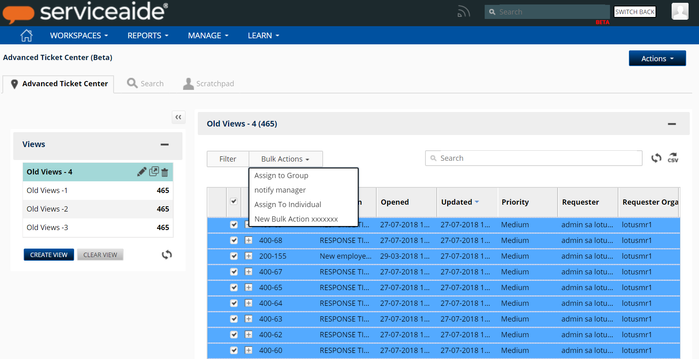
Select one or more tickets using the checkboxes on the left side of the grid to perform a Bulk Actions. Bulk Actions are defined by an Administrator and can greatly simplify re-assignment of tickets, changing the status of tickets and much more.
Learn more about Bulk Actions here: Create and Manage Bulk Actions for Tickets
My Tickets Tab
The 'My Tickets' Tab under Advanced Ticket Center allows you to find and track tickets which are no longer visible under Ticket Center because the ownership on the ticket has changed.
The business rules that determine which tickets you will see under ‘My Tickets’ are given below for you to better understand what you see under this Tab The ‘My Tickets’ tab shows tickets based on the logged in user.
- If the user has performed any of the actions listed below he will see the ticket:
- Opened By
- Updated By
- Owner
- Not Opened by, not Updated by, not the owner, but has added a work log into the ticket
- Is related as the Approver on the ticket
- Is related as a Reviewer of the ticket
- By default, only Open Tickets are visible under My Tickets Tab. If you also see Closed Tickets, it is dependent upon the DAYS_TO_SHOW_CLOSED_TICKETS_IN_TICKET_CENTER configuration parameter set up by your ISM Administrator.
- You can filter, search, Print to PDF, Export to CSV the tickets listed under My Tickets tab.
Add Comment