This article contains the following topics:
...
Perform the following tasks:
| Anchor | ||||
|---|---|---|---|---|
|
...
Note: You can also add child organizations in bulk, using the Bulk Import feature.
Follow these steps:
- Navigate to MANAGE> ADMINISTRATION> Tools on the main navigation panel.
- Click Organizations.
- To create a new organization: Enter the name and other necessary information and click Save.
Note: To view the sibling and child organizations of the parent organization, click icon.
icon. - To create a sibling organization: Click
 icon at the organization level where you want to create the sibling organization. Enter the necessary information and click Save.
 To create a child organization: Click
 icon at the organization level where you want to create the child organization. Enter the necessary information and click Save.
Note: When you create a child organization, all the CCTI families related to the parent organization are automatically inherited by the newly created child organization. For more information about how to create and manage a CCTI family, see Create and Manage CCTI Family.
...
Deactivate Organization and Child Organization
You can deactivate a root level organization or a child organization if the organization is no longer required. If a root level organization that you deactivate has child organizations below it, the child organizations are also deactivated. For example, consider the hierarchy, Documentation Management Company>>NA>>New York>>Islandia. Deactivating NA deactivates New York and Islandia. Deactivating only New York also deactivates Islandia.
Note: You cannot deactivate the out of the box root level organization that has been created during tenant provisioning. However, you can deactivate the child organization or sibling organization belonging to the out of the box root level organization.
Follow these steps:
- Navigate to MANAGE> ADMINISTRATION> Tools> Organizations.
- Select or search for the desired root level organization or child organization.
- Click the
 icon.
icon. Click Yes to confirm the deactivation.
The organization is deactivated.
Note: The deactivated organization is retained on all tickets, CIs, knowledge articles, and other transaction records for reporting and other purposes. However, the deactivated organization is not available for use in any new operations.
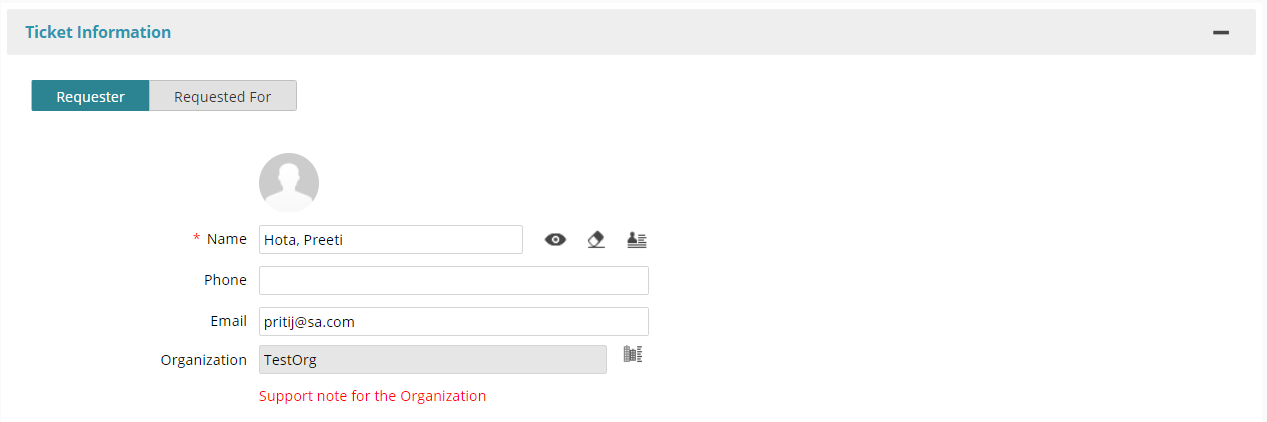
Organization Support Note
Analysts are working with many different organizations (or departments) and aren't always aware of special considerations such as upcoming renewals, recent upgrades, management changes and so on. With the Organization Note, an analyst will see key information about the requester's organization directly on the ticket. This keeps them up to date on the latest information for that organization so they can better handle the ticket and user.
Administrators can add a support note to an organization. To do so, perform the following.:
- Navigate to Mange, Tools, and then Organizations.
- Select an existing organization and edit it or create a new Organization, click the
 icon.
icon. - Type the required note in the Support Note text box.
- All users that are part of this organization will now have the note associated with them. If the organization does not have any users in it, Select the Users tab and create a new user or relate an existing user to the Organization. See Manage Users to learn more.
- Click Save & Exit to save the Organization.
While creating or viewing a ticket, the support note will be shown based on the Requester and Requested For user. If the Requester's Organization has a note, it will be shown below the Organization field in red.:
To activate a previously deactivated organization, navigate back to the desired organization and click the  icon.
icon.
...