Manage Organizations
- Former user (Deleted)
- Richard Graves (Deactivated)
- priti.hota (Deactivated)
- Amy Le (Unlicensed)
This article contains the following topics:
Perform the following tasks:
Create Organizations and Child Organizations
Adding child organizations is the first step in creating an organization hierarchy. When you add child organizations, you assign them access to your subscribed application services. Organizations can be added one at a time or in groups.
This procedure explains how to add a single child organization to a parent organization and set access to capabilities.
Note: You can also add child organizations in bulk, using the Bulk Import feature.
Follow these steps:
- Navigate to MANAGE> ADMINISTRATION> Tools on the main navigation panel.
- Click Organizations.
- To create a new organization: Enter the name and other necessary information and click Save.
Note: To view the sibling and child organizations of the parent organization, click icon.
icon. - To create a sibling organization: Click
 icon at the organization level where you want to create the sibling organization. Enter the necessary information and click Save.
 To create a child organization: Click
 icon at the organization level where you want to create the child organization. Enter the necessary information and click Save.
Note: When you create a child organization, all the CCTI families related to the parent organization are automatically inherited by the newly created child organization. For more information about how to create and manage a CCTI family, see Create and Manage CCTI Family.
Notes: The maximum limit for hierarchy levels in an organization is 10 levels.
Administer Users in a Child Organization
After you create a child organization, you further configure the entity by adding users and assigning access to capabilities.
Follow these steps:
- Add the users to the child organization. Users can be added manually, one at a time, or using the bulk import feature.
- Assign the users to application services.
Customize the Logo
You can customize the logo that displays in the banner area of all workspaces.
To change the logo, navigate to the MANAGE> Administration> Tools> Organization, and upload the new logo.
The guidelines for accepted file formats and dimensions are as follows:
- .jpg, .jpeg, .png, and .gif are the accepted image file formats.
- The logo image must confirm to the following dimensions:
- Maximum width - 275 pixels
- Maximum height - 50 pixels
Larger images are scaled proportionally to fit the 275x50 pixels logo space.
Configure HTML Outbound Email Template
The HTML Template field allows administrators to tailor outbound email communications sent to end users based on their organization. A custom rich text header and footer can be added to make each email sent from the system more organization specific. For example, you may want to add different company logos for Organization A and B's communications and custom footer message.
You can configure HTML outbound email templates according to the requirements of your organization. To configure the template, see /wiki/spaces/CloudITSM/pages/4043308.
A sample HTML template is provided in the application for reference, click the Insert Sample icon. You can edit the sample template or can create a new template.
If the primary organization for a user does not have a template, it would go up the hierarchy to find a matching template. For example, Serviceaide is the MSP and A1 and B1 are subtenants. B1 has a child organization, Boston, and the organization hierarchy is Serviceaide >> B1 >> Boston. The application searches for the template in the organization and its parents. In this example, the order is Boston, B1, and Serviceaide. When no template is found, the default slice template that is defined in the Slice Configuration is used.
To enable the HTML email outbound template, configure the ENABLE_ORGANIZATION_HTML_COMM_TEMPLATES parameter value to yes. For more information, see System Parameters.
Consideration:
- Not applicable on SOAP services.
- Only English templates are available.
Deactivate Organization and Child Organization
You can deactivate a root level organization or a child organization if the organization is no longer required. If a root level organization that you deactivate has child organizations below it, the child organizations are also deactivated. For example, consider the hierarchy, Documentation Management Company>>NA>>New York>>Islandia. Deactivating NA deactivates New York and Islandia. Deactivating only New York also deactivates Islandia.
Note: You cannot deactivate the out of the box root level organization that has been created during tenant provisioning. However, you can deactivate the child organization or sibling organization belonging to the out of the box root level organization.
Follow these steps:
- Navigate to MANAGE> ADMINISTRATION> Tools> Organizations.
- Select or search for the desired root level organization or child organization.
- Click the
 icon.
icon. Click Yes to confirm the deactivation.
The organization is deactivated.
Note: The deactivated organization is retained on all tickets, CIs, knowledge articles, and other transaction records for reporting and other purposes. However, the deactivated organization is not available for use in any new operations.
To activate a previously deactivated organization, navigate back to the desired organization and click the  icon.
icon.
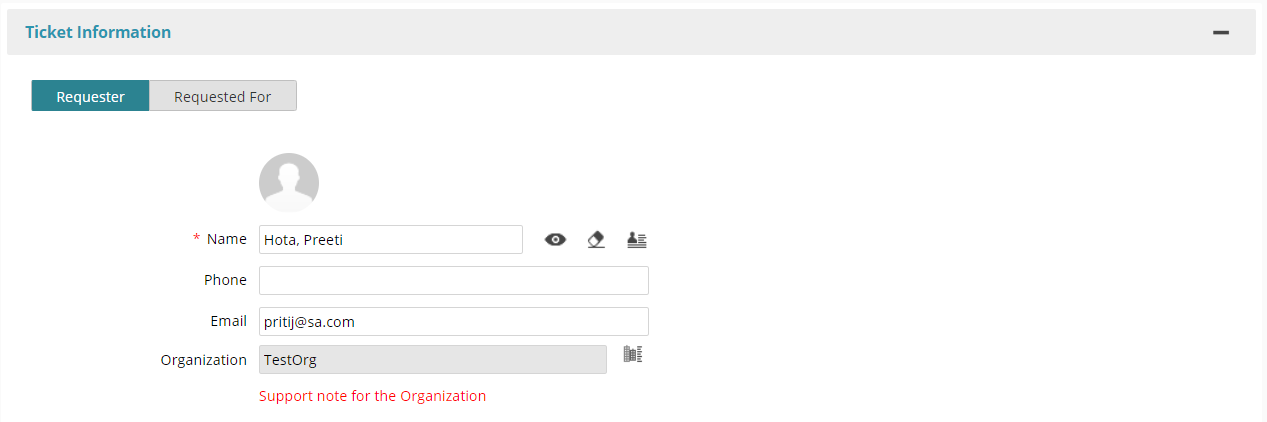
Organization Support Note
Analysts are working with many different organizations (or departments) and aren't always aware of special considerations such as upcoming renewals, recent upgrades, management changes and so on. With the Organization Note, an analyst will see key information about the requester's organization directly on the ticket. This keeps them up to date on the latest information for that organization so they can better handle the ticket and user.
Administrators can add a support note to an organization. To do so, perform the following.:
- Navigate to Mange, Tools, and then Organizations.
- Select an existing organization and edit it or create a new Organization, click the
 icon.
icon. - Type the required note in the Support Note text box.
- All users that are part of this organization will now have the note associated with them. If the organization does not have any users in it, Select the Users tab and create a new user or relate an existing user to the Organization. See Manage Users to learn more.
- Click Save & Exit to save the Organization.
While creating or viewing a ticket, the support note will be shown based on the Requester and Requested For user. If the Requester's Organization has a note, it will be shown below the Organization field in red.:
Related content
© 2019 Serviceaide 1-650-206-8988 http://www.serviceaide.com info@serviceaide.com