Manage Users
- Former user (Deleted)
- Richard Graves (Deactivated)
- priti.hota (Deactivated)
- Amy Le (Unlicensed)
This article contains the following topics:
The Manage tab lets tenant administrators do the following tasks:
- Add the users to the system, either one at a time or through the bulk import. You can maintain, update, and deactivate the user information.
- Control user access by assigning them to groups with specific roles and permissions.
- Access key application fields for all services for the efficient management of user application data.
The following diagram outlines the scenario:
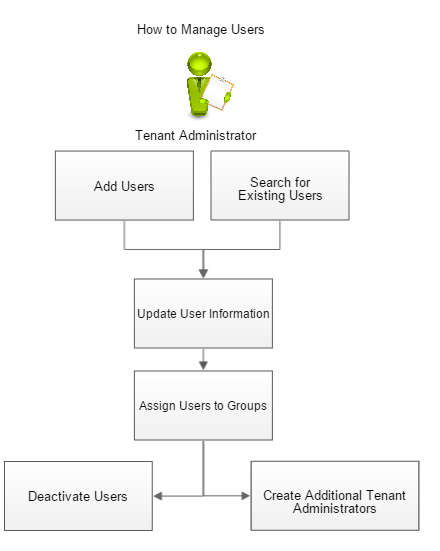
Add Users
The first step in user management is to add organization members as users. You can add users one at a time, or in groups with the bulk import feature.
The new users can receive an automated email notification that provides their login credentials. They receive this notification if the Email Notification setting for your organization is enabled.
If your organization contains one or more suborganizations, you can add users to one or more of these entities.
These procedures explain how to add a single user and how to add an existing user to another organization. You can also manage users in bulk, using the Bulk Import feature.
Follow these steps: (add users)
- Navigate to MANAGE> Administration> Tools> Users.
Click Create Users and complete the required fields.
Note: The Email Address field supports alphanumeric and special characters [_ | - | . | $ | # | ' | *]- Select the License Type and the organization to which you want to add a user. The license type defines the role of the user.
Note: Following license types are available: Self Service (Self Service User), Named (Administrator), Concurrent (Analyst), and Web Service (Web Service User). For more information about the various license types, see Manage Access through Licenses. - Click Create and Edit.
- Complete the additional fields such as organization, role, and group.
- To grant access to applications, assign the user to relevant groups.
- Click Save.
The user is added.
Follow these steps (add an existing user to another organization):
- Navigate to MANAGE> ADMINISTRATION> Tools> Organizations .
- Search the organization to which you want to add a user. By default, the top-level organization is selected.
- Click Users.
- Click Relate Existing, and select the user.
- To grant access to applications, assign the user to relevant groups.
Click Save.
The user is added.
Search for Existing Users
In a large organization, locating a single user record can be daunting. From the Users administration page, you can find a user record as follows:
- Filter: Filter provides options for limiting user results by the following categories:
- Organization - filters for users for the selected organizations.
- Support Group - filters by the selected groups.
- Roles - filters by the selected roles.
- License Type - filters by the selected license types.
- Status - filters by the active or inactive status of the users.
- Type - filters by the type of user. Select System Users to get a list of web service users.
- Search Users: Search page lets you type in any portion of the first name, last name, or email address of the user. The results are automatically filtered for all matching user records in your organization, limited to active users only. If you are an administrator for multiple organizations, the search results are restricted to the organization selected.
Note: These search options are mutually exclusive. Applying either filter automatically clears any current entry in the other filter.
Update User Information
You can update the following types of user information:
- Basic and advanced user properties including the user name.
- Associate groups.
- Associate organizations.
Note: To modify the user name, configure the configuration parameter ALLOW_EDITING_USER_NAME to Yes.
The groups to which your organization subscribes can require some additional user information. Changes to this information can be made through the Users administration screen.
Follow these steps:
- Open the Users administration screen from the MANAGE menu.
- Locate the user that you want to update.
Note: You can use the Filter or the Search Users field to locate the desired user quickly. - Hover over the User in the list, click the
 icon in the far left column, and click Edit Properties.
 - You can update any of the fields on the user record mentioned above including First Name, Last Name, Phone Number and so on.
- If you want to use Cost Center information in contextual approvals you must do the following:
- Specify the Cost Center to associate with the user.
Select the Cost Center Approver from the drop-down.
Update the required information.
Click Save.
Note
To use the Cost Center Approval process on a ticket
- You must associate this user while creating a ticket for approvals based on the cost center.
- The user must be a 'Requester' or 'Requested For' in the ticket.Select the Cost Center Approval Group. The Cost center approval group consists of users who are eligible to validate, review, and approve the cost center information
Reset User Password
As a tenant administrator, you can reset the password of any user in your control.
Note: The tenant administrators cannot reset their own password using this functionality.
Follow these steps:
- Open the Users administration screen from MANAGE> Administration> Tools> Users.
- Hover over the User in the list, click the icon in the far left column, and click Edit Properties.
- On the Basic tab, perform one of the following actions:
- Enter a new password and retype the password in the Change Password field. Click the Change Password button.
Password change successful or policy violation message is displayed. - Click Send Email. An email with a reset password link is sent to the user. The user can click the link and can reset the password.
The user password is reset.
- Enter a new password and retype the password in the Change Password field. Click the Change Password button.
You can also reset the password of a web service user.
Follow these steps:
- Open the web services user password administration screen from MANAGE> ADMINISTRATION> Tools> Reset Web Services User Password.
- Search and select the web services user.
- Perform one of the following actions:
- Enter the new password details and click Apply Changes.
- Click Reset Password. An email with a reset password link is sent to the user. The user can click the link and can reset the password.
Assign Users to Groups
As a tenant administrator, you can assign users to groups to give them access to the services that your organization subscribes. After you assign a user to a group, the user can access the application through the UI.
You can assign a group when you create a user or can add an existing user to a group.
You can remove access to a group at any time.
Follow these steps:
- Navigate to MANAGE> ADMINISTRATION> Tools> Users.
- Locate the user to whom you want to assign the group.
Note: You can use the Filter or the Search Users field to locate the desired user quickly.
Hover over the User in the list, click the
icon in the far left column, and click Edit Properties.Click Groups
Click Relate Existing.
- Add the group and click Save.
The user assignment to the selected services is updated.
Create More Tenant Administrators
An organization can have multiple tenant administrators. The tenant administrators can designate other users as extra tenant administrators for their organization. A user can be designated as a tenant administrator for any organization to which the user belongs. A tenant administrator has administrator privileges for the selected organization, and for any child organizations that exist or are added.
Follow these steps:
- Navigate to MANAGE> ADMINISTRATION> Tools> Users.
- Locate the user that you want to designate as a tenant administrator.
- Hover over the User in the list, click the icon in the far left column, and click Edit Properties.
- Select the License Type as Named.
Note: Assign the user to the Administration Group to provide the administrator privileges. - Click Save to create the tenant administrator.
Note: To revoke tenant administrator privileges, follow this procedure and change the License Type to Self Service. The tenant administrators cannot revoke their own administrator privileges.
Deactivate Users
If you do not want users to access the associated organizations and groups, you can deactivate them. After you deactivate a user, the user cannot log in to the application. The deactivated users are not removed from the user management grid. They are displayed in the grid, but the License Type column appears blank. Some scenarios for deactivating users are as follows:
- The user is on sabbatical.
- The user violated the terms of use.
- Customers using contract resources that come and go frequently. Instead of recreating the account every time, the customer can simply deactivate the account.
- Customers following a per-active user licensing model, charged based on the number of active users in a tenant.
Note: For more information about the user activation and deactivation, see the next topic, Considerations—User Activation and Deactivation.
For deactivated users, their community contributions, consisting of board posts, remain on record.
Follow these steps:
- Navigate to MANAGE> ADMINISTRATION> Tools> Users.
Hover over the User in the list, click the
icon in the far left column, and click Deactivate User.
The user is deactivated.
Considerations—User Activation and Deactivation
Review the following information:
Note: When a user is created, the user is active by default.
- Privileges:A tenant administrator or security group administrator can activate or deactivate a user.
- If a tenant administrator or security group administrator deactivates a user, the user is not deactivated globally. To deactivate the user globally, deactivate from all the organizations where the user exists.
- Users cannot deactivate themselves.
- A security group administrator cannot deactivate a user which is at a higher access level.
- Login: A deactivated user belonging only to a single tenant cannot log in.
- If a user belonging to multiple tenants is deactivated from one tenant, the user can still log in. The reason is that the user is still active in other tenants.
- If a user gets deactivated from all the associated tenants, the user cannot log in.
- Scope: The user activation and deactivation occur within the context of the organization. For example, if a user who belongs to multiple organizations within the same tenant, is deactivated in one organization, the user can still log in to the tenant.
- Notifications:
- A user does not receive any email when the user is made inactive.
- A user gets an email when the user is made active again.
- For a deactivated user, Forgot Password email is not sent to the user.
Delete Users
To remove a user completely from the system you can use the Delete action. This action is available on the Users screen and can be done from a row action or as a bulk action to delete more than one user at a time. This is useful for support organizations that want to remove a user completely from the system or need to comply with a privacy request from an EU citizen related to GDPR.
Important Note
Deleting a user removes all data in the user's profile from the system. There is no way to undo this action.
Deleting a user removes all of the data in their user profile. This includes their name, phone number, email address, location and any other information.
The user will no longer be associated with any tickets or other objects in the system. For example, if the deleted user was the requester of ticket 100-123, the request would no longer show who the requester was and show "Deleted User" in the name field.
The following rules are validated before allowing the user to be deleted:
- All tickets associated with the user must all closed (inactive)
- A user cannot delete themself
- At least one administrator must be active in the system
To delete a user follow these steps:
- Navigate to MANAGE> ADMINISTRATION> Tools> Users.
Hover over the User in the list, click the
icon in the far left column, and click Delete User. Or select multiple users with the row checkboxes and click the Delete User button above the grid.A warning message will be shown asking the user if they want to proceed.
If confirmation is given, a message will be shown indicating if the delete was successful. If multiple users were selected, a message will be shown for each success or error.
Related content
© 2019 Serviceaide 1-650-206-8988 http://www.serviceaide.com info@serviceaide.com