Skill fulfillment can be done in many different ways including a text response, web service call or sending an email. Email is a simple and fast way to integrate with many other systems including Facilities, CRM or Service Desk applications. An Administrator can configure the email server and trigger emails from a specific email address. Email templates can be created to standardize outbound communications used during skill fulfillment.
...
Configure an Email Server
| Info | ||
|---|---|---|
| ||
By default Luma leverages a mail server defined by Serviceaide for all customers. This allows Luma to send registration emails and other key notifications out before a custom mail configuration is defined. Once you save your own custom configuration the only way to revert back to the original system settings is to contact the Serviceaide support team. |
An Administrator can create an email server which can be used to trigger emails from the bots in your tenant. Once the email server is configured, customized emails can be sent from a specific inbox to a specific email address for skill fulfillment. Only one email server can be created for a Tenant. To create an email server, do the following:
- On the Settings menu,
 click the Email Settings tab.
The Email Settings page appears as shown below.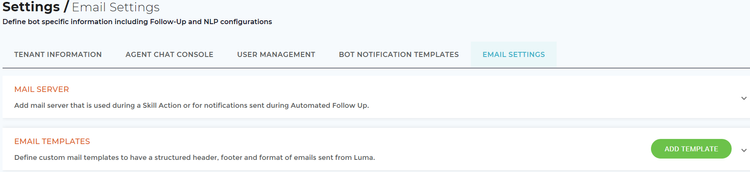
- Click the Mail Server section to add a email server.
Enter the Mail Server details as shown below.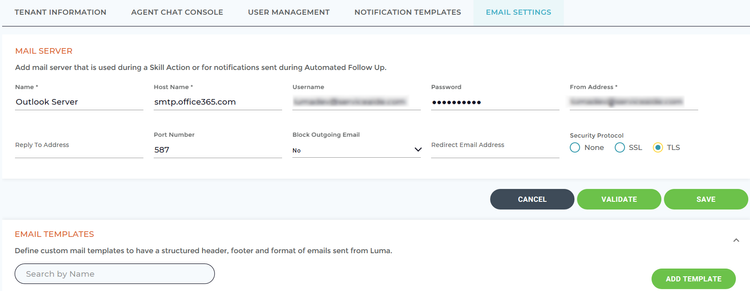
- Enter the mail server Name.
Enter the Host Name, which is the internet name of the server.
- Enter the Username. Some email providers may require your full email address as your user name.
Enter the Password you use to sign in to your email account.
Info title Note Advanced Encryption Standard (AES) algorithm encryption is used to ensure that the password is stored in clear text, and not misused.
- Enter the From Address from which you want the email to be triggered.
Enter the Reply to Address which is the email address to which you want the users to reply to an email.
Info title Note The Reply to Address field is used when you want the user replies to be received on a different email address instead of the sender's email address. You can either leave this field blank, in this case, the sender's email address appears when the user clicks Reply. Alternatively, if you include an email address in this field, then the user replies are sent to the the email address specified in the Reply to Address field, instead of the sender's email address.
- Enter the Port Number used by the outgoing mail server. This port number helps to upload emails onto a server and then relay them to other mail servers.
Select the Block Outgoing Email from the drop-down list. Select Yes to block the outgoing emails, and No to allow the outgoing emails.
Info title Note You can set the Block Outgoing Email to yes, when you do not want to send any emails while testing the Email Notification feature. However, you can provide the Redirect Email ID to check whether the email server was configured properly.
Enter the Redirect Email Address. When the skill is executed, if the outgoing email address blocks the email, then the email is sent to the address specified in Redirect Email Address. This allows for monitoring of blocked emails and taking action.
Select whether the Security Protocol is None, SSL or TLS, based on the mail server. Security Protocol helps to transfer emails on a server and protect service providers from email fraud attempts. The Port Number is dependent on the selected Security Protocol.
- To validate whether the mail server is configured properly, click Validate.
The Validate Mail Server Configuration dialog box appears as shown below.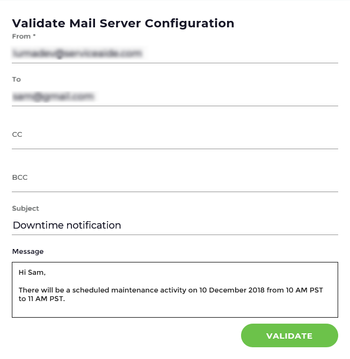
- Create a sample email to be sent to a user by entering the following:
- The From email field is auto-populated based on the email address entered while configuring the server. However, it can be edited if required.
Next populate the To, CC or BCC email addresses as required.
Info title Note It is mandatory to enter the To, CC or BCC or email address, else the email cannot be sent.
- Enter the Subject of the email.
- Enter the body of the email in the Message field.
Click Validate to send the email to the users.
Info title Note Once the email is sent to the intended email address successfully, a success message appears. To confirm whether the email is received, check the Inbox of the targeted user.
- Click Save to configure the email server, else click Cancel to discard the process.
| Info | ||
|---|---|---|
| ||
Ensure that you enter correct email settings; else, the emails cannot be sent. If the mail server details are not provided, then system uses the default out-of-the-box mail server configuration. |
Once the email server is created, you can create email templates.
...
Following are the common issues and their resolutions while triggering the email fulfillment skills:
- If you use HTML in the email message body, ensure that your HTML is properly formatted including tags are closed as shown below.

- There may be instances where the configured mail server may not recognize the sender's email address, and hence the email may land in the 'Junk Email' or 'Spam' folder. Check your email server settings to resolve this issue.
- If the Host Name and Port Number details are not provided correctly, or if the outgoing emails are blocked for the configured mail server, then the emails may not be received by the recipients.
- Ensure that the mail server is configured and validated before executing the email fulfillment skill.
- Ensure that correct email addresses are entered while creating the mail server and in the skills, else, the emails may not be sent.