Table of Contents
The Agent Chat Console is an interface for agents to handle multiple inbound requests from users. Administrators can use the Agent Chat Console tab to configure the Agent Chat Console settings. Here Administrators can set the required timeout intervals both for the end user and live agents supporting those end users. As well as manage the Agent Chat Console settings by creating a web service to create a ticket from the chat console, define the agent's availability, suggest skills to the users agents and end users, the create ticket button for agents, agent availability, skill suggestions and more.
To manage the Agent Chat Console settings, on the Settings page, click the Agent Chat Console tab as shown below.
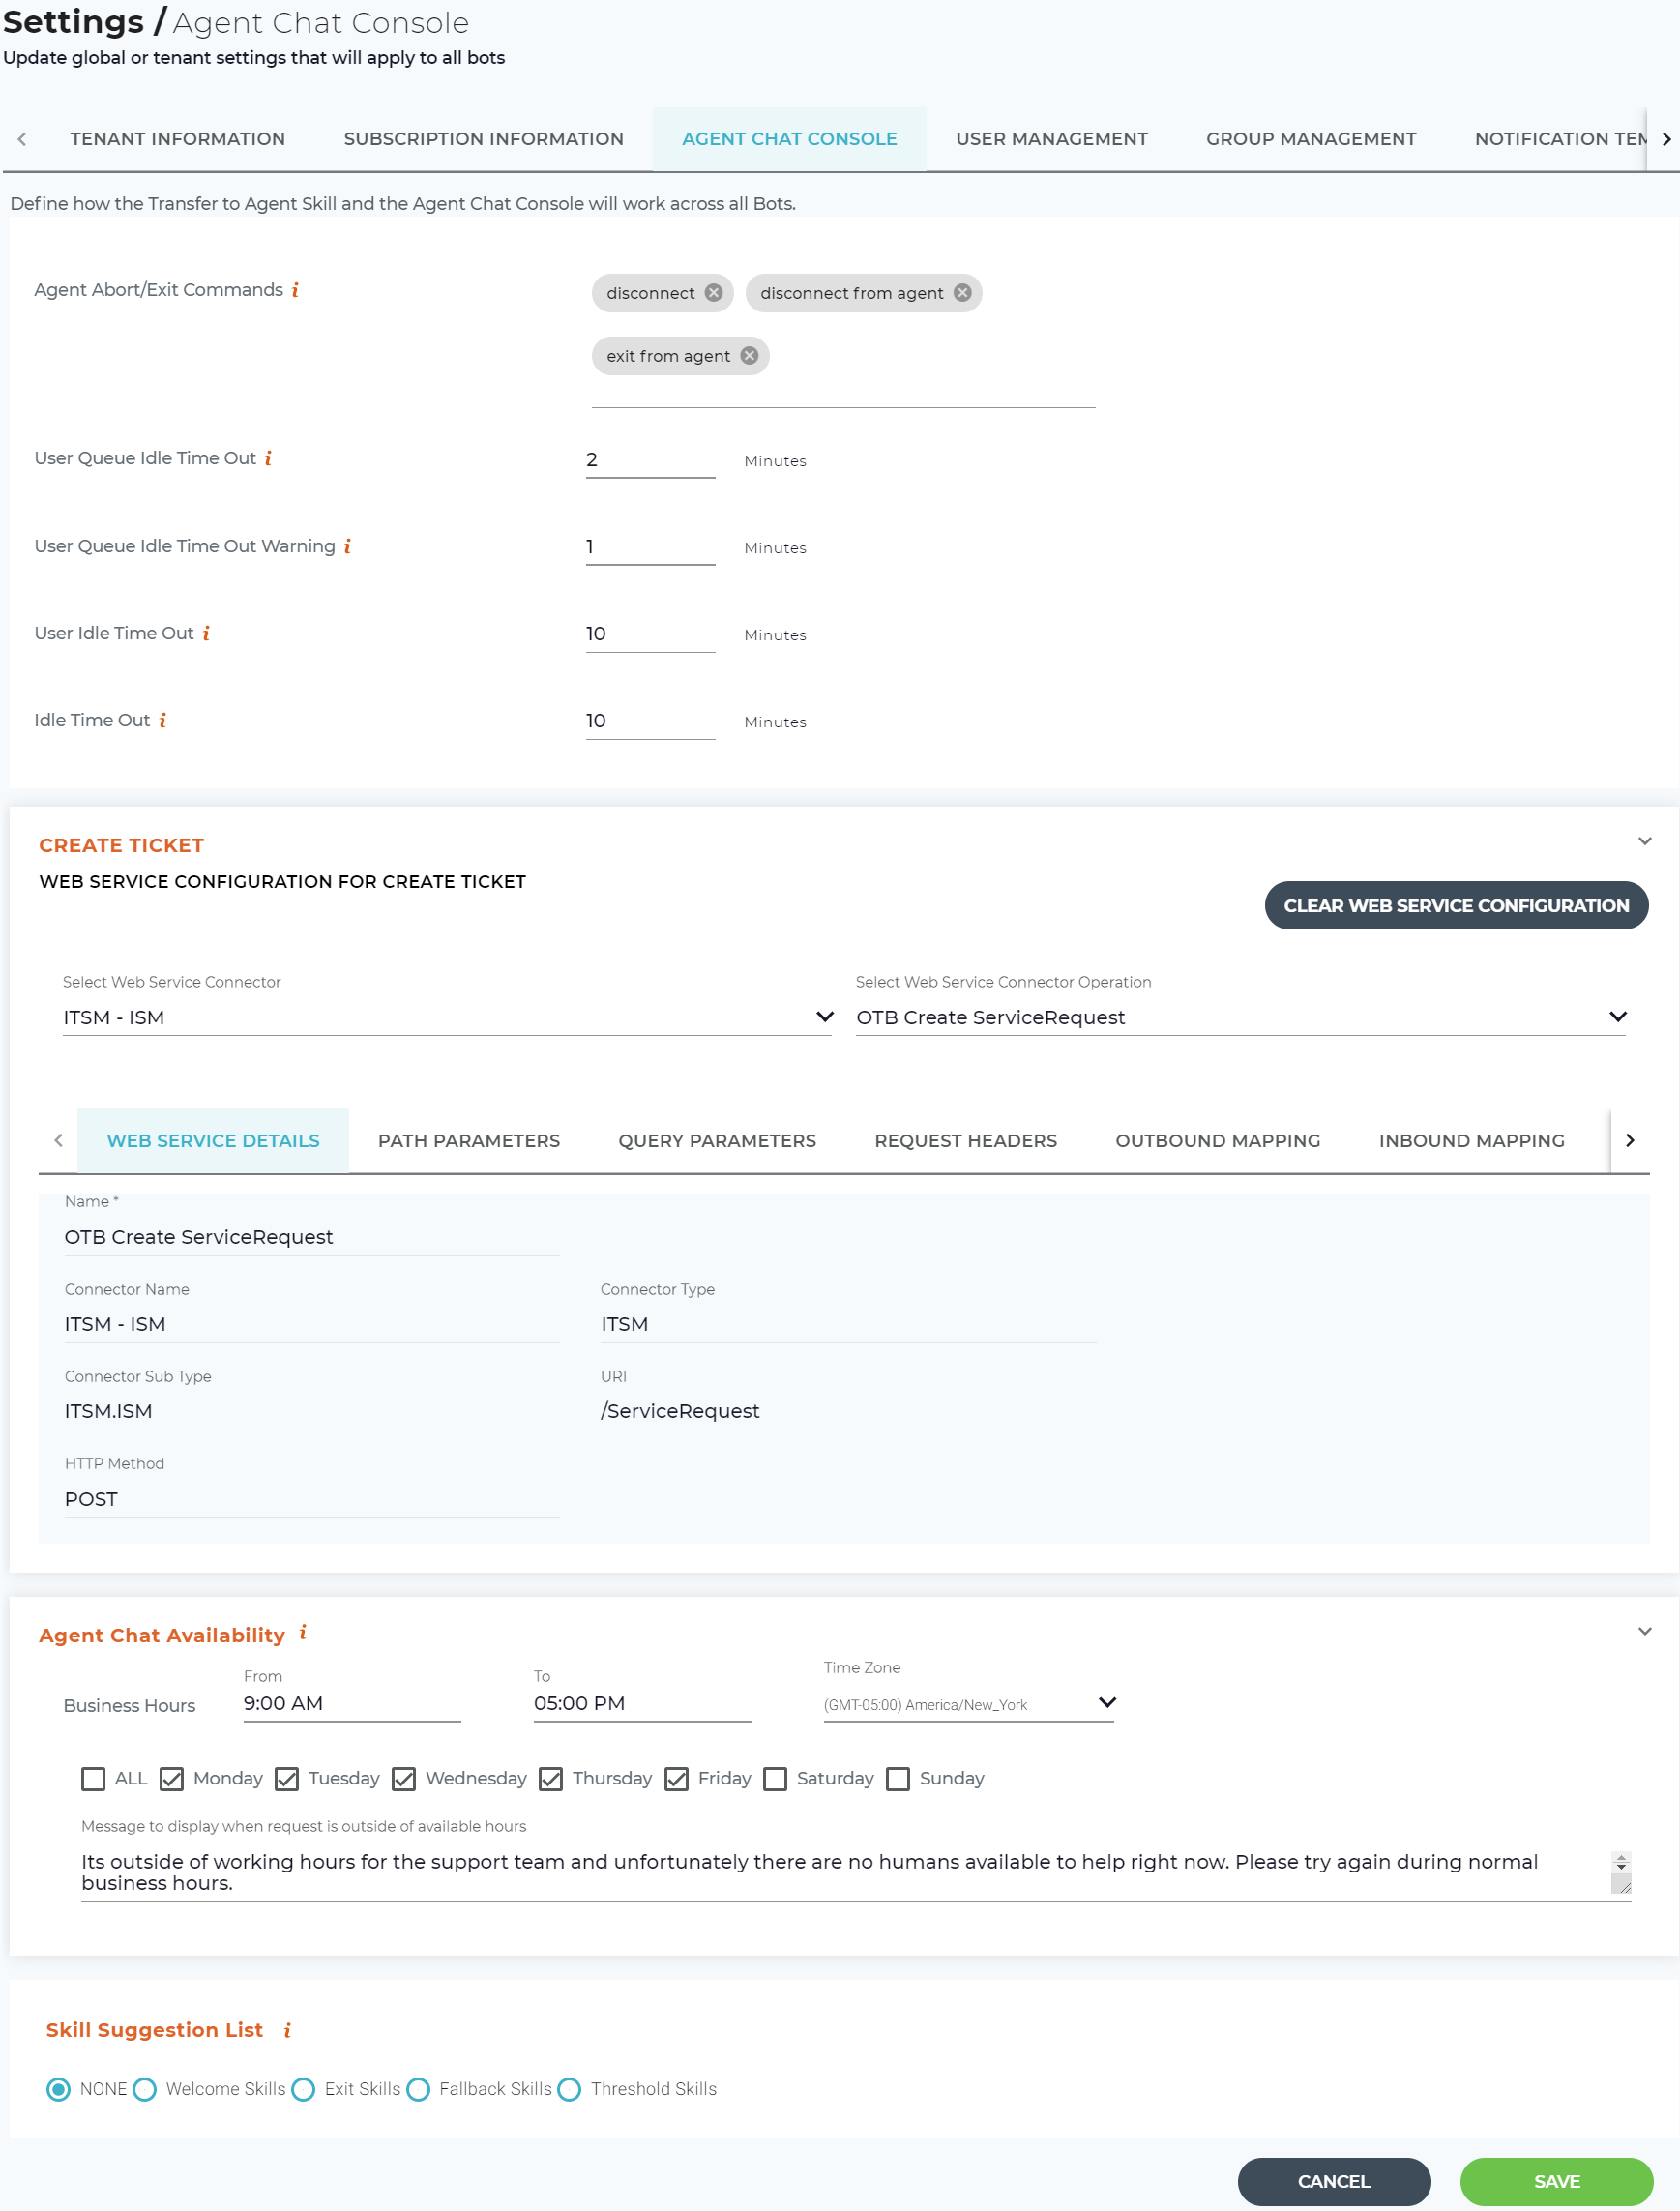
Agent Abort/Exit Commands
Define the commands for the end user to type to leave the Transfer to Agent process. When a user enters one of these commands, the conversation with the agent will immediately end and the user will be back to chatting with Luma. For example, type 'exit from Agent' to abort the Transfer to Agent process.
User Queue Idle Time Out
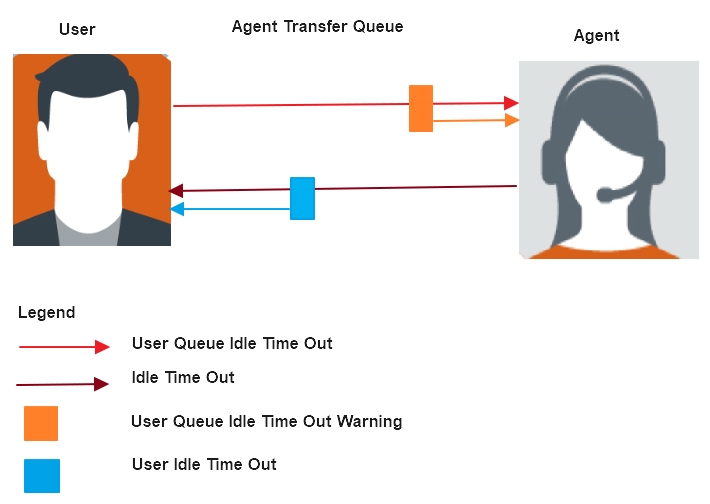
Define the time that an end user can wait for an Agent to accept their request before timing out. When the time out is reached, the Transfer to Agent process will end and the user will be automatically returned to chatting with Luma the bot (also known as Bot mode). The default value is 2 minutes (which is the minimum value), and the maximum value is 60 minutes. For example, if you set the value to 5 2 minutes, then if the user is waiting to be transferred to the Agent for further assistance, after 5 for an agent to accept the conversation, after 2 minutes, the user exits the Transfer to Agent queue and returns to Bot mode.
User Queue Idle Time Out Warning
Once the conversation is accepted by the Agent, you can define the time the Agent is warned on the end user time out interval from the wait queue. The default value is 1 minute (which is the minimum value), and the maximum value is 10 minutes. Once the set time elapses, user returns to Bot mode. For example, if you set 5 minutes, the maximum time the user can remain in the Agent Chat Console wait queue is 5 minutes. In case the Agent still does not start a conversation with the user, then the user returns to Bot mode.
User Idle Time Out
Define the time when the Agent is warned that the user has reached the maximum time limit in the Agent Chat Console wait queue, and if the Agent still does not accept the request, then the user returns to Bot mode. The default value is 1 minute (which is the minimum value), and the maximum value is 10 minutes. For example, if you set 5 minutes1 minute, then the user will return to Bot mode after 5 minutes 1 minute without an Agent accepting their chat request.
User Idle Time Out
Once the conversation is accepted by the Agent, define the time the end user can be idle before moving the end user back to Bot mode. The default value is set to 10 minutes; the minimum value is 1 minute, and the maximum value is 60 minutes. For example, if you set 5 10 minutes, the maximum time the Agent can keep the user idle is 5 10 minutes. In case the user is still kept idle beyond this time, the user returns to Bot mode from Agent chat mode.
Idle Time Out
Create Ticket
The Once the conversation is accepted by the Agent, you can define the number of minutes the Agent is idle before the session with the end user automatically ends. The default value is 1 minute (which is the minimum value), and the maximum value is 60 minutes. Once the set time elapses, user returns to Bot mode. For example, if you set 10 minutes, the maximum time the user can remain idle in the Agent Chat Console is 10 minutes. In case the Agent still does not start a conversation with the user, then the user returns to Bot mode.
The following diagram shows a sample interaction between the user and the agent during which the above scenarios can be encountered.
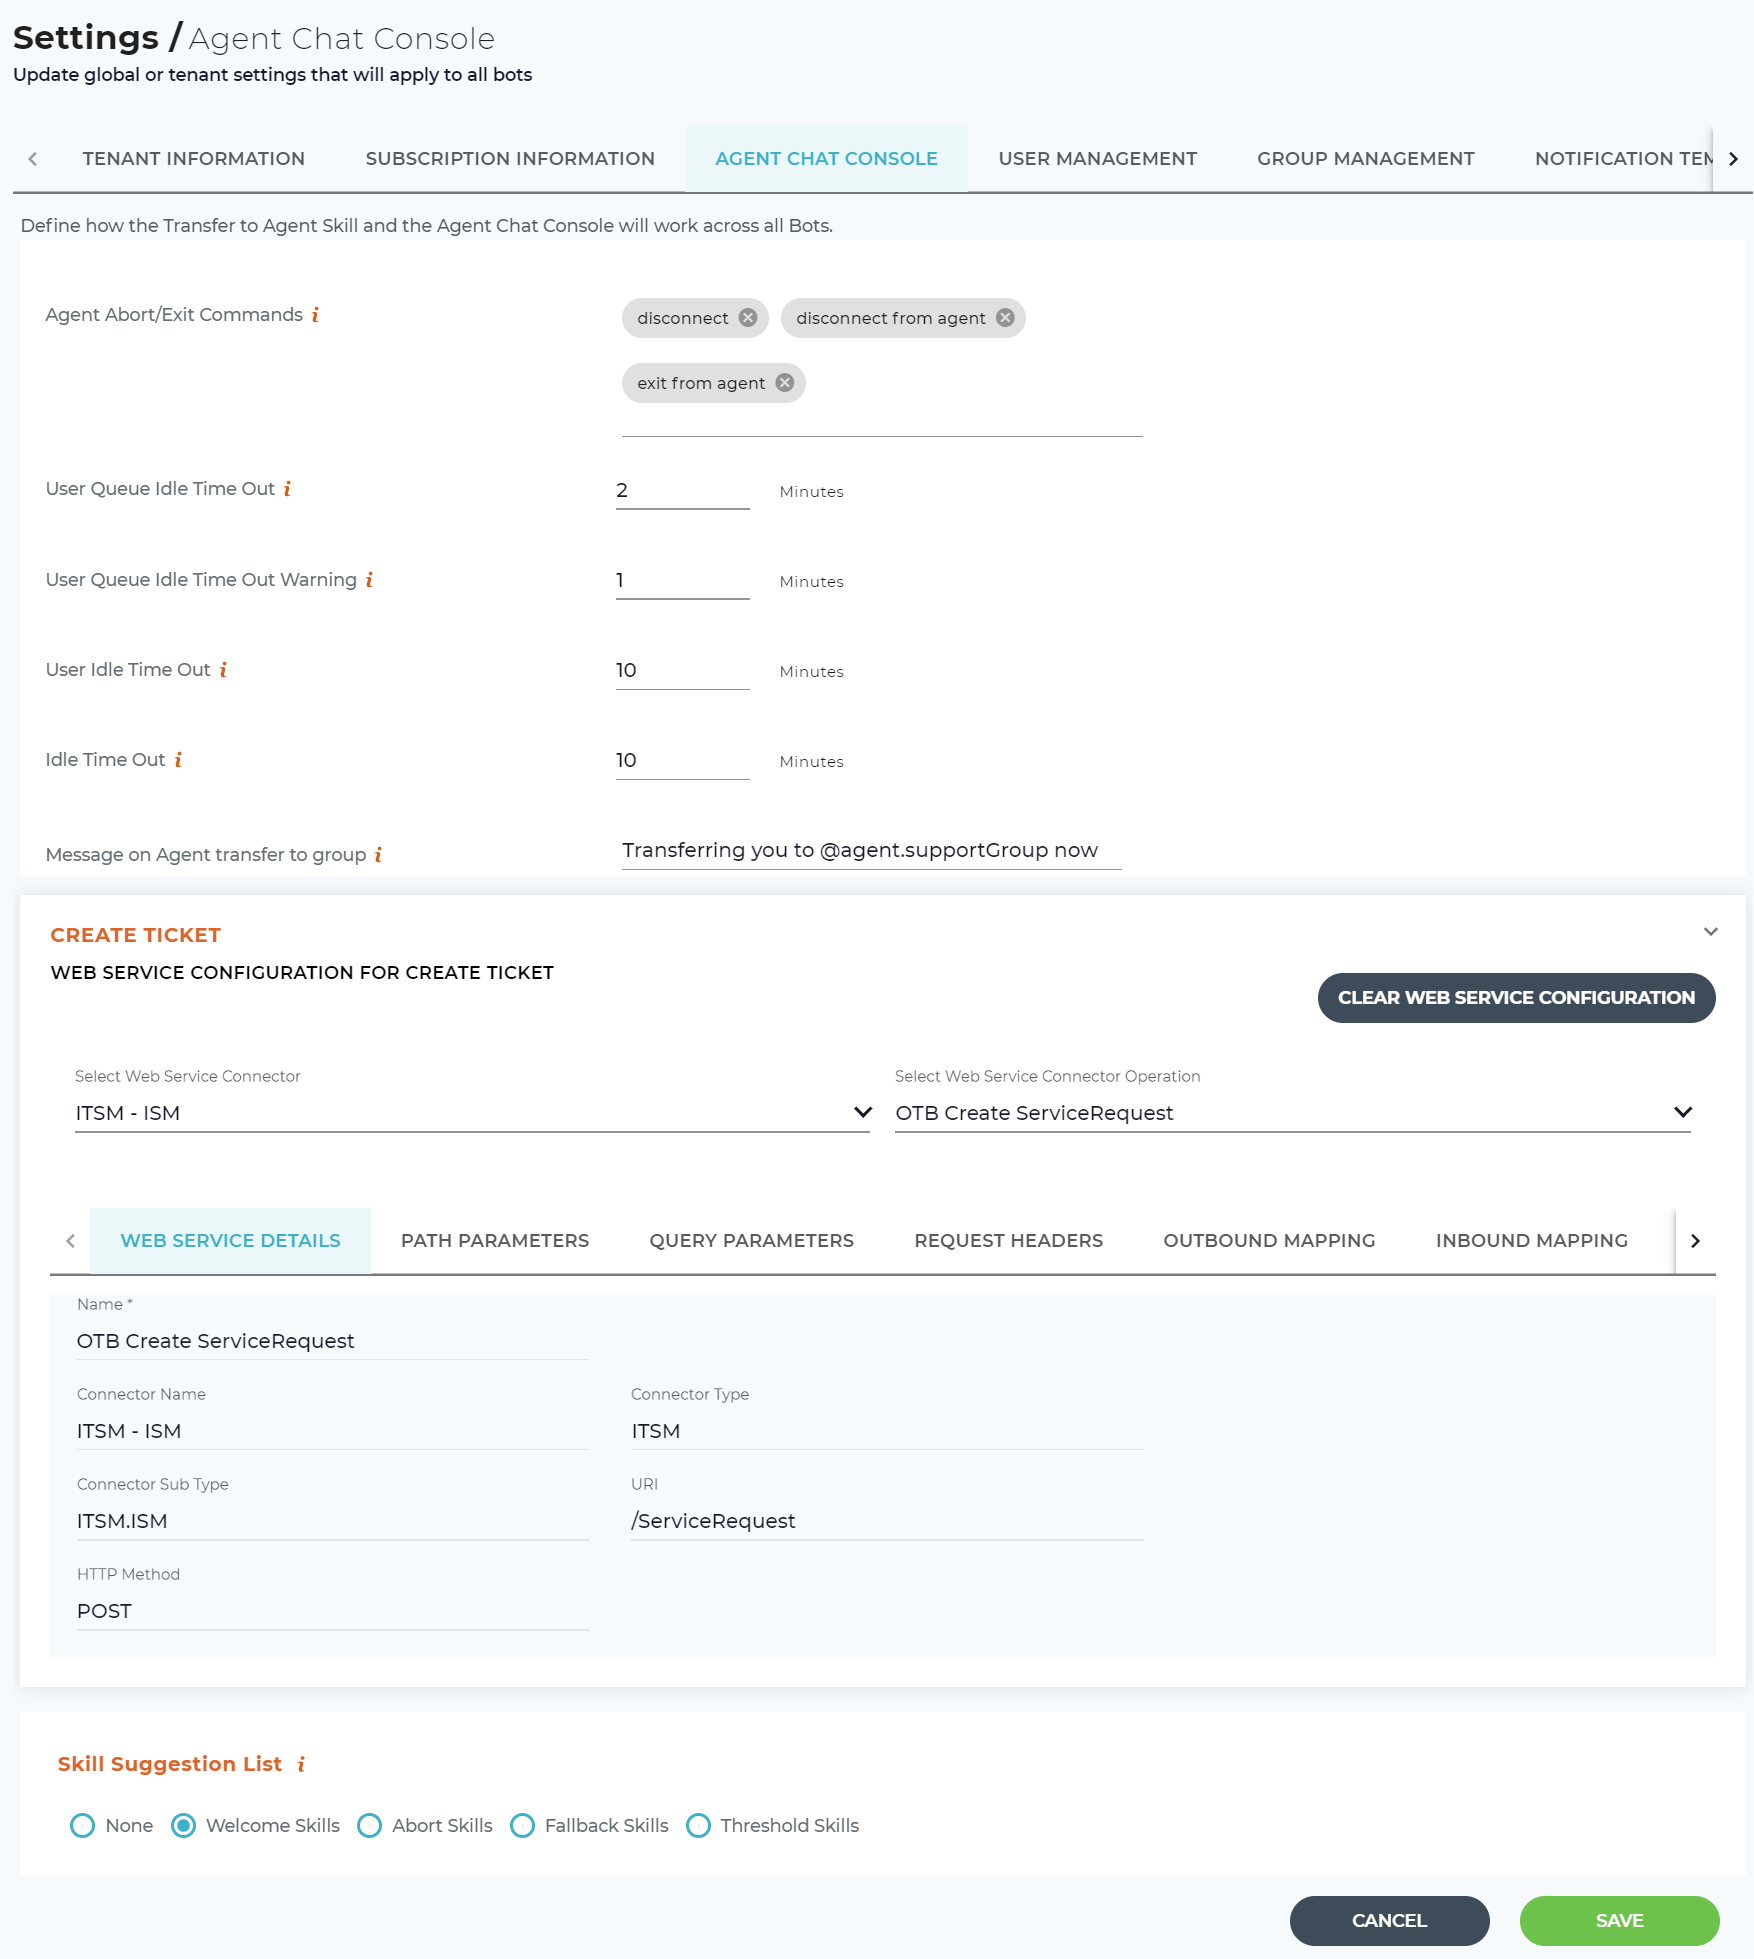
Message on Agent transfer to Group
This message is shown on transferring the end user request to the group. Groups in Luma allow for simple assignment of skill permissions as well as for managing groups of support Agents. Groups of support agents are used for the transfer to agent processing and ensuring the user's request goes to the right subject matter experts.
You can customize the message if required, and use the variable @agent.supportGroup to help the user know the group to which they are being transferred. For example, if the user is being transferred to the Finance group, then the message can be ''Transferring you to the Finance support group now'' appears. You can also use @agent.agentWaitTime to communicate the agent's wait time. To learn more on using the different variables, refer Conversation Variables.
Create Ticket
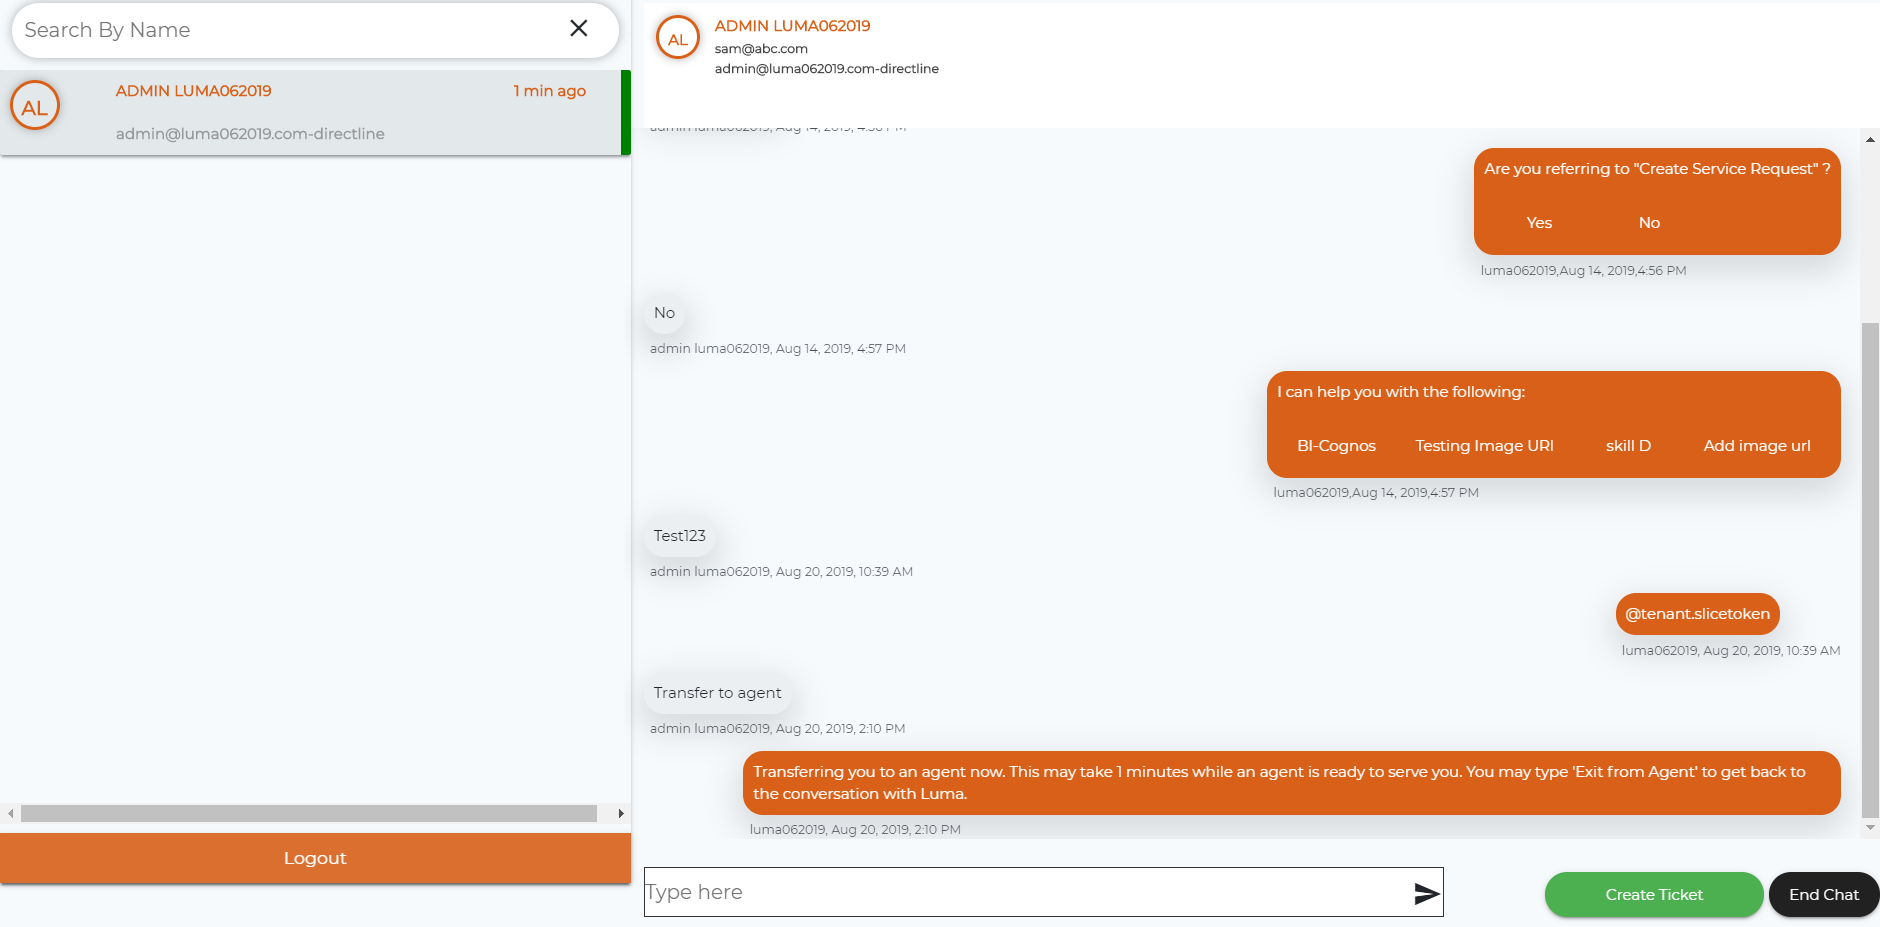
An end user may want to create a ticket in an ITSM system such as ServiceNow, ServiceDesk, Cherwell or others. For this, it is important that a corresponding web service and web service operation details are provided. An Administrator can configure a web service operation to create a ticket by selecting the Web Service Connector and the respective Web Service Connector Operation. To know learn more about how to create a web service, refer refer to Create a New Web Service article. Once the web service operation is created, the Agent can click Create Ticket in the Agent Chat Console based on the details provided by the end user to create a ticket.
Agent Chat Availability
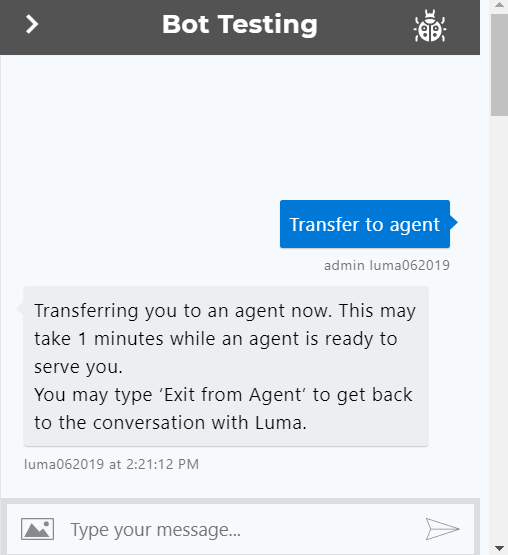
Specify the business hours when support analysts will be available to chat with the end users. Select the From time, To time, Time Zone and the working days. The default operating hours is set to 24 hours, which can be changed. The end user will also be able to see the estimated wait time in the Agent Chat Console wait queue. This provides the user with visibility on how long they should expect to wait for an agent so that they can make a decision to wait or exit. The estimated wait time is calculated by the previous seven days average wait time. You can also customize the message to be shown to the end users when the chat request is outside the available business hours. During the business hours, when the user requests to be transferred to an agent, the following message appears.
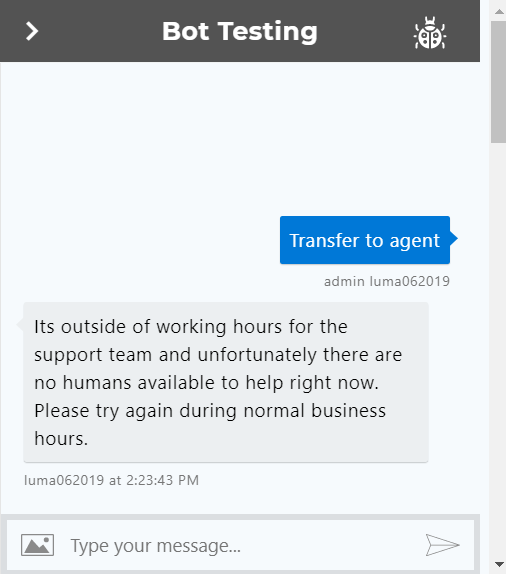
During the non-business hours, when the user requests to be transferred to an agent, the following message appears.

The Create Ticket pop-up window appears, where the Agent can specify the ticket Summary and Description as shown below.
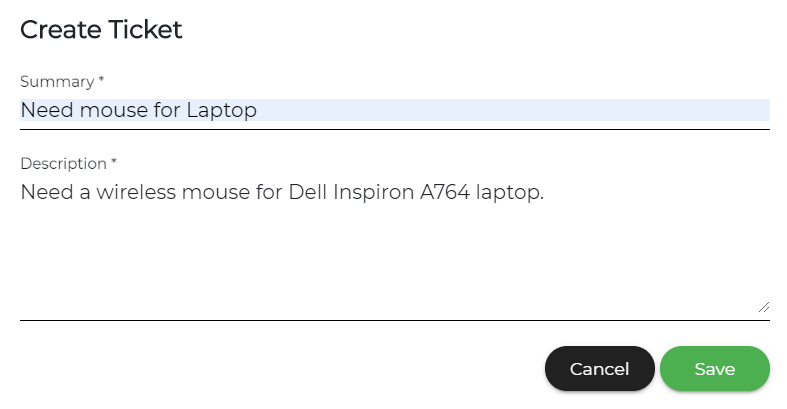
The following variables about the user can be used in the Description while creating the ticket:
- @agent.userName - used to retrieve the user's name
- @agent.userFirstName - used to retrieve the user's first name
- @agent.userLastName - used to retrieve the user's last name
- @agent.userEmail - used to retrieve the user's email ID
- @agent.userPhoneNumber - used to retrieve the user's phone number
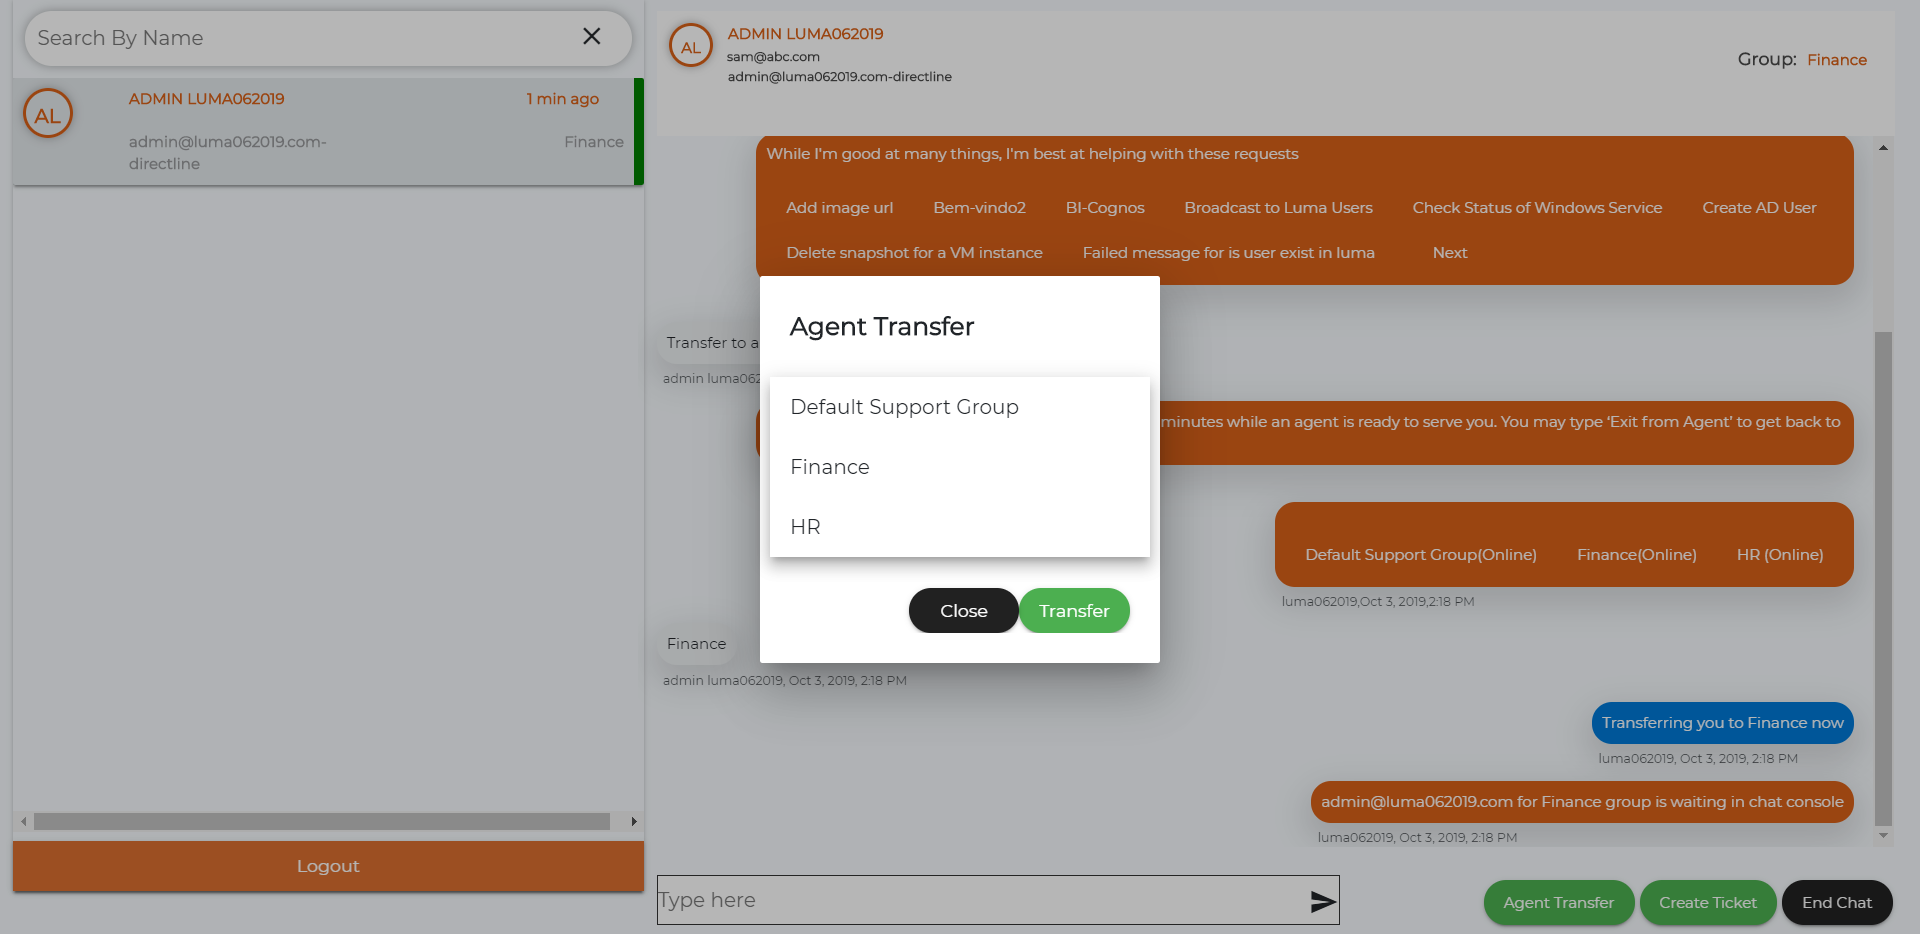
Agent to Group Transfer
An agent can transfer the chat request to another agent in situations such as the end user needs help with a request pertaining to some other department. In such case, the agent can click Agent Transfer and select the group to which the chat request needs to be transferred. On selecting the required group, click Transfer to complete the agent transfer process.
Skill Suggestion List
Select a skill to be shown during non-business hours: Welcome Skills, Exit Skills, Fallback Skills or Threshold Skills. To know learn how to configure each skill, refer to Define Welcome Skills, Manage Aborted Skills, Manage Post Fallback and Manage Threshold Validation. Based on the selection and the user's role and permission, the respective set of skills are displayed to the user during non-business hours. You can also select None if you do not want to show any skill suggestions.
...