Create Notification Templates
- Reena Wadekar (Deactivated)
An Administrator can trigger custom notifications to users from external systems using an API. The notifications can be in the form of text, images or cards. They can be triggered to an individual, group of users or to all Luma users. Notification templates can be used for both automated notifications and to manually trigger messages using the inbound API.
Following are some of the benefits of creating notification templates:
- Reduce the time spent on creating custom messages to be triggered to different set of users.
- Use context variables to call values for different fields instead trying to look up the values.
- Send custom messages to an individual or different groups of users.
- Notify the user about the current status or completion of a workflow or task from an external system.
Note
- In case of skill fulfillment, the notification will be triggered after skill fulfillment.
- The inbound notifications are sent to the users in the last used communication channel.
Following are some examples of scenarios where the users can be notified.
- While executing an external workflow (such as deleting a user account in Active Directory), the user is notified of the status of the workflow as a response.
- In case an external workflow is executed and a ticket is created in the external system, then the Ticket ID or related details can be triggered to the Luma users.
- Send notification to all users in case of a maintenance activity, outages or announcements.
- Notify the user regarding their password reset request.
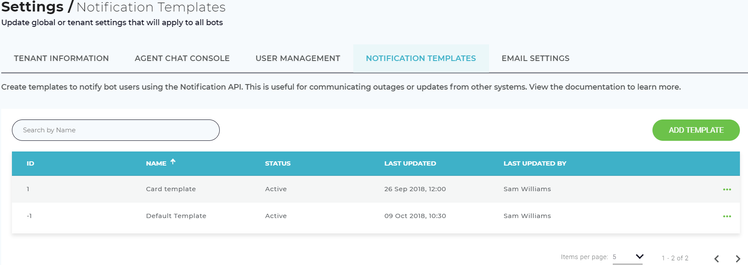
To view the default out-of-the-box (OOTB) notification template, on the Settings page, click the Notification Templates tab. The default template, which is a text response (denoted with the ID -1), appears as shown below.
Create a New Notification Template
Perform the following steps to create a custom notification template:
- To create a new notification template, click Add Template from the Notification Templates tab on the Settings page.
The following page appears, where you can create different types of message templates.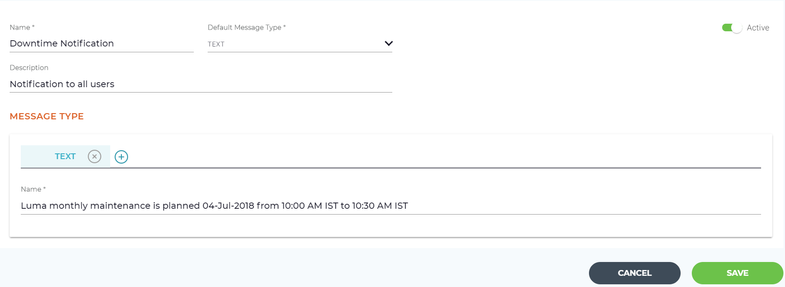
- Enter the template Name.
- The system automatically displays the Default Message Type as text.
- The system automatically activates the message template by default. To make inactive, reset the toggle button.
- Enter the template Description.
In the Message Type section, by default the Text message type appears. Enter the text that should be sent in the message in the Name field.
Note
The Message Type which is set in the Default Message Type cannot be deleted.
- To create an image template, click
 and select image from the list. Image template helps you to send images to the end users. For example, if the user reports an issue while executing a skill, once the issue is fixed, you can display a success image showing that the issue is resolved.
The Message Type section refreshes as shown below.
Enter the Image URL to display an image to the users.
Note
The Image URL needs to be available on a public URL, as Luma cannot access images that are on a private network.
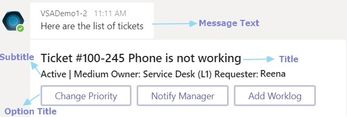
- To create a card template, clickand select card from the list. Card messages include headers, text paragraphs, sets of buttons, images, and key/value text. The card messages translate the user response into the corresponding UI elements. For example, in the following sample, users are provided clickable buttons; clicking them triggers the respective skill or a web service.
The Message Type section refreshes as shown below.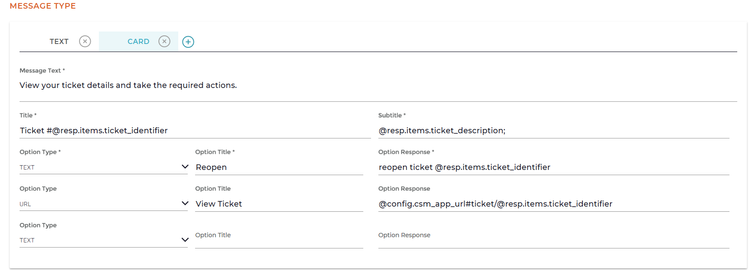
- Enter the Message Text. This is the initial text displayed to the user when the card message is displayed.
- Enter the message Title.
- Enter the message Subtitle.
- Select the Option Type from the drop-down list as URL or Text.
- Enter the Option Title. In the above image provided as a sample, to reopen a ticket, user can click the Reopen button in the card message. To view the ticket details, user can click View Ticket.
- Enter the Option Response. In the above image, the reopen ticket skill is triggered on clicking Reopen. Similarly, user can navigate to the ticket information on clicking View Ticket in the card message.
- Click Save to create the message template.
Once the message template is created successfully, system generates an ID for the template. The template ID is used while sending the message from any external REST API such as Postman.
Test Notification Template
Once you create the notification template, you can test it by triggering the message from any external REST API such as Postman.
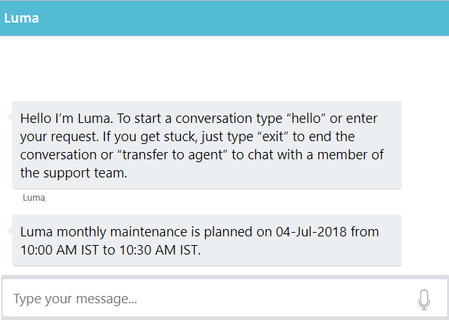
The text messages appear as shown below.
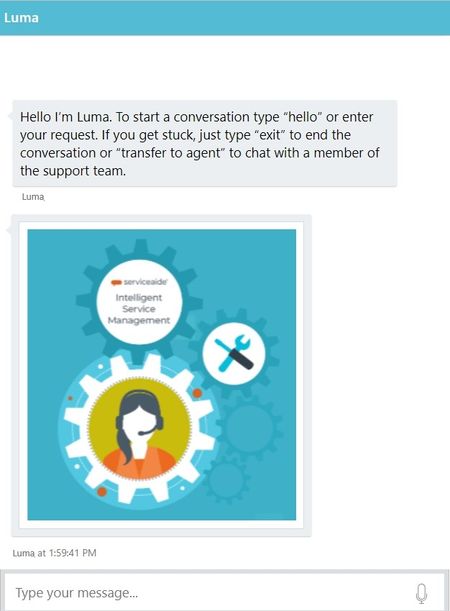
Following is an example of how the image message appears to users.
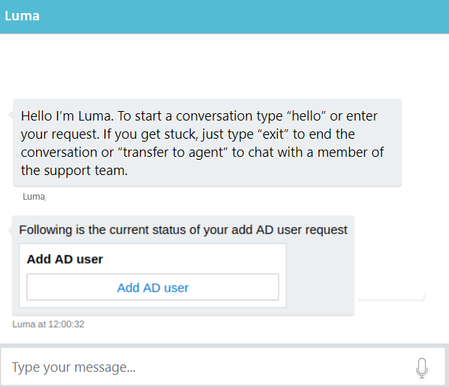
Following is an example of how the card message appears to users.
To learn more about how to make API calls through an external application, refer Send Notifications to Luma Users from other Applications.
© 2019 Serviceaide 1-650-206-8988 http://www.serviceaide.com info@serviceaide.com