Mobile App - Analyst User Guide
- priti.hota (Deactivated)
- Richard Graves (Deactivated)
Table of Contents
Overview
This article explains the mobile app navigation and the procedure to use each feature by an analyst.
Support analysts can quickly access the Ticket Center page and act efficiently by reducing mean-time-to-resolution.
Key Features and Benefits
- Quickly create a ticket using the Service Catalog.
- Review and approve outstanding items such as approvals and surveys.
- Leverage your existing Filters - Any filters the you create using the web interface, are available; so you can quickly select your familiar views of the ticket queue.
- Attach a picture to a ticket – Instead of typing or tapping notes, just take a picture of the issue, attach it to the ticket.
- Dictate versus type - Use the speech-to-text capability of the device to enter text.
- Simple authentication - Authentication is simple using a magic link to register new devices including those using Single Sign-On.
- Quickly switch between different accounts in one or more Intelligent Service Management environments.
- Analyst functionality in the mobile app requires a Named license, Concurrent license or trial license for Intelligent Service Management™.
Downloading the Mobile App
The mobile app is available for Google Android and Apple iOS devices from the Google Play and the App Store respectively. For information about the supported versions for each mobile operating system, please view the corresponding store.


Logging into the Mobile App
Contact the application administrator to gather the login information such as user name and password. Log in to the Intelligent Service Management mobile app using the following two options:
Authentication using Application Credentials
Follow these steps, to log in to the mobile if single sign-on is not configured:
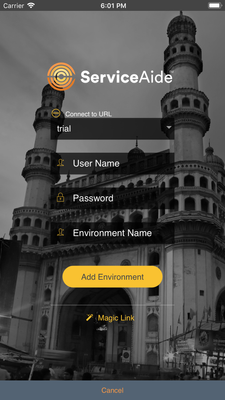
- Specify the URL. It is the Intelligent Service Management URL.
Specify the User Name.
- Specify the Password.
- Tap Sign in.
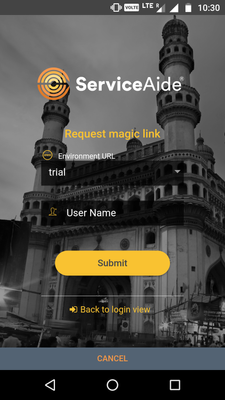
Authentication using Magic Link
The Magic Link process provides an easier authentication experience for users using Single Sign-On (SSO) or a username and password.
At first login, the user requests a Magic link to be sent to their inbox using the URL that they use for login as well as their user name. A Magic Link email is sent to the email address associated with the user's account with a link in it. The link must be opened in the user's mobile device where the Intelligent Service Management mobile app is installed. Their device will recognize this link and open up the correct app. The user's authentication information is stored in secure storage in the device until the user logs out of the mobile app. Each time the user opens the app in their device, it will automatically log them in.
If the user logs out of the mobile app, it will remove the magic link association with the app. The user can then use a username/password to login to Intelligent Service Management or request a new Magic Link.
If your mobile device opens the magic link in your mobile app browser, try clicking the URL in the browser to see additional options. In Safari on iOS, the user can open the mobile app from there and the Magic Link process will complete
Follow these steps to log in to the mobile app using the magic link:
- Tap Magic Link on the Log In page.
- Specify the URL from the Environment URL menu.
- Specify the user name. That is your e-mail ID, which you have specified in your Users account.
- Tap Submit. A login link will be sent to your e-mail account.
- Open your e-mail account in your mobile and tap the link. You may get a prompt if you want to log in using the Intelligent Service Management app or any browser.
- Select the app. The Sign in page is displayed.
- Specify the application URL, User name, and password.
- Tap Sign in and you will see the Home page.
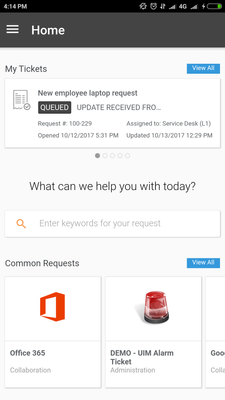
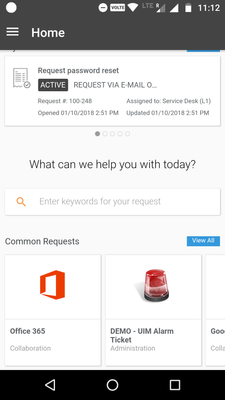
Home Page
On the Home page, you can view all the open tickets and a list of common requests. You can also search for a specific request from the catalog. You can access several functions on the Home menu.
Tap View All to view all the open tickets.
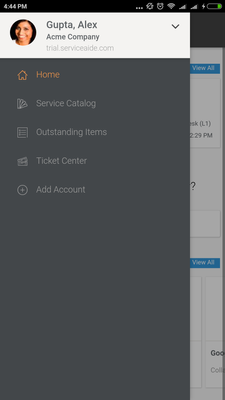
Tap ![]() to view the following options on the main menu:
to view the following options on the main menu:
- Service Catalog
- Outstanding Items
- Ticket Center
- Add Account
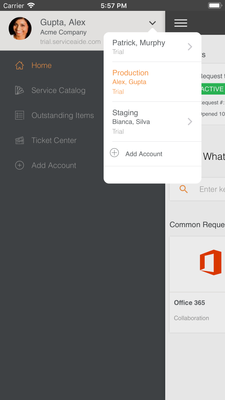
The side menu also displays your profile picture along with your account details. Click ![]() to view all associated accounts. You can add more accounts as required. This allows users to easily switch between two or more accounts without having to logout of the app, enter new credentials and login again. This is helpful for users who may have multiple usernames in the same system or even across Staging and Production environments.
to view all associated accounts. You can add more accounts as required. This allows users to easily switch between two or more accounts without having to logout of the app, enter new credentials and login again. This is helpful for users who may have multiple usernames in the same system or even across Staging and Production environments.

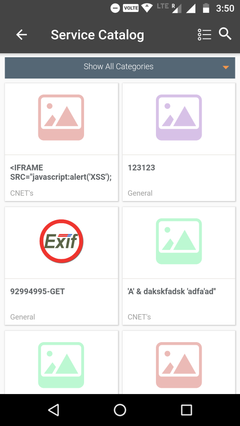
Using the Service Catalog
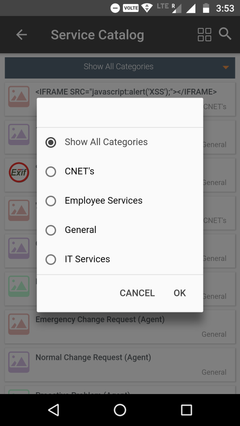
The Service Catalog can be used to provide users with access to items that are frequently requested. Based on this, a set of predefined templates are created for the users in service catalog, to quickly create a request for various categories as mentioned below. You can view a list of service catalog items such as change request, report an outage etc. By default, all service catalog categories are displayed. You can also filter on the categories. The Show All Categories window consists of the list of categories based on the permissions provided to the user.
For more information about catalog items, refer to (Cloud Service Management - English).
Navigation
Tap ![]() the main menu and select Service Catalog.
the main menu and select Service Catalog.
On this page, you can view a list of service catalog items such as change request, report an outage etc. By default, all service catalog categories are displayed.
- The Show All Categories menu displays all the available service catalog categories which you can filter based on your requirement. Click
 to view the list of categories and filter the required category.
 - Tap
 to toggle between the list view and grid view. By default, the catalog items are displayed in a list view.
 - Tap
 to search for a specific catalog item.
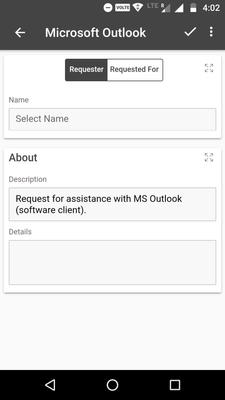
Creating Tickets from the Service Catalog
Catalog items have relevant, prepopulated information, which allows the requester an easy way for routing the request to the correct support group for action and fulfillment.
Follow these steps to quickly create a ticket using the catalog item template:
- Tap Service Catalog from the Main menu.
- Tap on the required template from the list. For example, Report an Outage.
- Tap the Requester tab. Tap
 to hide/unhide additional fields.
 - Type the requester's name, phone number, e-mail id, and organization name. Based on the selected request type, the fields are populated.
Note: The field details are prepopulated for the self-service user.
5. Description and Details field are prepopulated.
6. Tap ![]() to save the information.
to save the information.
For more information on catalog items, see Create and Manage Catalog Items.
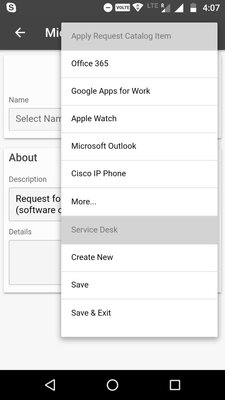
Apply Request Catalog Item
Users can access only those catalog items which they are authorized to. Based on the catalog item that you have selected, the options will be displayed in the Apply Request Catalog Item menu.
Note: This feature is available only for the Analyst user.
- Select the required catalog item from the list.
- Tap
 to select one of the options (predefined templates) from the Apply Request Catalog Item menu. The attributes which are defined in the selected menu option, are added to the existing catalog item.
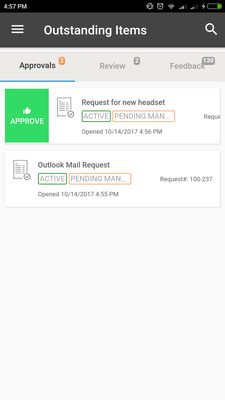
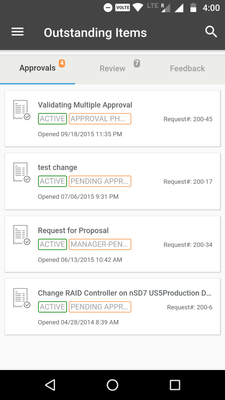
Using Outstanding Items
Outstanding Items page displays a list of open tickets in approval/rejection phase based on the date of submission for approval. The logged in user must be an approver to view the list of tickets for which action is awaited. Actions such as Approve, Reject, or Need more information (with a comment).
Navigation
Tap ![]() the main menu and select Outstanding Items.
the main menu and select Outstanding Items.
On this page, you can view a list of open tickets in approval/rejection phase based on the date of submission for approval. This page consists of three sections:
- Approvals: the Approval section displays tickets which are pending for approval or rejection.
- Review: the Review section displays tickets that are in the approval phase, for which the logged in user is a Reviewer.
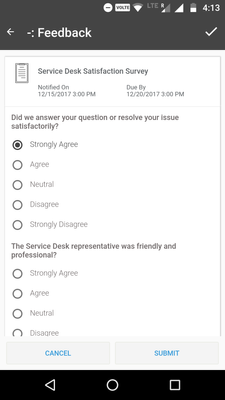
- Feedback: the Feedback section displays the survey requests which the logged in user must respond to.
You can also use the ![]() icon to search for a specific outstanding item.
icon to search for a specific outstanding item.
Taking Action on Outstanding Items
Approvals
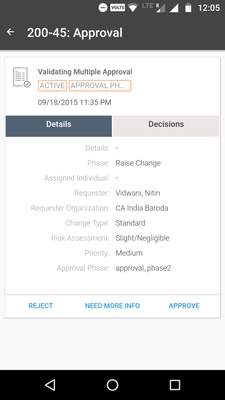
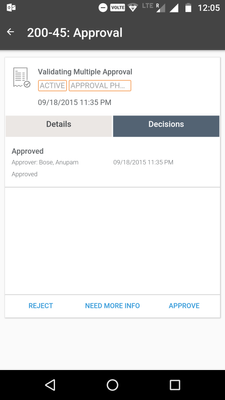
The Approvals section consists of the Details and Decisions tab. It lists all open tickets in the approval phase for which the logged in user is an Approver. The approver can take actions such as Approve, Reject, or Need more information by adding comments.
- Tap to select a ticket from the Approvals section. By default, the Details tab is selected.
![]() Details Tab:
Details Tab:
The Details tab displays the information such as ticket details, phase, assigned individual, requester, and priority.
![]() Decisions Tab:
Decisions Tab:
The Decisions tab displays the information such as name, role, decision time, decision, and comment.
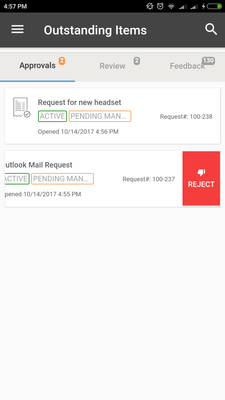
Follow these steps to approve or reject a ticket:
- Tap Approve to approve a ticket.
- Tap Reject to reject a ticket. A text box is populated. When you reject a ticket, you must specify your comments to convey the requester the reason why you rejected the ticket.
a. Type your comments in the text box.
b. Tap Reject.
3. Tap Need More Info if you seek more information about the ticket. A text box is populated. You must specify your comments to convey the requester your concerns before approving or rejecting a ticket.
a. Type your comments in the text box.
b. Tap Need More Info to submit your comment.
c. or tap Cancel to exit without submitting your comments.
![]() You can also approve or reject an outstanding item by swiping the item to the right or left.
You can also approve or reject an outstanding item by swiping the item to the right or left.
- Approve: On the Outstanding Items page, tap to select the item from the list and swipe it to the right to approve.
- Reject: On the Outstanding Items page, tap to select the item from the list and swipe it to the left to reject.
Review
The Review section consists of the Details and Decisions tab. The tickets which requires a review before approval, are listed in the Review section. It lists all open tickets that are in the approval phase, for which the logged in user is a Reviewer. The reviewer can submit comments or ask for more information. After the ticket is approved or rejected, will not be available in the Review section.
- Tap to select a ticket from the Review section. By default, the Details tab is selected.
- Tap Need More Info or Review to submit your comments.
Feedback
The Feedback section lists all the survey requests which the logged in user must respond to. For example, a rating requested by the analyst after closing the ticket successfully.
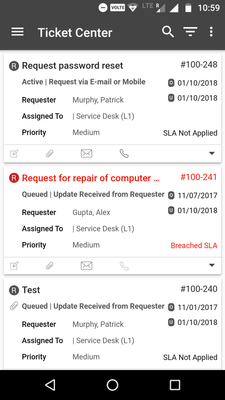
Using Ticket Center
Ticket Center displays a list of open tickets assigned to the logged in user. As an analyst, you can perform the following actions using the Ticket Center:
- View tickets
- Create new ticket (request, incident, change, and problem)
- Add worklog
- Add attachments
- Send mail to the requester or requested for using communication template.
- Call the end user on the ticket (requester or requested for users)
- Perform workflow actions
- Create and link a task from an existing ticket.
Navigation
Tap ![]() the main menu and select Ticket Center.
the main menu and select Ticket Center.
On this page, you can view the list of open tickets. You can also use the following options in the Ticket Center:
- Search for a specific ticket
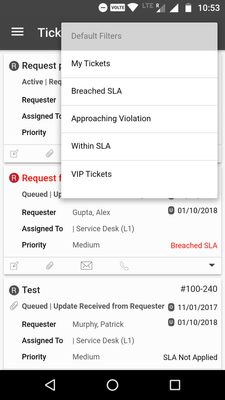
- Use default filter options such as approaching violation and within SLA, to filter tickets.
- Create different types of tickets such as Requests, Incidents, Change, and Problem.
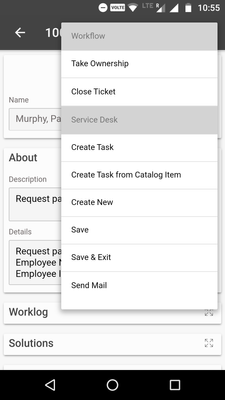
The Ticket Details page displays the additional information such as Worklog, Solutions, and Approvals in different sections, for the Requester and Requested For.
The Workflow Action is also displayed on the Right menu, in the Ticket Details page.
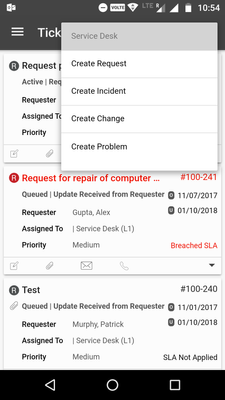
Creating a Ticket
To create a ticket perform the following steps:
- Tap
 on the Ticket Center page.
 - To create a ticket, select one of the following options from the menu:
- Create Request
- Create Incident
- Create Change
- Create Problem
Note: For the self-service user, the above options are not available. The self-service user can only create a ticket of the type 'Request'.
3. Specify the name of the requester or requested for, followed by the phone number, e-mail id, and organization name.
4. Specify description and more details about the ticket in the About section.
5. Specify the required information.
6. Tap ![]() to save the ticket.
to save the ticket.
Additional Actions
The following actions can be performed from the Ticket Center, for a ticket.
- Add worklog: Tap
 to add work log to the ticket.
 - Add attachments: Tap
 to add attachment to the ticket. Choose one of the options from camera
  or gallery
  , as required.
 - Send mail: Tap
 to send e-mail to the requester or requested for using communication template.
 - Call: Tap
 to call the requester or requested for.
 - Tap
 to expand the ticket to view more details.
 - Filter tickets: Tap
 to apply default filters in the Ticket Center.
 - Search tickets: Tap
 to search for a specific ticket.
Using Workflow Actions
After a ticket is created, a process workflow is automatically linked to the ticket using Intelligent Service Management's routing engine. A workflow defines actions that are performed to resolve a ticket during its lifecycle. Serviceaide Intelligent Service Management mobile app provides the following types of predefined process workflows:
- Incident Management
- Service Request Management
- Problem Management
- Change Management
Note: For more information about predefined process workflows, see Predefined Process Workflows.
Adding an Account/Environment
The Add Account option allows the users to add various accounts without having to log out from the existing account. For example, if the user is assigned to two different roles such as admin and analyst, this option helps to quickly switch between the accounts and perform the required task. This helps users experience hassle free navigation.
To add another account:
- Tap Add Account from the
 main menu, on the Home page. The Log In page is displayed.
 - You can also tap on the user profile to add another account and view the existing accounts.
- Tap Add Environment in the Log In page to add another environment and a different account.
- Tap Add Account.
- Tap Continue to add another account Or tap Cancel to exit.
- After you select Continue, you will be redirected to the Login page.
- Specify the URL followed by your username and password for the new account.
- You can also name this account using the Account Name field. This helps you differentiate between accounts in the dropdown list.
Related content
© 2019 Serviceaide 1-650-206-8988 http://www.serviceaide.com info@serviceaide.com