Log a Ticket
- Former user (Deleted)
- priti.hota (Deactivated)
- Former user (Deleted)
This article contains the following topics:
A ticket is a transaction document that records all the information that is related to a request. A ticket includes details of a Problem, Incident, Change, or Service Request. Tickets have different fields and tabs to record and store information that is related to the problem, incident, change, or service request. A ticket also contains records of the actions that are taken to diagnose and resolve the issue.
The availability of different sections and fields for a particular ticket type depends upon the configurations made by your administration. For example, by default the Approvals section is available for only Change Requests. However, your administrator can make it available for other ticket types by editing the default role based view for those ticket types.
The administrator configures Ticket Templates with details of common and standard requests. Ticket templates have a predesigned format in which all required details are identified and populated into the request automatically. An administrator can configure ticket templates for all type of tickets and can manage their use by applying permissions. For more information about ticket templates and other ticket relationships, see Manage Ticket Relationships.
Each ticket includes a Source field. This field can be used to identify the source of the issue or request. The information in this field can also be used for creating matching conditions for auto routes and workflows. You can customize the options available in this field by modifying the relevant Value List. For more information about value lists, see Manage Value Lists. The source field is available for all ticket types, namely Service Request, Change Request, Incident, and Problem.
The application prompts you to create a contact when you create a ticket on behalf of a nonexisting user. The new contact only exists in the application. As a result, no license is assigned and the user cannot log in to the application.
To create a new contact from a ticket, click the  icon. Click the Create Contact button on the dialog that displays. Enter the necessary information and click Save. The contact is saved.
Using Service Catalog
The Service Catalog displays items that are used to log new tickets. The request catalog includes items for logging new fulfillment requests and templates to log incidents, problems, and change tickets. Use ticket templates from the request catalog to fill the essential information you submit a request. All catalog items have information such as Source, CCTI, or assigned to group filled in to route a new request.
Follow these steps:
- Navigate to WORKSPACES> SERVICE DESK> Service Catalog. You can view, search, sort, and request for a catalog item.
- Click desired Item, enter the Name, Description, Email, and other necessary information.
- Click Save.
Using a Ticket Template
You can create a ticket using a list of ticket templates that are already populated. This action is available only on a new ticket, before it is saved.
Follow these steps:
- Navigate to WORKSPACES> SERVICE DESK> Ticket Center> Actions.
Note: Under 'Service Desk' you can see actions to Create Request, Create Incident, Create Problem, and Create Change. The application administrator configures and manages the actions available to you. - Click Create Request, click Actions, and select the desired ticket template available in the Apply Ticket Template Section.
- Enter the Name , Phone, Email, Description other necessary information and click Save.
Using Email
Users can send an email to a preconfigured email id to create new tickets or to update the existing tickets. The subject of the email gets reflected as ticket description and the message body as the ticket details. Any attachments that are related to the email get related as a ticket attachment. The application administrator configures mailboxes to correspond to different ticket types. An email sent to a specific mailbox results in the creation of a Service Request, Incident, Problem, or Change Request. Use the communication template made available to you by the administrator.
Verify that the subject line does not contain the values that are defined in the configuration parameter SUBJECT_LINE_TEXTS_TO_DISCARD_INCOMING_EMAIL_PROCESSING. For more information, see System Parameters.
Follow these steps:
- Click New in your mailbox.
- Enter the email ID in the To field, specify any Cc or Bcc, other necessary information and click Send.
Note: The To, CC, BCC, and the Subject field support a maximum of 512 characters. The message body must not exceed 4000 characters.
Using Scratchpad
The scratchpad enables you to respond quickly to a user calling in for support. You can see a quick snapshot view about the contact by selecting the contact in the Name field. The scratchpad provides information such as tickets logged by or on behalf of the requester. The Scratchpad also provides information about Configuration Items that are related to the requester. When, a contact is related in the Name field more details that are related to the contact is displayed. The information is found in the Related Tickets, Related Configuration Items, User Badge, User Statistics, and User Notes sections.
Use this information to locate and work on an existing ticket or log a new ticket using the scratchpad.
Note: You can categorize a ticket while logging a ticket and the CCTI value overrides the related CIs. For more information, see Categorize a Ticket.
Follow these steps:
- Navigate to WORKSPACES> SERVICE DESK> Scratchpad or WORKSPACES> SERVICE DESK> Ticket Center, and click the Scratchpad tab.
- To create a ticket, enter the name of the user in the Name field. The profile details, Related Tickets, and Related CIs of the user are populated.
- Specify the Details, Ticket Type, and any other necessary information and then click Submit.
Categorize a Ticket
You can categorize a ticket by Class, Category, Type, and Item (CCTI). CCTI ensures appropriate routing of a new ticket. The application administrator manages the categories applicable to tickets in your Instance. The following rules are applicable to your Search Categorization Lookup results:
- Only the CCTIs that are associated to the Requested For and Requester's organization are displayed.
- Only the CCTI's that are active are displayed.
- Only the CCTIs applicable to your ticket type are displayed.
If none of the rules are met and there exists no associated, active, or applicable CCTIs, then you will see all the CCTIs in the system.
Follow these steps:
- Click the icon next to the Search CCTI field under the Ticket Information section.
- Search or filter the list based on your requirements.
Note: If you want to view all the CCTIs in the system, select the Show All Categorizations checkbox. The administrator configures permissions to view and select this checkbox. - Select the Categorization that you want to apply to the ticket.
Note: Based on the Categorization select the Class, Category, Type, and Item. For example, Hardware » Laptop » Lenovo » T410.
Modify the Status of a Ticket
You cannot directly modify the Status, Reason Code , or Phase of a ticket. The application administrator defines and controls these fields. The fields change when you act on a ticket.
Follow these steps:
- Navigate to the ticket click Actions, and then click Take Ownership.
Note: The Status changes to Active, and the Reason Code changes to In Progress. You can manually reassign tickets to specific individuals or groups by clicking Actions, Reassign to Individual, Reassign to Group, or Reassign in My Group under Workflow.
The administrator configures permissions to modify, delete, cancel, and work on a closed ticket. You can view the actions that are taken on a ticket by navigating to the ticket Board.
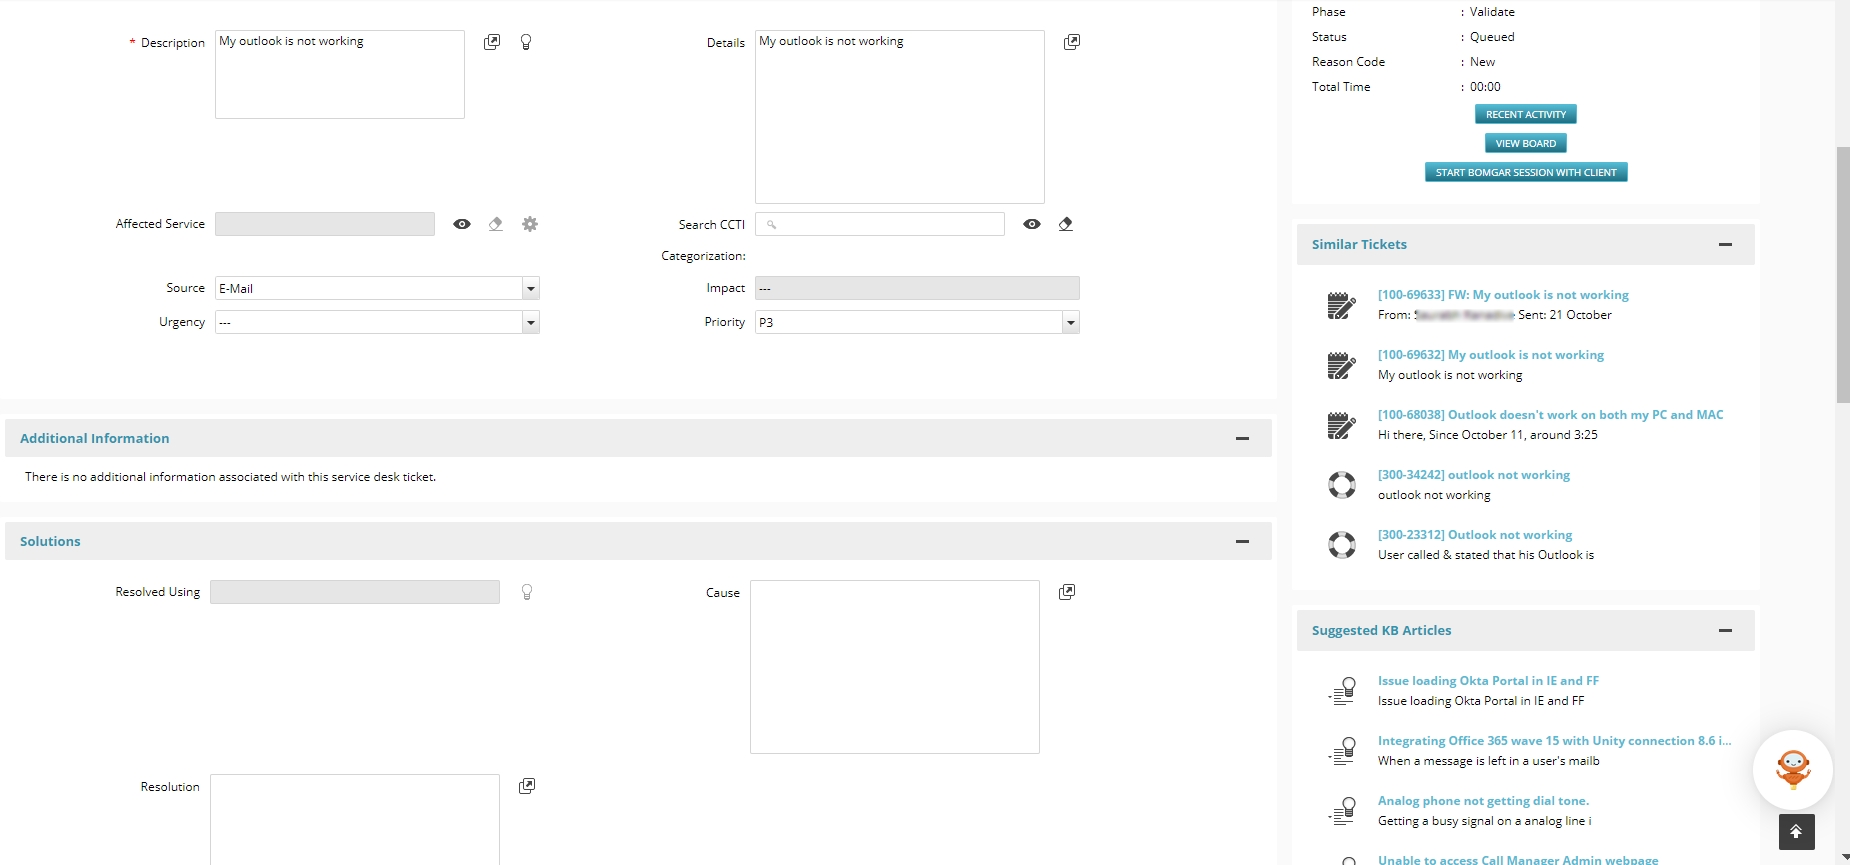
Similar Tickets and Suggested KB Articles
Similar Tickets and Suggested KB Articles sections appear on the right panel in the Ticket Details page. When an analyst or end user creates or edits a ticket, the Similar Tickets section displays the top 5 most comparable tickets based on the current ticket's description. The Suggested KB articles section displays the top 5 related Knowledge Articles based on the ticket description. The results in both panels are based on a Machine Learning model that looks at historical tickets and existing knowledge articles in your environment. The suggestions automatically appear on the corresponding panel while creating a ticket (as soon as you type the ticket description). This helps analysts and end-users resolve tickets faster, therefore, improving mean-time-to-resolution by using information from existing or resolved or closed tickets and KB articles.
Note
- The content in the Similar tickets and Suggested KB Articles panels are based on the logged-in analyst's permissions in the system
- The panels show the top five similar tickets and KB articles to the user.
- Selecting a suggested ticket or KB article opens it in a new workspace tab.
- Show and hide these panels by clicking the - or + in the right panel.
© 2019 Serviceaide 1-650-206-8988 http://www.serviceaide.com info@serviceaide.com