Ticket Workflows
- UdayKiran.Guduri (Unlicensed)
- priti.hota (Deactivated)
- Richard Graves (Deactivated)
Once a ticket is submitted in Intelligent Service Management, either through the Service Catalog or Ticket Center workspace, a process workflow is automatically selected and applied to it by Intelligent Service Management's routing engine in order to control how the ticket's lifecycle is managed. The process workflow selection is based on matching data entered on the new ticket form and matching criteria defined in a process workflow. Matching criteria is based on ticket attributes like a priority value, the requester's organization, a VIP user, or categorization. There is also a sort order assigned to process workflows to guide the engine to which workflows to check for matching criteria first. When the first match is found, the routing engine stops checking and assigns that workflow to the ticket.
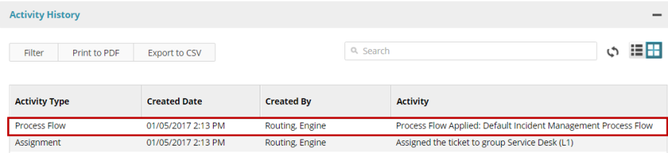
Many default process workflows are included with Intelligent Service Management. One example is the Default Incident Management Process. Out of the box, you will see this process being added to all new incidents under the incident's Activity History.
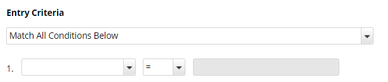
The Default Incident Management Process flow is not directly linked to any Service Catalog Item, but in a new system it will be automatically selected because the process workflow does not have any initial entry criteria rules defined to match on, as seen in the below screen shot, and will therefore match all entry criteria. It is also the only published workflow for incidents.
When reviewing the default process workflow for an Incident, refer to the documentation wiki here. You may want to modify the Default Incident Management Process Flow in order to support your business flows and necessary initial incident assignments.
Review the Default Incident Management Process
Take time to review how the default incident management process works, and update it as necessary to support your own assignment requirements and incident workflow.
- Log in to the Intelligent Service Management as an Administrator
- Navigate to MANAGE> ADMINISTRATION> Tools> Process Workflows
- Select the Filter button and under Form Type select Incident
- Click Apply
- To the left of Default Incident Management Process Flow, select Checkout for Editing
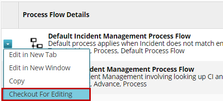
- Select Yes, checkout for editing
- Select the Process Designer channel button
- Review the Basic Properties button fields:
- Form Type means a Process Flow is associated with one particular type of ticket
- Tags to categorize are a convenient and useful way to categorize the Process Flows and easily filter or retrieve these specific workflows later.
- Click the Process Designer button to open the graphical UI for building Process Flows. Note the workspace on the left and the Edit panel on the right.
- Minimize the Edit panel but clicking the
 button.
 - Zoom out and back in by clicking on the
 icons.
 - Use the scroll bars on the right and the bottom of the workflow window to review the different steps and branches.
- Click the Back To Top
 icon.
icon. - In the left side panel, select the top box, Entry Criteria - Incident.
- Move your mouse over the information icon
 to get a summary of the step and how it is configured.
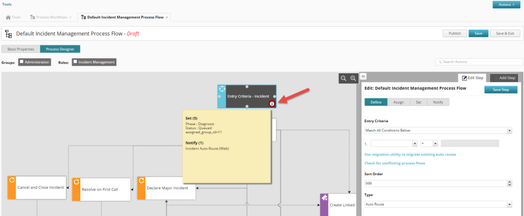
- The Edit Step tab displays on the right side with the Define channel button selected. This is where the workflow step is configured.
- Look at the fields on the Define channel button:

- Entry Criteria: conditions that must be matched for this workflow to drive an incident. In this case, there are no matching conditions.
- Sort Order: as with existing auto route functionality, this field will dictate when the entry criteria is evaluated.
- Type: Auto Route is selected by default, and is indicated by the icon and blue color coding of the Step. By default there is no Entry Criteria for this workflow as defined in the Rapid Workflow Implementation Guide. The additional option, Auto Route with Workflow Action, can be used to trigger an immediate action after the request is submitted by the user, such as automatically creating associated tasks, or approvals.
- Check for conflicting process flows: hyperlink to assist in finding overlapping conditions.
- Click the Assign channel button.

- The Group that will be assigned to Incident tickets by default is the Service Desk (L1). Change the default group to one of your own if you do not have the default group populated with analysts.
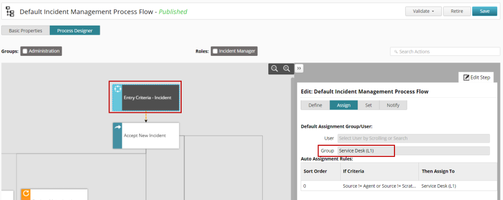
- There is no defined User assignment for this process.
- The Auto Assignment "assign" rules are defined here. They state to assign the Service Desk (L1) group if the source is not equal to Scratchpad or Agent. This way, when an analyst manually opens an incident for an end user, the analyst will become the default assignee and not the Service Desk (L1) group.
- The Group that will be assigned to Incident tickets by default is the Service Desk (L1). Change the default group to one of your own if you do not have the default group populated with analysts.
- Click Set channel button.

- Ticket attribute values can be defined here and will be set when this step in the Process Workflow is completed.
- Select the
 icon to remove any attributes you don't want set. Traditionally, Phase, Reason Code, and Status are used to set ticket lifecycle status and to drive behavior in the workflow.
 - Select the
 icon to add additional fields you would like to set when an incident is created.
- Click the Notify channel button.

- This is where notifications, or communication templates, are related to the workflow action.
- The IncidentAuto-Route (Web) is used in this example. Change the associated communication template if needed.
- Click on the second workflow step in the left side pane, Accept New Incident.
- Hover your mouse over the Information icon.
- The pop-up summary will show an overview of the configuration for this step. Also notice the different paths, or connected steps, that are available at this stage in the Process Flow. These become highlighted with dashed orange lines.
- Click the Show Advanced Options hyperlink.
Notice the ability to set Mandatory Fields, attach Web Service Operations (like sending a request to a 3rd party Service Desk or to another system) and the ability to configure how this Workflow Process Step will work when the ticket is a Child ticket. - Click the Permissions channel button.

This step will be available to the Administration group and any user with the Incident Manager role when working the incident. - Click the Set channel button to view the Ticket Parameters, or attributes, which will be set during this workflow step.
- Click the Notify channel button. The default communication template, Incident_Accepted, is set for this step.
- Optionally, continue exploring the configuration of additional steps.
- Click Back To Top.
- If you made changes, click Save and Re-Publish, otherwise, close the Default Incident Management Process Flow without saving it.
Review Common Ticket Actions
Aside from using Process Workflows to present actions to analysts to use during a ticket's lifecycle, common ticket actions present additional common actions without the restriction of being defined in a process workflow. Common ticket actions are either defined as bulk actions, which will work across all ticket types or are defined for a specific type of ticket only.
Unlike actions defined in a process workflow, Common Ticket Actions are always visible on a ticket no matter what the ticket phase is in since they do not have matching conditions.
Intelligent Service Management has 24 default common ticket actions available. They can be seen by navigating to MANAGE> ADMINISTRATION> Tools> Process Workflows and clicking on the Common Ticket Actions channel button. The below screen shot shows the incident specific common ticket actions circled. 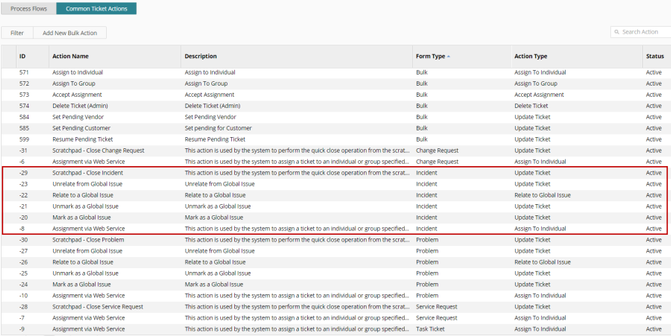
Similar to actions defined in a process workflow, common ticket actions are defined with permissions at the role, group, or contact level. They can be used to set attribute values and trigger notifications.
Common ticket actions will show up in the Ticket's list on the Ticket Center Workspace, and in a ticket detail form.
Ticket Center
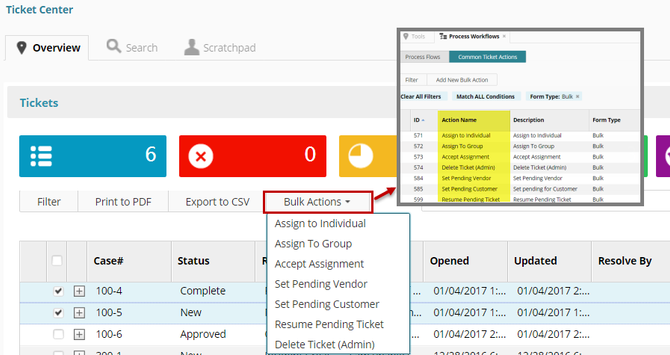
The Ticket Center Workspace has a Tickets list area with a Bulk Actions drop down button used to present relevant actions to the logged in analyst or administrator. When case numbers, or tickets, in the list are selected, Bulk Actions becomes available, as shown below.
Ticket Detail
When an analyst is working in a ticket detail form, the Actions drop down menu will present actions from:
- The process workflow in play
- Common ticket actions defined for the type of ticket the analyst is looking at
- All Bulk Actions
- System defined actions that are always there and not modifiable.
The following screen shot shows an incident's Actions list noting where the action is derived from. 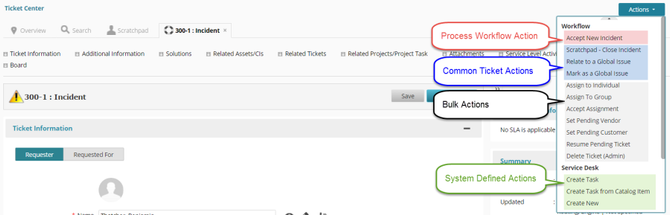
Applying Process Workflows
After you have created, reviewed, updated, and tested process workflows to support your business, you are ready to apply them to tickets.
There are several ways to instantiate your business process.
Directly from a Service Catalog Item
When an end user or analyst selects an item from the Service Catalog, it may be directly linked to a process flow, as shown below. 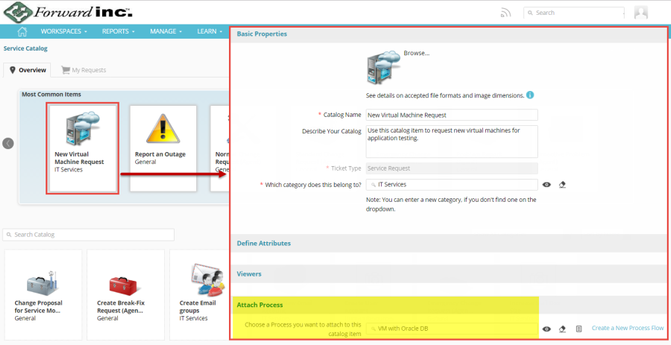
Attaching a specific process flow to a catalog item will ensure that the correct process will be applied to the ticket.
From the New Ticket
Analysts using Intelligent Service Management from the Ticket Center workspace can create new tickets by selecting an option under the Actions drop down. For example, ActionsNew Incident. 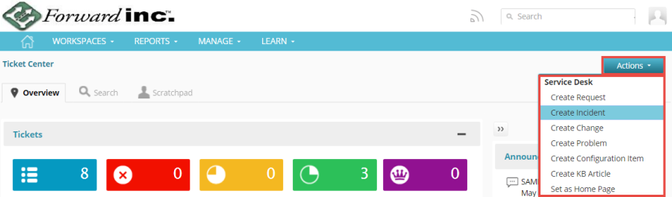
When the new ticket form appears, the analyst is free to start entering data about the requester and capture the nature of the incident. During this process, if there is a relevant Service Catalog Item that has a matching workflow, it can be selected from the new ticket's Actions menu. The screen shot below shows the Report an Outage service catalog item being selected to apply to the new incident. 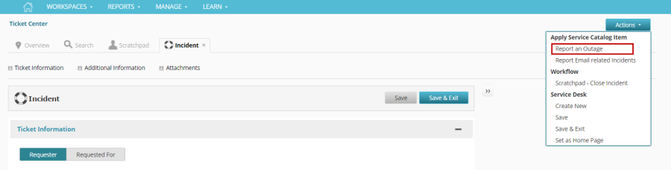
All default information will be applied to the new incident such as default attribute values, process workflows, and routing.
Matching Criteria
When an analyst or end user enters data in a ticket, that data is used to match against entry criteria in process workflows. Refer to the documentation wiki here for information on entry criteria.
The following screen shot shows a ticket with a description that matches the matching condition in a process workflow's Entry Criteria tile.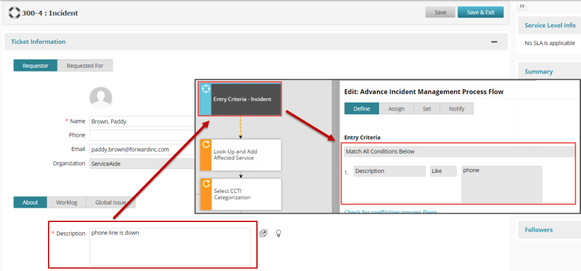
Example: Create a New Service Request Process Workflow
In this example, we will create a new Process Flow that handles the process for Service Requests for a Virtual Machine with an Oracle DB installed. Oracle DB requires a license and thus requires approval from management.
Create Pre-requisite data for this example
In order to create process flows, you will need to be logged in as an Administrator. The example uses data that will not exist in a new slice, so the steps to create the supportive data follows.
Categorization: Infrastructure Services > Server > Provision/Add > Virtual Guest Machine
A new category will drive the assignment of the sample workflow.
- Navigate to MANAGE> ADMINISTRATION> Tools> Categorizations
- Click the New Categorization button
- Enter Class: Infrastructure Services
- Enter Category: Server
- Enter Type: Provision/Add
- Enter Item: Virtual Guest Machine
- Select Service Request
- Select Save
Group 1: Infrastructure (L2)
A new group will be used for initial default assignment of the Service Request.
- Navigate to MANAGE> ADMINISTRATION> Tools> Groups
- Select New Group
- Group Name: Infrastructure (L2)
- Description: Test group for new process exercise
- Used for: Permission, Approval Group, Notification, Assignment
- Group Email: <enter a valid email address if you want to test notifications>
- Select the Members Channel button, and add yourself as a member and one or two other contacts to test with
- Click Save
- Under the Members tab, enter yourself and optionally another analyst
Group 2: Database Administration
A second group will be used for conditional assignment.
- Navigate to MANAGE> ADMINISTRATION> Tools> Groups
- Select New Group
- Group Name: Database Administration
- Description: Test group for new process exercise
- Used for: Permission, Approval Group, Notification, Assignment
- Group Email: <enter a valid email address if you want to test notifications>
- Select the Members Channel button, and add yourself as a member and one or two other contacts to test with
- Click Save
- Under the Members tab, enter yourself and optionally another analyst
Custom Attribute: Select Database Server Type
A new field on the form will hold information gathered from the end user.
- Navigate to MANAGE> ADMINISTRATION> Tools> Custom Attributes
- Click Create New
- Attribute Name: Select Database Server Type
- Attribute Type: List
- Possible Values: Oracle 10G~Oracle||Microsoft SQLSQL||MySQL~MySQL
- Click Apply Changes
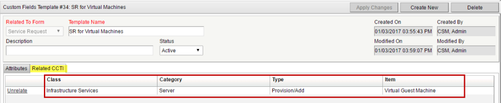
Custom Ticket Attribute Template: SR for Virtual Machines
A new Custom Ticket Attribute Template will link the custom attribute to the new categorization so that it will be available to the end user whenever the category is selected on the ticket form.
- Navigate to MANAGE> ADMINISTRATION> Tools> Custom Ticket Attribute Templates
- Click Create New
- Enter:
- Related To Form: Service Request
- Template Name: SR for Virtual Machines
- Click Apply Changes
- In the lower half of the form, select the Attribute Name: Select Database Server Type
- Select Visible To Self-Service User
- Select Save Attribute at the bottom of the form

- Click the Related CCTI Tab
- Search for the CCTI added earlier and click Add CCTI.
Service Catalog Item: Virtual Machine Request
Service catalog items act as templates in Intelligent Service Management where pre-defined field data and workflow behavior can be defined. The catalog items are made available to users with assigned permissions from the Service Catalog. In our case, we will create a service catalog item and pre-define the categorization, or CCTI. To do this:
- Navigate to MANAGE> ADMINISTRATION> Tools> Service Catalog Configuration
- Select New Catalog
- Browse for an icon by selecting Browse…
Note, default icons can be downloading in a zip file here. These are helpful in building out your catalog.
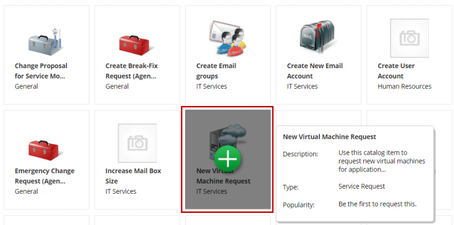
Enter:- Catalog Name: New Virtual Machine Request
- Describe Your Catalog: Use this catalog item to request new virtual machines for application testing.
- Ticket Type: Service Request
- Which category does this belong to?: IT Services
Note: This is not related to CCTI, it is the service catalog categorization for items listed.
- Select Save & Proceed To Next Step
- Under the Define Attributes section, Populate the Categorization with: Infrastructure Services » Server » Provision/Add » Virtual Guest Machine

- Select Save & Proceed To Next Step
- Under the Viewers section, enter the Self-Service Group
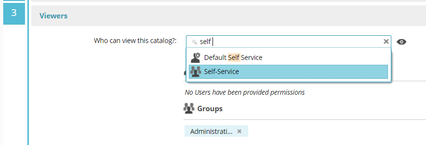
- Click Save and Exit, as we will attach the process workflow later.
- Test the Catalog Item by navigating to WORKSPACES> SERVICE DESK> Service Center
- Select the catalog item, New Virtual Machine Request
- Enter:
- Requester: Enter your name as the Requester
- Description: Testing new catalog item
Notice that the Categorization is pre-set with our new CCTI, and under Additional Information, the new custom attribute is listed. - Select Database Server Type: Select Oracle 10G for the attribute value.
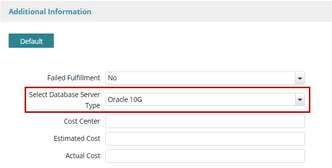
- Select Save & Exit
View your new ticket under the My Tickets tab.
- Open the ticket by double clicking on it.
You will see that the ticket is assigned to the group Service Desk (L1), unless you changed the default assignment group on the Default Service Request Management Process Flow.
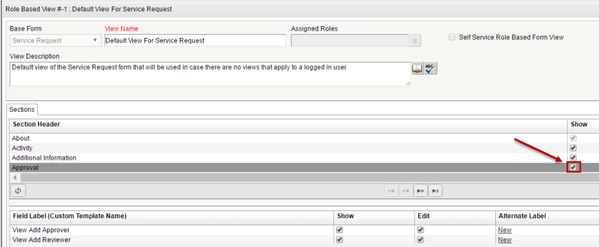
Role Based Views: Default View for Service Request
In order for approval statuses to be seen on Service Requests, we will need to ensure that the default role based view has the Approval section selected to show. By default this section header is not viewable on Service Request forms.
Update the default View for Service Requests.
- Navigate to MANAGE> ADMINISTRATION> Tools> Role Based Views
- Select the View Name: Default View For Service Request
- Under Section Header, select Show next to Approval
- Click Apply Changes
Note: You will need to log out and back into Intelligent Service Management for the form change to take effect.
Create Service Request Process Workflow
In this example we will create a process to handle service requests for virtual machines. We will create an assignment routing rule, and if the user is requesting an Oracle DB, we will move the ticket through an approval cycle before the fulfillment of the request.
- Navigate to MANAGE> ADMINISTRATION> Tools> Process Workflows
- Click New Process Flow.
- Complete the fields:
- Process Flow Name: VM with Oracle DB
- Description: New process to manage requests for VMs using Oracle.
- Form Type: Service Request
- Tags to categorize: <start typing 'vm' to get a list to choose from> select vmware
- Click Save & Proceed
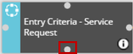
The entry criteria box will automatically be in focus, Entry Criteria - Service Request.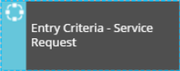
In the right panel, the Edit Step is displayed with the channel selected.
 - Click the dropdown box numbered 1.
- Select Categorization.
- Click Search icon

- Select Infrastructure Services > Server > Provision/Add > Virtual Guest Machine.
- Add a Sort Order value of 100.
Note: Sort Order is important as the first Process Flow that has matching Entry Criteria is executed unless it is exclusively associated with a Service Catalog item. - Click Save Step.
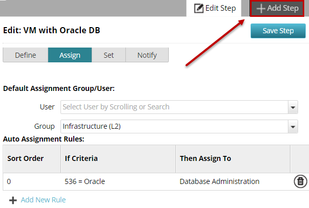
- Click the
 channel. Enter:
- Group: Infrastructure (L2)
- Click

The Auto Assignment Rule dialogue window will be displayed. - Click the dropdown box labeled 1.
- Locate Select Database Server Type as the value for the Custom Attribute. The filter results will update as you start typing the letters.
NOTE: Custom attributes will only show in the list once they have been tested on a ticket and populated at least one time. If your attribute is not in the list, make sure to test it using the pre-requisite steps above for linking custom attributes to categories through Custom Ticket Attribute Templates. - Select Oracle 10G from the right dropdown box.

- Click Next
- Select Database Administration from the Group dropdown list.
- Click View Advanced Options.
- Under Set Fields:
- Select: Reason Code
- Value: Assignment Validation
- Click Add Rule
- Click Save Step.
- Click the Add Step tab
- Hover your mouse on each item in the All Steps list to see the available options:
- Approval: use to define this step to submit or withdraw the ticket to/from approvals
- Assign To: allows this task to set assignment to an individual or a group
- Auto Assign: use to initiate the auto assignment engine for reassignment
- Execute Automation Connector: use to call an automation center process
- Create: use to create a new related ticket type from this ticket
- Other: use to delete or check for open tasks
- Update Ticket: used to insert a function that will update values on the ticket.
- Click Approval, then Submit For Approval
- On the Edit: Submit for Approval form, update the following:
- Name: Oracle DB Approval
- Description: Approval step submission for license key.
- Sort Order: 5
- Click Show Advanced Options and enter:
- Match Conditions Below: Select Database Server Type = Oracle 10G
- Approval Phase: Oracle DB Approval Phase
- Approval Status: License Approved
- Approval Type: Any One Approver
- Mandatory Fields: Cost Center
- Click Save Step
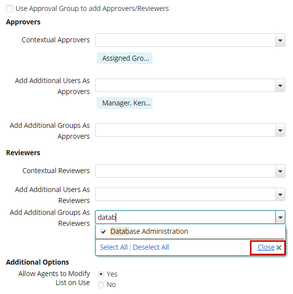
- Click the Approvers channel. Enter:
- Contextual Approvers: Assignment Group
- TIP: Click Close when you have selected the appropriate item(s) from the list.
- Add Additional Users As Approvers: <any user name>
- TIP: Start typing in the drop down field to filter the list.
- Add Additional Groups As Reviewers: Database Administration, Infrastructure (L2)
- Click Save Step
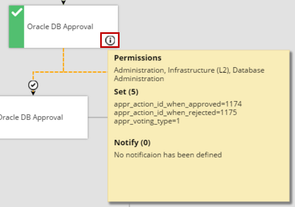
- Click the Permission channel. Complete:
- Who can trigger this step: Add Infrastructure (L2), Database Administration
- Click Save Step
- Click the Set Channel
- Set Ticket Parameter: Reason Code = Pending License Approval.
- Click Save Step
- Review the Step configuration by hovering your mouse over the Information icon.
- Click the On Approval tile in the left pane
- Select Update Ticket from Select Step Type dialogue box
- Define Basic Properties for the step:
- Name: Oracle DB Approval
- Description: Update ticket
- Click Save Step
- Click the Permission channel. Complete:
- Who can trigger this step: Add Infrastructure (L2), Database Administration
- Click Save Step
- Click the Set Channel
- Set the following Ticket Parameters, and click
 to add new fields:
- Assign to Group: Infrastructure (L2)
- Phase: Fulfillment
- Reason Code: Oracle DB Approved
- Status: Approved
- Click Save Step
- Click the On Reject tile
- Select Update Ticket from Select Step Type dialogue box.
- Define Basic Properties for the step:
- Name: Oracle License Denied
- Description: Update ticket
- Click Save Step
- Click the Permission channel. Complete:
- Who can trigger this step: Add Infrastructure (L2), Database Administration
- Click Save Step
- Click the Set Channel
- Set the following Ticket Parameters, and click to add new fields:
- Status: Closed
- ReasonCode: NOT Approved
- Phase: Cancelled
- Click Save Step
- Select the Oracle DB Approval tile
- Click the Add Step tab
- Select Update Ticket from Select Step Type dialogue box
- Define Basic Properties for the step:
- Name: Complete Fulfillment
- Description: Close ticket
- Sort Order: 2
- Click Save Step
- Click the Permission channel. Complete:
- Who can trigger this step: Add Infrastructure (L2), Database Administration
- Click Save Step
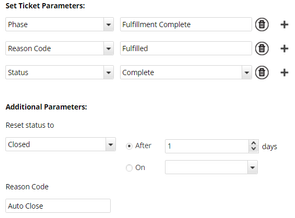
- Click the Set Channel
- Set the following Ticket Parameters, and click to add new fields:
- Status = Complete
- Reset status to: Closed
- After 1 days
- Reason Code: Auto Close
- ReasonCode = Fulfilled
- Phase = Fulfillment Complete
- Click Save Step
- Status = Complete
- Hover your mouse over the Entry Criteria and when the small dot appears at the bottom, click it and drag it to the Complete Fulfillment tile.
- Reposition your tiles to make the process easier to visualize
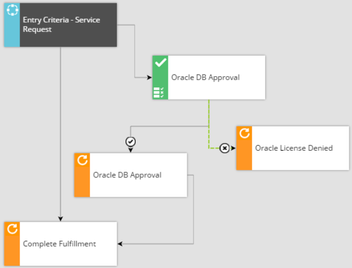
- Click Save on the top menu bar

- Click Publish
- Click Yes, check for conflicts
- Click Check Conflicts
- Click Ok
- Click Publish Process Flow
Link Process Workflow to Service Catalog
A Process Workflow will apply to any ticket that meets the Matching Criteria. If more than one process flow matches, the one with the lowest entry criteria sort order will be applied. In our example, Categorization must equal Infrastructure Services > Server > Provision/Add > Virtual Guest Machine.
Additionally, you can link a Process Workflow directly to a Service Catalog item. Let's add our new process flow to the Service Catalog Item we created in the pre-requisite steps.
- Navigate to MANAGE, ADMINISTRATION, Tools, Service Catalog Configuration
- Search for and Select New Virtual Machine Request
- Click the anchor link for

- Search for and select the new process flow: VM with Oracle DB
- Click
 to go back to the top
 - Click Save and Exit
Test the Process Workflow
- Test the Catalog Item by navigating to WORKSPACES, SERVICE DESK, Service Center
- Select the catalog item, New Virtual Machine Request.
This time it should show up in the Most Common Items: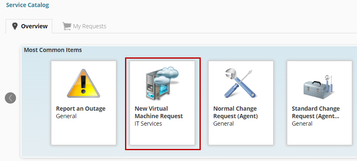
- Enter:
- Requester: Enter your name as the Requester
- Description: Testing new process workflow
- Select Database Server Type: Oracle 10G
- Select Save
This time notice that the Owner is Database Administration, and not Service Desk (L1), and the Reason Code is Assignment Validation.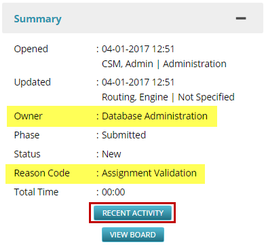
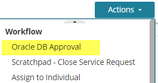
- Click the Actions Drop down and select Oracle DB Approval
- You should receive a notice about a required field that we set on this workflow action: Cost Center.
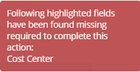
- Enter a text value for Cost Center and select Oracle DB Approval from the Actions list again.
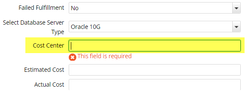
NOTE: You can inactivate the default Service Request fields by modifying the Custom Ticket Attribute Template named Default Custom Fields for Service Request. - When presented with the list of approvers and reviewers, select yourself and any others from the list.
- At this point, the ticket is in the approval phase and cannot be edited.
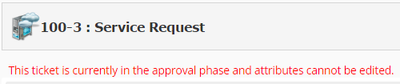
Note, the locking of tickets during approvals is controlled with the Configuration Parameter of LOCK_TICKET_DURING_APPROVAL. - Select the Approvals anchor link to view the list of approvers
- Close the Service Request window
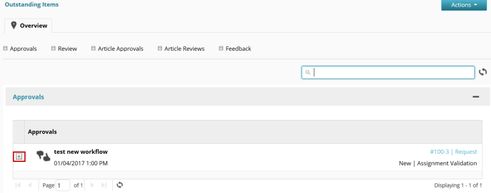
- Navigate to WORKSPACES, SERVICE DESK, Outstanding Items
- The approval task should be listed under the Approvals section. Select the task and approve it.
- Navigate back to the My Requests tab and open the test Service Request ticket
- Validate that the Group Assignment, Phase, Status and Reason Code have been updated
- Select *Actions->Complete Fulfillment*
- Validate that the Phase, Status and Reason Code have been updated
- Open a new Service Request from the Service Catalog and test the path of Rejecting the approval.
- Open a new Service Request and test assignment when Oracle 10g is not selected. Ex. the group assigned should be Infrastructure (L2), and no approval option is presented.
© 2019 Serviceaide 1-650-206-8988 http://www.serviceaide.com info@serviceaide.com