Data Loading
- UdayKiran.Guduri (Unlicensed)
- priti.hota (Deactivated)
- Richard Graves (Deactivated)
Before you can start using Intelligent Service Management, you will need to create data in the application which is specific to your business. How much and what kind of data will depend on your business. This section will cover common data that is loaded, ways to load certain data, and any security or workflow features that interact or rely on it.
Data should be entered into Intelligent Service Management in the following order for the purpose of supporting relational dependencies:
- Organizations
- Support Groups
- Contact Persons
- Roles
- Categorizations
- Configuration Items
- CI Related Contacts
- Models
- Assets
Organizations
Intelligent Service Management supports an N-Level organizational structure, where you can have parent and child hierarchy or pier, or sibling, levels. You will have a root, or top, level organization created by default.
There is no right or wrong way to set up your organizations, but in order to take advantage of Intelligent Service Management functionality, consider the following before adding organizations to Intelligent Service Management.
- Mapping Intelligent Service Management Organizations: Intelligent Service Management organizations should map to how your organization is constructed. You will want to understand how your business sees tickets and what data, if any, is needed for reporting.
- Logos: Logos can be associated with all levels of organization. When a logo is associated with an organization, the logged in user will see that logo when they are logged into Intelligent Service Management. Contacts can be associated with multiple organizations, but the Logo presented will be the Primary Organization's logo. If you create a child organization, it will automatically receive its parent logo. Click here for instruction on updating organization logos.
- Organization Based Access Control: Enable organization based access permissions on service desk tickets and Configuration Items that the agents can operate upon.
- Advanced Reports: Use reports to provide ticket metrics at the organizational level.
- Associate CCTI Families: Categories are broken down into four levels: Class, Category, Type and Item (CCTI). A CCTI Family is a group of CCTIs that can be associated with one or more Organizations. This enables limiting CCTI records on tickets based on the Requested For/Requester's organization.
- ADSync: The ADSync Utility helps you download user data from an LDAP server to Intelligent Service Management. If you plan on using ADSync to populate the users in Intelligent Service Management, make sure to create Organizations in Intelligent Service Management first since ADSync will not create them for you. Further, if you have users associated with an organization in your LDAP directory, and that organization does not exist in Intelligent Service Management, the users will not be created in Intelligent Service Management since the utility will be unable to match the organizational profile.
To get started, locate and review your default root Organization:
- Navigate to MANAGE> ADMINISTRATION> Tools on the main navigation panel
- Click Organizations
- To update how your organization name appears, change the text next to Name field and select Save
- To update your logo from the default one select Browse… next to the default logo.
- Any child organizations created will inherit the parent organization's logo
- Any users associated with the organization as a primary organization, will see the logo when they log in.
- Click Save
Options for Creating Organizations in Intelligent Service Management
There are a few ways to add Organizations to your Intelligent Service Management environment. You can choose one option, or a combination of options, depending on your business needs.
- Manually: you can create and manage organizations through the Intelligent Service Management application manually. Use this option if you do not have many organizations to manage. Click here for additional information on manually creating organizations.
- Bulk Process Data: you can load many organizations at the same time using an XLS or XML template through the Intelligent Service Management application by populating the Organization tab. Use this option if you have a long list of organizations that you can copy and paste into a formatted template. Click here for additional information on creating organizations using the bulk import, or refer to the Bulk Load Example in this document.
- Web Service: Web service calls to Intelligent Service Management can create, search, and update organizations. If you have a way of making web service calls automatically, you may want to use web service calls to update Intelligent Service Management organizations.
Organization Based Security
You will need to decide if you'd like to implement security for organizations. This can be done for self-service users and analysts.
Analyst Security
Security for Analysts can be controlled at the organization level and managed through the following configuration parameter.
- Log into Intelligent Service Management as an Administrator
- Select MANAGE> Tools
- Select Configuration Parameters
- Search for ENABLE_ORGANIZATION_BASED_ACCESS_CONTROL
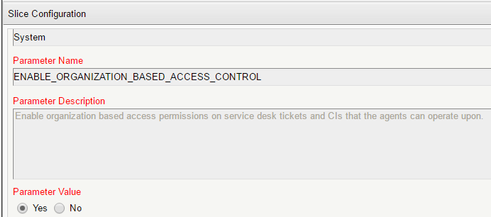
- Parameter Value = No
An Agent or Analyst will be able to view tickets assigned to any of the Support Groups for which he or she is a member. If tickets do not appear on the Analyst's Ticket Center list, the Analyst is able to use the global search to find any ticket using a keyword or ticket number, and then open and edit the ticket. - Parameter Value = Yes
An Agent or Analyst will be able to view, search, or edit only those tickets which belong to the organizations that Agent is a member of. An Agent will not be able to view and take actions on a ticket belonging to an organization for which the Agent is not a member. The Agent can be directly related to an Organization OR can be indirectly related to an Organization via a Support Group. For example, an Agent related to Organization A can see tickets from Organization A. An agent who is a member of Support Group L1, where Support Group L1 is related to Organization B, will be able to see tickets belonging to Organization B if Support Group L1 is assigned to them.
- Parameter Value = No
Search for ENABLE_CHILD_ORG_BASED_SEARCH
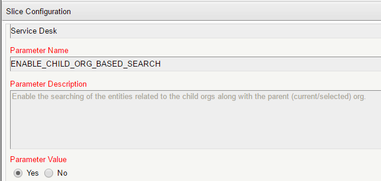
Set the parameter value to Yes if you'd like to allow searching for tickets that belong to child organizations.
Self Service Security
For the Self-Service Interface the system honors the "View Organization Tickets" flag on the Self-Service Support Group.
- Log into Intelligent Service Management as an Administrator
- Select MANAGE> Tools
- Select Groups
- Select Self-Service from the list:
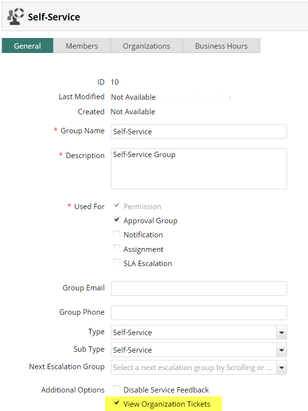
- Unchecked: When the View Organization Tickets flag on the Self-Service Support Group is NOT checked, then Self-Service User (SSU) can only view tickets requested by them. They will not be able to view tickets requested by others belonging to the same organization.
- Selected: When the View Organization Tickets flag on the Self-Service Support Group is checked, then SSU can view tickets they have requested as well as tickets requested by others belonging to the same organization.
Groups
You will use groups in Intelligent Service Management to logically group contacts, or users of the application, in order to manage ticket assignment, approvals, or other work.
By default, several example groups are active in Intelligent Service Management. You will want to review them, inactive those that do not make sense for your business, and create new groups that are missing.
To locate and review the default Groups:
- Navigate to MANAGE> ADMINISTRATION> Tools on the main navigation panel
- Click Groups
Use groups to:
- Control what tickets show up in an analyst's Tickets list in the Ticket Center workspace
- Group contacts together as members of a group for the purpose of providing support on similar tasks
- Link groups to organizations to take advantage of organizational based security
- Add groups as approvers or reviewers of tickets
- Add groups as approvers or reviewers of knowledge articles
- Assign to receive communications from Intelligent Service Management
Options for Creating Groups in Intelligent Service Management
There are a few ways to add Groups to your Intelligent Service Management environment. You can choose one option, or a combination of options, depending on your business needs.
- Manually: you can create and manage groups through the Intelligent Service Management application manually. Use this option if you do not have many groups that need to be created or managed in the application. Click here for additional information on manually creating groups.
- Bulk Process Data: you can bulk load groups with the XLS or XML template through the Intelligent Service Management application by populating the Support Groups tab. Organizations must be loaded prior to Groups if you need to link groups to organizations. Refer to the Support Groups Worksheet section in the documentation wiki, located here, for additional information on creating groups using the bulk import, or refer to the Bulk Load Example in this document.
- Web Service: Web service calls to Intelligent Service Management can create, search, and update groups. If you have a way of making web service calls automatically, you may want to use web service calls to manage Intelligent Service Management groups.
Once you have groups created in Intelligent Service Management you will be able to create and add users.
Contacts
Any individual who will need access to Intelligent Service Management as a self-service user, an analyst, or an administrator, must exist as a User in the application. If you have an integration requirement from a different application into Intelligent Service Management, the web services contact record will be utilized.
Self Service Contacts can potentially:
- Create self-service tickets using the web or mobile application interface
- Act as approvers or reviewers of tickets
- Act as approvers or reviewers of knowledge articles
- Receive communications regarding ticket status
- Update the Worklog on their tickets
Analysts Contacts can potentially:
- Create tickets for users
- Act as the assignee or owner of a ticket
- Act as an approver or reviewer of tickets
- Act as an approver or reviewer of knowledge articles
- Send or Receive communications regarding ticket status
Administrator Contacts have access to all modules of Intelligent Service Management, regardless of what group, role, or organization they belong to. Administrators see all data in the system and have access to all modules.
Web Services Contacts can access the WSDL to make web service calls to Intelligent Service Management.
Options for Creating Users in Intelligent Service Management
There are a few ways to add Users to your Intelligent Service Management environment. You can choose one option, or a combination of options, depending on your business needs.
- Manually: you can create and manage users through the Intelligent Service Management application manually. Use this option if you do not have many users to manage. Click here for additional information on manually creating users.
- Bulk Process Data: you can bulk load users with the XLS or XML template through the Intelligent Service Management application by populating the Contact Persons tab. Organizations and Support Groups must be loaded prior to Contacts if you need to link analysts to groups or contacts to organizations. Click here for additional information on creating users using the bulk import, or refer to the Bulk Load Example in this document.
- Web Service: Web service calls to Intelligent Service Management can create, search, and update users. If you have a way of making web service calls automatically, you may want to use web service calls to update Intelligent Service Management users.
- Active Directory Synchronization: The ADSync utility synchronizes user data from an LDAP server, and imports users and their organization. Click here for additional information on ADSync.
Roles
Roles are used to assign privileges to Users or Groups in Intelligent Service Management. If a group or user has a role assigned, the application features or permissions will be granted to those users or groups. For ease of application management, adding support groups and/or contacts to roles offers a more effective way of managing permissions.
There are many pre-defined roles in Intelligent Service Management. New Intelligent Service Management Administrators should review the existing roles before modifying them. When a level of comfort is gained with roles, they can be manually created or modified. See the documentation wiki page here for information on creating and managing roles. Roles can be created through bulk import, but only the role names are added. Bulk import will not link roles with groups or users. That will need to be done manually.
Use Roles to:
- Add viewing and editing rights to Advanced Reports
- Assign communication template permissions
- Implement Role Based Access Control
Categorization
Categorization in Intelligent Service Management is available on several types of components, such as tickets, assets and knowledge articles. You define your categorization as a four level hierarchy defined as Class, Category, Type, and Item (CCTI).
Before creating CCTIs in Intelligent Service Management, understand how you will use them. Some users classify tickets down to a low level for detailed process workflow support and reporting, while others use a more generic, high level categorization for broader requirements and easier data management.
Use Categorization to:
- Classify components in Intelligent Service Management
- Drive process workflows
- Run reports on different levels of ticket classification
- Associate custom ticket attributes, or fields, to a ticket for user population
Options for Creating Categorization in Intelligent Service Management
There are a two ways to create categorizations in Intelligent Service Management. You can choose one option, or a combination of both options, depending on your business needs.
- Manually: you can create and manage CCTIs through the Intelligent Service Management application manually. Use this option if you do not have many level of categorization to manage. Click here for additional information on manually creating categorization.
- Bulk Process Data: you can bulk load categorizations with the XLS or XML template through the Intelligent Service Management application by populating the Categorizations tab. Refer to the Bulk Load Example in this document for an example of loading CCTIs in bulk.
Bulk Process Data Example
Much of the system data used in Intelligent Service Management can be bulk imported using a formatted XLS or XML. The bulk load process will load, update and delete data. This exercise will help you understand what data can be loaded into Intelligent Service Management and how it is done.
- Navigate to MANAGE> ADMINISTRATION> Tools, and click Organizations
- Make a note of your default Organization. In my Example it is vanilla
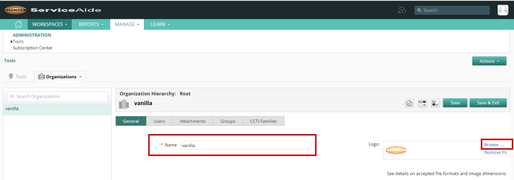
- Update the Organization's logo to your own image file by clicking the Browse link, otherwise all your new organizations will inherit the default Serviceaide logo.
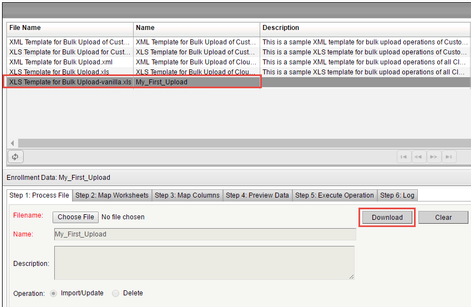
Download the XLS Template
Download and populate the XLS Template file. This example uses the Excel sheet template.
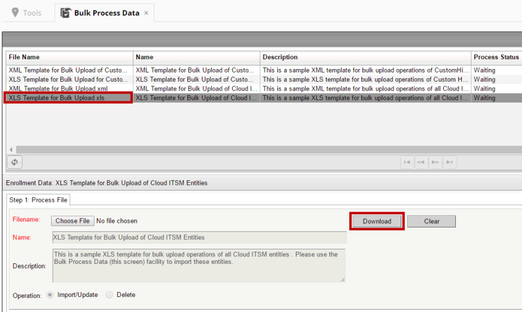
- Select Bulk Process Data under the Tools tab
- Select XLS Template for Bulk Upload.xls
- Select Download and save the template locally
- Open the XLS Template
There are 12 tabs in this template, one for each object that you can load data into using this method. - Required fields will show up with red text:

- Hover your mouse over any heading fields that have a red corner to see tips on populating that column.
Refer to the following documentation wiki page, here, for assistance.
Organizations
- Start with the Organization Tab
- Refer to the documentation wiki for instructions on bulk importing Organizations here.
- Additional Tips on Organization fields:
- Organization Name – plain text field which is required
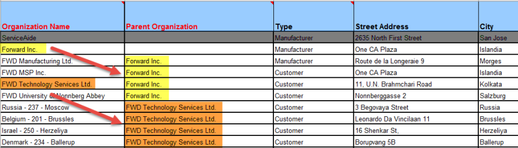
- Parent Organization (if needed) – plain text field which must match an existing Organization name in the database, or a name listed in the XLS sheet in a previous row.
- If an organization will be a "sibling" to your root Organization, then leave the Parent Organization column empty, as seen below with the first row:

- If an Organization will be a sub-organization to your root Organization or a new organization, then populate the Parent Organization column with the name of your root organization, or the name of the to-be parent organization. The parent organization can be the root organization, since it already exits, or a value listed in the Organization Name column above it. See below example:
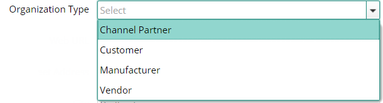
- Organization Type must be a valid database value:
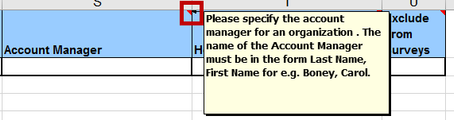
- Account Manager - The Organization tab has a link to Users through the Account Manager column. This is a relational field and must point to a valid lastname, first name. If users are not loaded yet, you cannot enter an Account Manager for your Organization. You'll have to do this as an update later.
- Holiday – this field must match a valid holiday in the system. Go to MANAGE> ADMINISTRATION> Tools> Holidays for the current list, or create a new one.
- Exclude From Surveys - the valid values are a yes or a no. Setting this to yes will exclude all contacts related to the organization from ever getting a survey sent to them.
- All other fields are free form text
Support Groups
- For help on populating most group fields, log into Intelligent Service Management and go to the MANAGE> ADMINISTRATION> Tools area. Select Groups and select any field on the default Group detail form. Each field will give you help text on what the field requires. Required fields will have a red star before them.
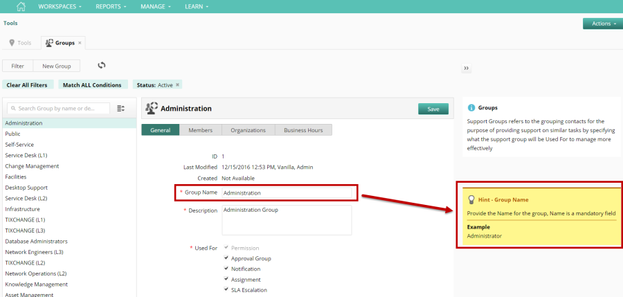
- The Used For fields, shown below, must have a Yes or No value:

- For help on additional worksheet fields, refer to the documentation wiki page here.
Contact Persons
- The Contact Persons tab maps to Users in Intelligent Service Management. Once loaded you will see them listed under Users when you navigate to MANAGE> ADMINISTRATION> Tools, and click Users.
- The Organization column has an invalid reference to Site/Location. Site and Location are referencing a previous Organizational structure that no longer exists and was replaced with the N-tier structure. The field is still required for Primary Organizational mapping.

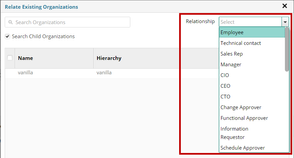
- The Relationship column refers to the list of available relationships when associating an Organization to a Contact. See the below screenshot showing the list of relationships.
Roles
There are several default roles that exist in Intelligent Service Management out-of-the-box. If you are just getting started, I suggest you skip creating roles through bulk import. Revisit this later if there is a need.
Categorizations
Categorizations, or CCTIs, are how you'll classify tickets in Intelligent Service Management or assets and CIs. An example of what the data might look like is shown in the following screen shot. 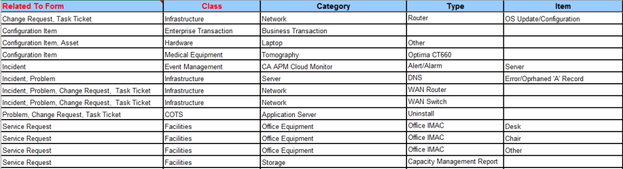
Configuration Items and CI Related Contacts
Refer to the documentation wiki for help populating these objects. The following is an example of a populated Configuration Item form. 
The Class, Category, Type, and Item field values on the Configuration Items tab must exist or be listed on the Categorizations tab and associated with Configuration Items. See below screen shot.
For CI Related Contacts, both the CI Name and the Client Defined System User ID must exist. This information is loaded from the Contact Permissions tab and the Configuration Items tabs, which is why CI Related Contacts is loaded after both of those.
Language Catalog
If you have international users of Intelligent Service Management, you may want to have languages other than English available. Refer to the documentation wiki for help populating these columns if you need a language other than English. If you plan to only use English, this tab is not relevant.
Assets, Models, Software, and IP Ranges
Refer to the documentation wiki page here for help on importing assets, models, software, and IP Ranges.
Note that in order to link manufacturers to asset models, they must first exist in Intelligent Service Management. Typically, Vendor and Manufacturer records would be automatically discovered and populated during asset discovery. If you will bulk load models, you will need to manually create the necessary manufactures first.
To manually create Manufactures:
- Navigate to MANAGE> ADMINISTRATION> Tools
- Click the Asset sub-tab
- Select Manufacturers
- Select New Manufacturer
- Enter the Name, for example Dell
- Select Save and Exit
Bulk Process the Data
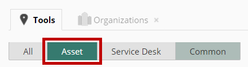
- Navigate to MANAGE> ADMINISTRATION> Tools
- Under the Common sub-tab, select Bulk Process Data
- Under the Enrollment Data Import section select
 and select the sample template you modified
 - Enter a name for the file, for example: My_First_Upload
- Click the Upload button
Your file will now show in the top list. - Select the Step 4: Preview Data tab
By selecting a sheet name from the drop down, you can see what data will be loaded into Intelligent Service Management. Select the Step 5: Execute Operation tab
Import data using the suggested order below:
- Organization
- Support Groups
- Contact Persons
- Roles
- Categorizations
- Configuration Items
- CI Related Contacts
- Models
- Assets
- Select OK to the webpage message that pops up.
Select the link to the left of the Organization Sheet Name.
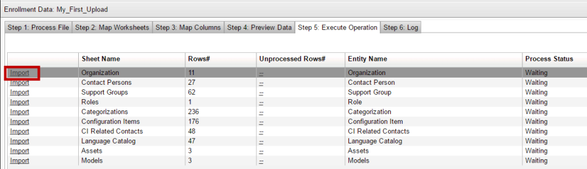
- Select Step 6. Once the sheet is loaded, it will be moved to the bottom of the list.
- Continue loading the other sheets in the order specified above, and check for errors along the way.
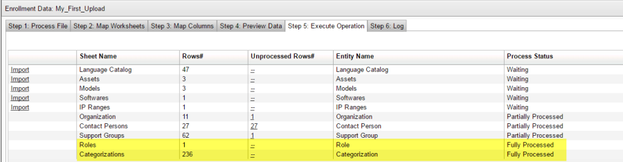
Note: Do not click Import for Contacts more than once or you will end up with duplicate users. - Data that is successfully processed will show as Fully Processed under Step 5: Execute Operation:
Bulk Load Errors
You will see if there were errors loading any data and what the problem was. Select the Sheet Name from the drop down. In this case, the Sheet Name Organization is selected with an error message. We can see that there was an Account Manager linked to the Organization which was defined on row 11, but the Account Manager did not exist as a Contact in Intelligent Service Management. This caused the failure to load the organization. You can fix the error, re-upload the new excel sheet, and re-import any data.

Help! I need to remove the data I just bulk loaded.
No problem. This is a simple enough task.
- Navigate to MANAGE> ADMINISTRATION> Tools, and select Bulk Process Data
- If you previously uploaded and used an xls template, and it contains the data that you want to remove, you can select the template from the list and click the Download button.
- Remove any data that is in the spreadsheet that you want to keep and save your new spreadsheet.
- Upload the new spreadsheet like you did previously with the Bulk Load Example, by clicking the Clear, and Choose File buttons.
- Once your new file is uploaded, change the Operation to Delete from the default of Import/Update.
- Select your new xls template. Notice that the Delete Operation is set.
- Select the tab labeled Step 5: Execute Operation
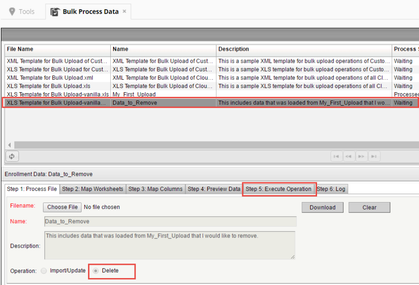
- Notice that all the options are set to delete. It's a good idea to double check the data on the tab labeled Step 4 prior to clicking Delete.
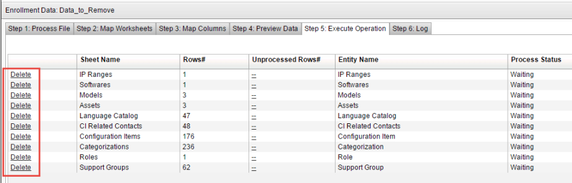
- Select Delete next to the Sheet Name that has the data you would like to remove. 4. Understanding Ticket Workflows.
ADSync Example
Information on installing and using the Active Directory Synchronization can be found on the documentation wiki by clicking here. This utility will take users from Microsoft Active Directory or Novell eDirectory and import, update, or inactivate them in Intelligent Service Management. It will also take LDAP attribute fields and populate them in Intelligent Service Management with the contact information.
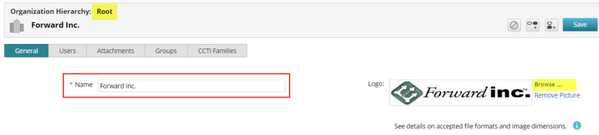
This example will show how to install and use ADSync with Microsoft Active Directory to populate the Intelligent Service Management Users. The example company is Forward Inc.
Step 1: Create Organizations in Intelligent Service Management
The default Root Organization was renamed to Forward Inc., the logo was updated to the Forward Inc. approved business logo, and the organizational structure was imported using the Bulk Process Data XLS sheet as described in the Bulk Process Data Example. The XLS template had the following organizational hierarchy: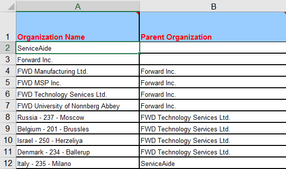
The default contacts are automatically associated with the root organization of Forward Inc.: 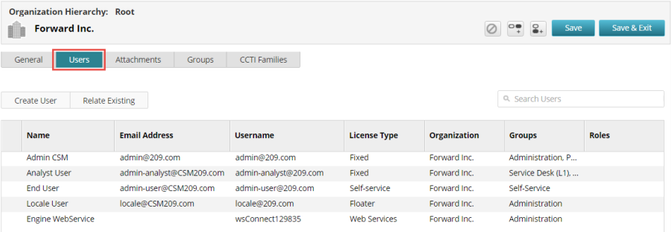
Step 2: Confirm or Install Java version 8
In this test scenario, we are logged onto the LDAP server as an Administrator. We will be installing and running ADSync on this server, but before we do this, we need to make sure Java 8 is installed.
If you don't know whether or not you have Java installed, point your browser to www.java.com and select the Do I have Java? link. If you need the latest version, select Free Java Download and follow the prompts to download and install Java.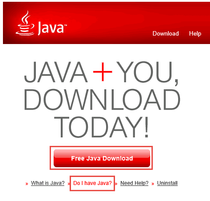
Once Java is downloaded and installed you will need to set JAVA_HOME as an environment variable on the ADSync server (in our case the LDAP server) and add it to your PATH statement. See below for an example. 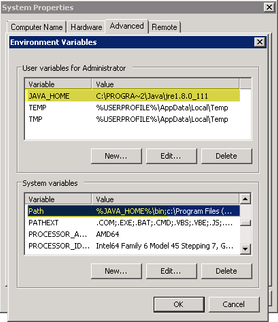
TIP: To find and use the short path of Java Home:
- Open a command prompt
- cd to the Java home folder
- Type: for /d %I in <.> do @echo %~sI

Step 3: Download and Unzip ADSync
- Log into the server which will have ADSync on it, which in our example is the LDAP server.
- Log into Intelligent Service Management and Navigate to MANAGE> ADMINISTRATION> Tools
- Select Downloads
- Select Active Directory Synchronization
- This will start the download of a zip file
- Unzip the ADSyncUtility file, in this example, we'll unzip it to C:\
Step 4: Download the SSL Certificate
SSL certificate can be downloaded from the Intelligent Service Management site. They are not included with the ADSync download by default since the SSL certificates expires frequently.
also enclosed is the training video of adding the SSL certificate to AD Sync.
https://www.youtube.com/watch?v=zHsor9SFnqQ&t=19s*
To enable an SSL environment for the ADSync Utility, perform the following steps:
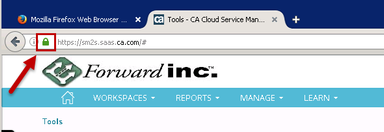
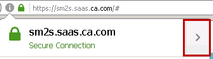
- Open up your browser, in this case Firefox, and log into Intelligent Service Management
- Click the View Site Information icon (the lock icon) next to the application URL in your browser address bar.
- Select the arrow next to Secure Connection
- Select More Information
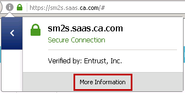
- Under Security, select View Certificate
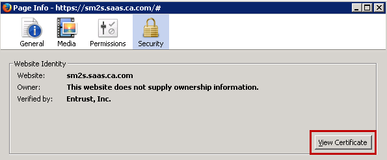
- Select the Details tab
- Click Export
- Give the file a name with an extension of .CER, for example: CSM_Certificate.CER
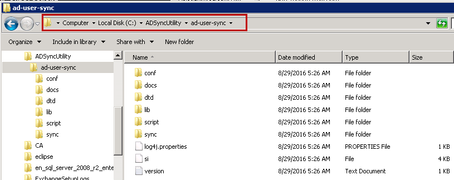
- Save the file to the ADSync root (ad-user-sync) location, in this case, C:\ADSyncUtility\ad-user-sync
- Close the Certificate Viewer window
- From a command prompt, navigate to the ad-user-sync\ location. For example: C:\ADSyncUtility\ad-user-sync
- Import the saved certificate file to the ADSync local keystore si, by running the following command from the ad-user-sync location: Keytool –import –trustcacerts –alias aliasname –keystore si –file saved_certificate_file_name.cer
For example:
Keytool –import –trustcacerts –alias CSM-AD-connection –keystore si –file saved_certificate_file_name.cer
- When prompted for the password, enter: itmaas
NOTE: The curser will not move or give any indication to recognize that you are typing the password - When prompted to Trust this certificate?, enter: yes
- This will create a new si fine under the ad-user-sync location
Step 5: Update sync.properties
This file provides the main configuration center for the data synchronization, and it needs a few site specific updates.
- Navigate to the ad-user-sync\conf folder on the ADSync server.
- Open sync.properties with an editing tool, for example Notepad++
- Update the following values in the file:
Variable | Default Value | New Value | Notes |
|---|---|---|---|
ldap.gc= | ldap:// 1024server:3268 | ldap.gc=ldap://CSMLDAPSERVER:3268 | CSMLDAPSERVER is the name of the LDAP server. |
ldap.dc= | ldap.dc=ldap:// CSMLDAPSERVER:389 | CSMLDAPSERVER is the name of the LDAP server. | |
ldap.bind.user= | AD account with access to run queries on the AD server | ||
ldap.bind.user.pwd= | user@123 | CSMR@ck$! | AD account password |
send.data= | yes | no | Temporarily set this value to 'no' for initial testing |
login.appender= | Value to append the sAMAccountName attribute in LDAD, which maps to the user's Username: |
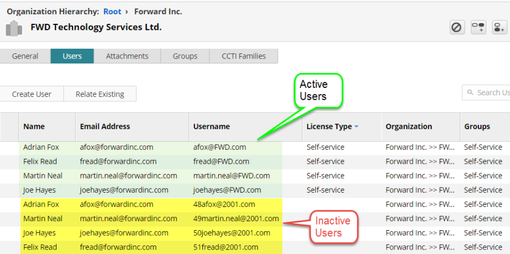
Note: If you do not update the login.appender value, your Users will be imported into CSM with a Username appended with @2001.com. See following screen shot.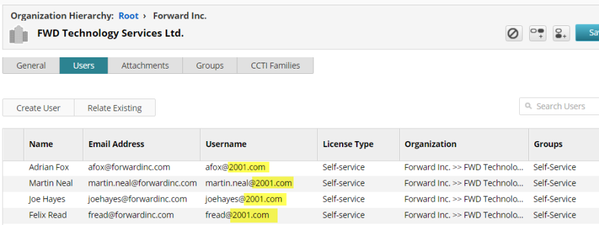
Optionally, you can modify the following variables:
Variable | Default Value | Notes |
|---|---|---|
ldap.searchFilter= | (&(objectClass=user)(objectClass=person)(objectClass=organizationalPerson) | Use to set a filter for looking up records. |
You may want to do this if you have a lot of system accounts that do not have a givenName populated in AD. The AD field of givenName maps to the CSM field of first name on a user's record. To skip all AD accounts with a null givenName, update the value to:
(&(!(givenName=""))(objectClass=user)(objectClass=person)(objectClass=organizationalPerson)
For a full list of variables in this file, refer to the documentation wiki location here.
Step 6: Update searchBase.list
When searchBase.list is populated, ADSync will cycle through each Organizational Unit (OU) defined and look for Users in accordance with the search criteria.
In our example, AD has an OU of Forward Inc., with users and contacts defined. Only User type records will be imported into Intelligent Service Management.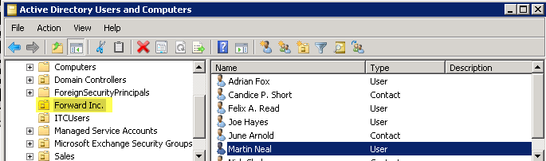
The contacts and users in the Forward Inc. OU have the following department and company defined in their User Properties: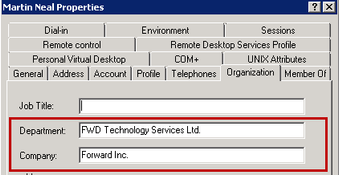
The searchBase.list file will have the following line defined in order to search only the Forward Inc. OU:
Intelligent Service Management must have the same matching Organizations and hierarchy defined: 
Step 7: Update attribute_map.list
You may need to update the attribute_map.list file to define your organizational structure. You can define an org_name using active directory (AD) attributes, static values, or a combination of both.
In the following screen shot, the default org_name value is set appropriately for the sample users, so no updates are necessary. The user shown will be created in the Intelligent Service Management organization Forward Inc.>>FWD Technology Services Ltd.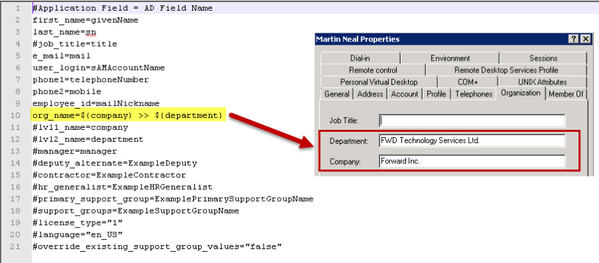
For additional information on updating the attribute_map.list file, see the documentation wiki page here.
Step 8: Run the sync Command
Run the sync command to test your connection to AD. Since we set send.data=No in the sync.properties file, no data will actually be sent to Intelligent Service Management. From a command prompt, run the sync command from the ad-user-sync\script directory. If you don't get any errors listed, the command worked. 
If you get errors, review the documentation wiki here for help. In the following example, the sync.properties file had an invalid server name in the ldap.gc value. 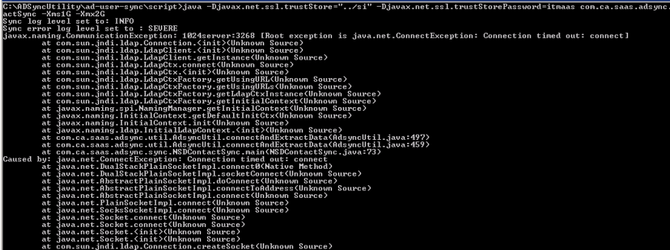
When you successfully have a connection, open the sync_data.log.0 and DATA.csv files to make sure your data looks correct. If it does, update the send.data value to yes, and re-run the sync command.
In our example, the following users were populated to the Forward Inc. >> FWD Technology Services Ltd. Organization. 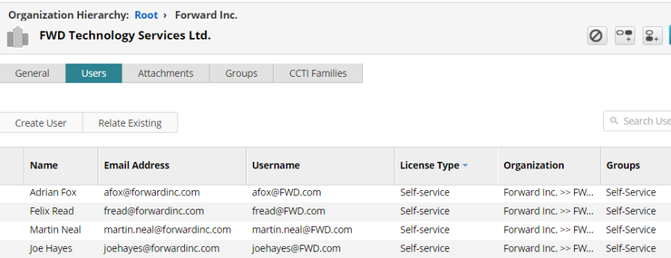
Note: As mentioned above, if you do not update the login.appender value in the sync.properties file, the users will be created in Intelligent Service Management with a Username value that ends with @2001.com. If you try and update the login.appender value after initially running sync.bat with the default value, the original Users will be deactivated in Intelligent Service Management but will still be linked to the Organization as inactive users. New Users will be created with the correct appended login.appender value and will assume the license type of the initial inactive users. This gives the appearance of duplicate records.
Related content
© 2019 Serviceaide 1-650-206-8988 http://www.serviceaide.com info@serviceaide.com