Create Global Attributes
Overview
Attributes are used to store information during a conversation between the bot and the user. The value of an attribute can be set from user input, a web services call (through Connected App), or passed from other skills. This allows for building dynamic conversations and gathering data to use to fulfill the user's request. Attributes are shared within a Bot, allowing them to be created and reused across skills.
Note
This article focuses on global attributes available to all skills within a bot. Local Attributes are covered within Create Skills and Integrations.
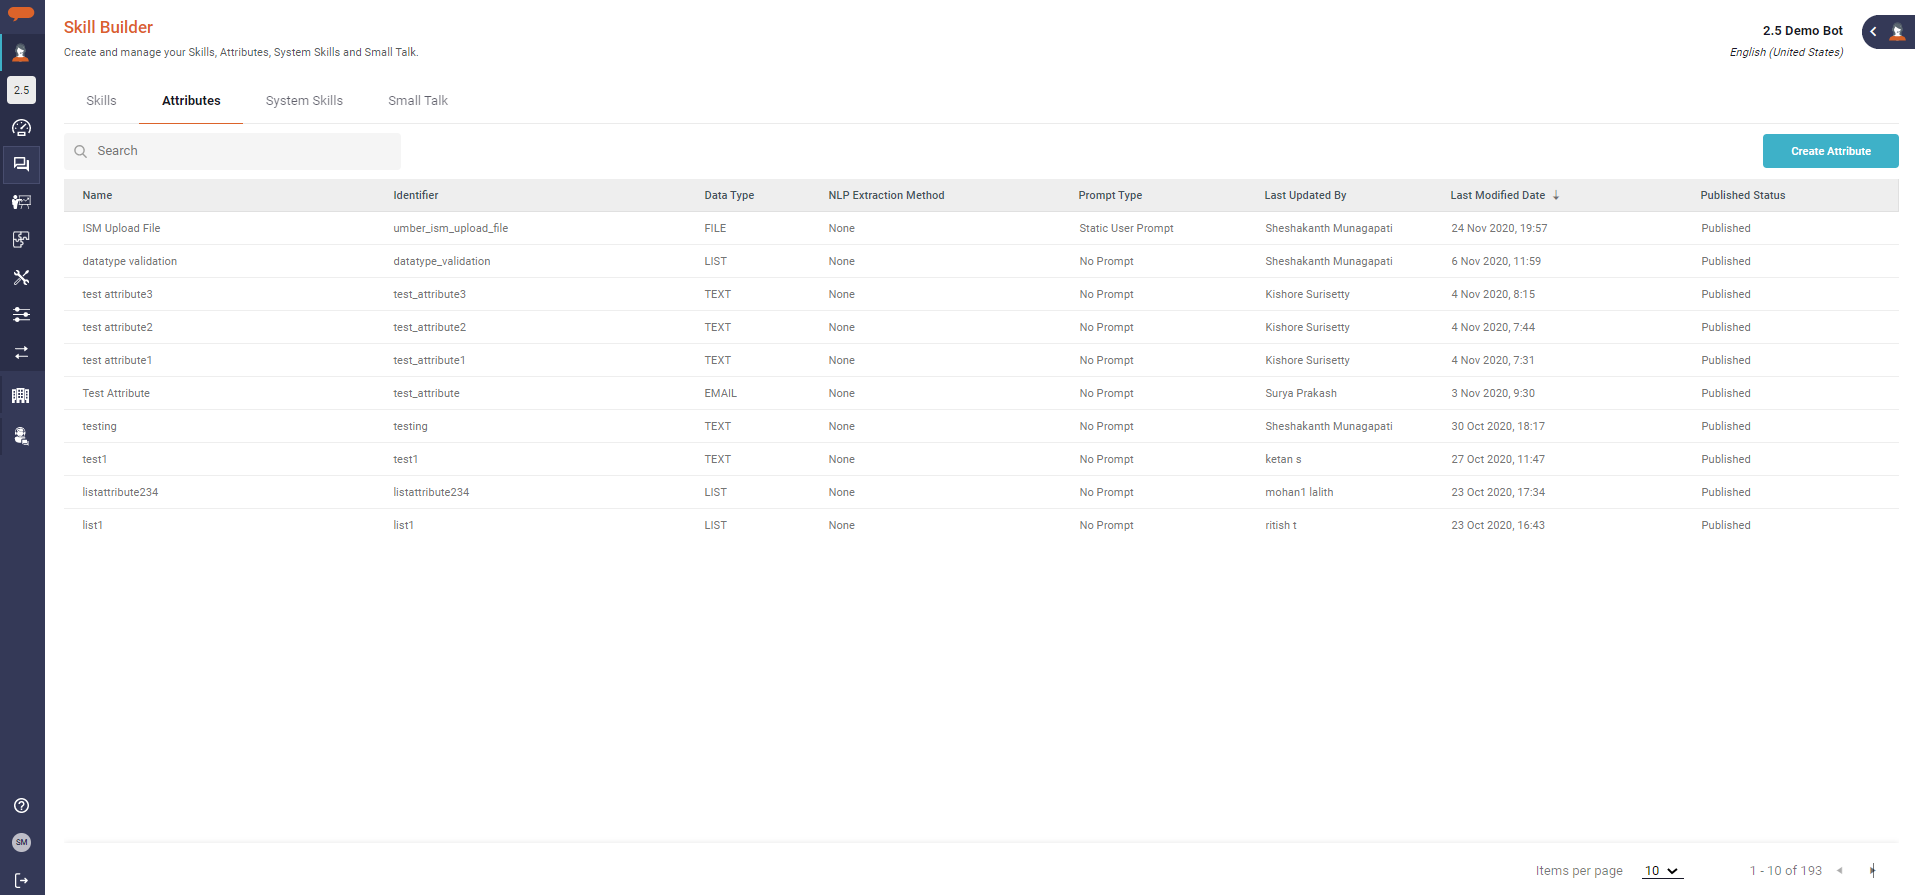
To manage Attributes, on the left navigation pane, click the Skill Builder menu, and then select the Attributes tab as shown below.
Create Attributes
Attributes are defined by three main components viz. Details, Prompts, and Validation. Each component defines how the attribute works in your skills.
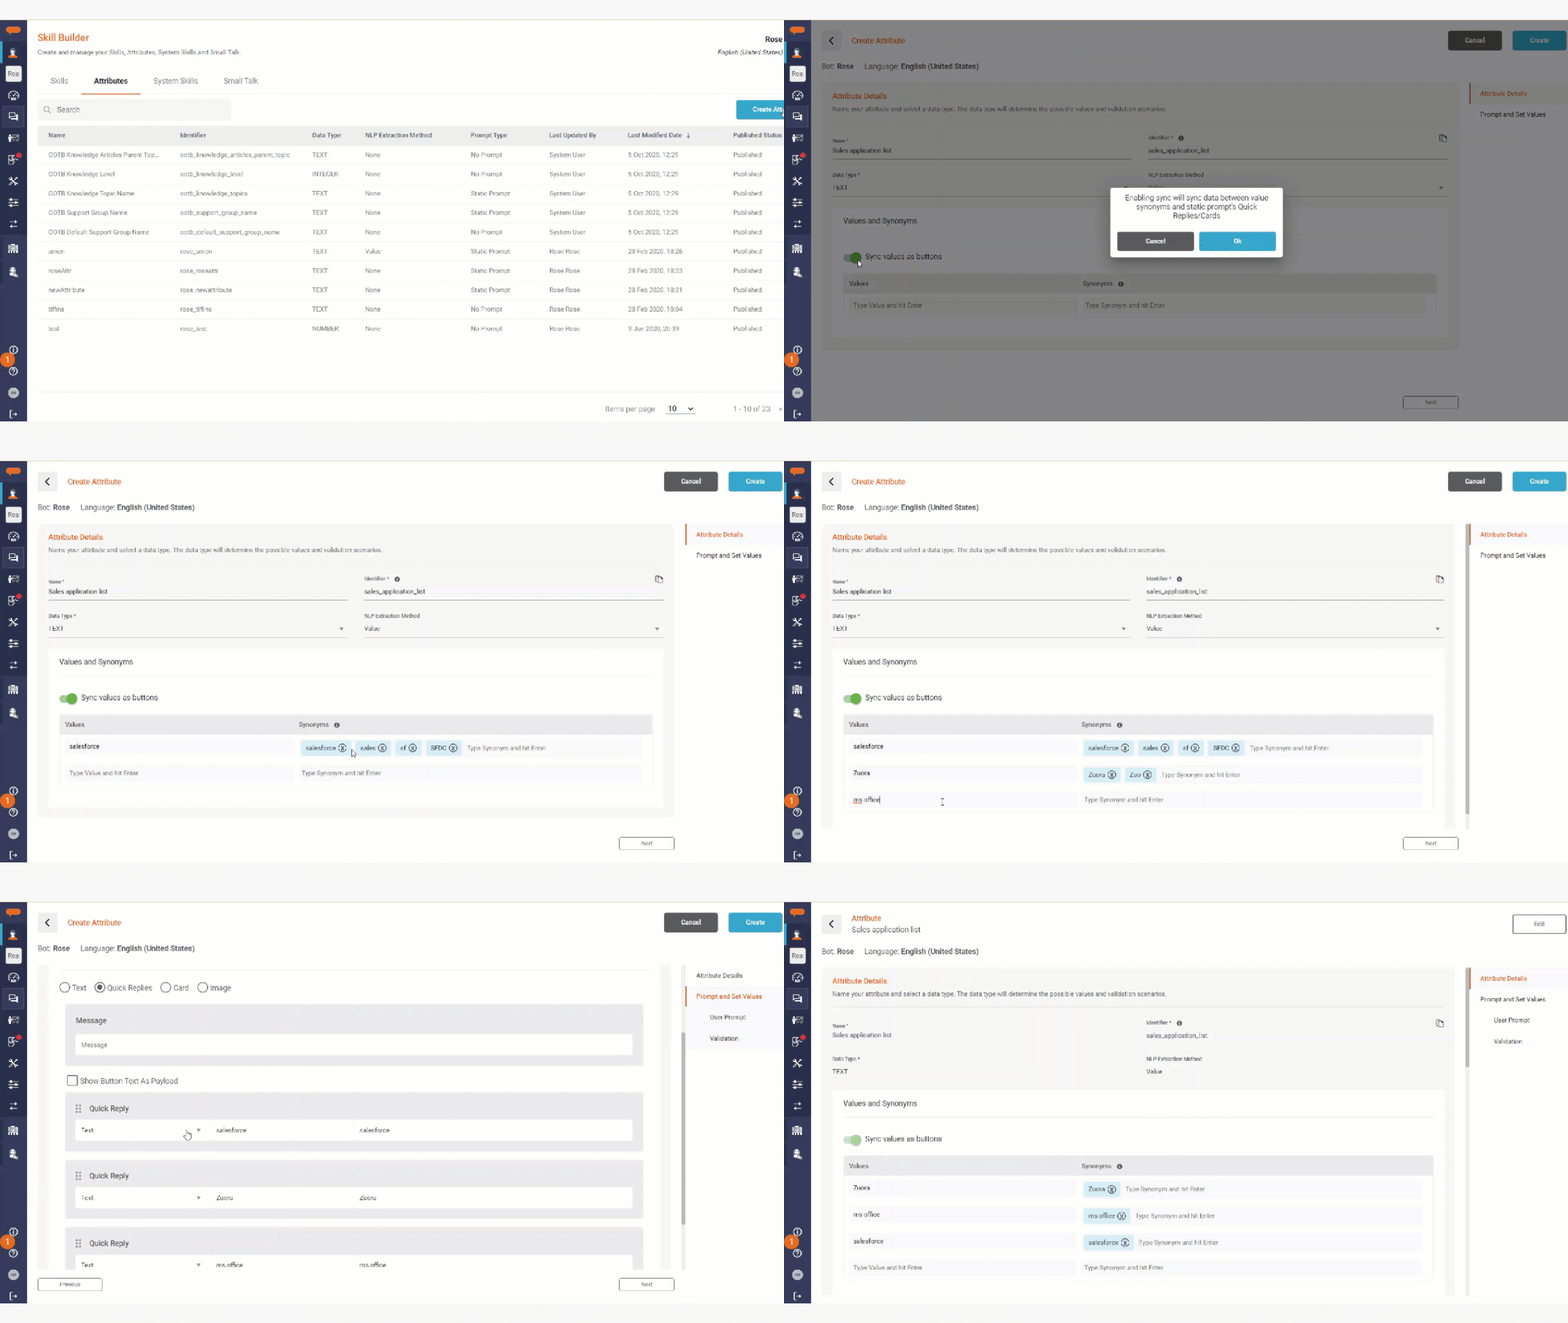
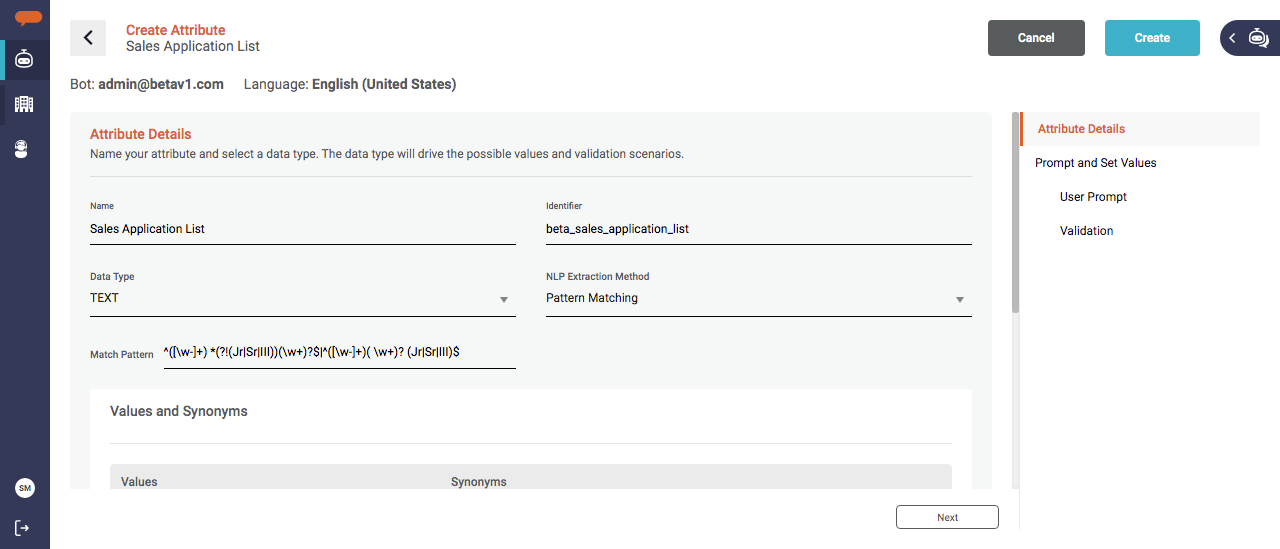
The following GIF shows the steps to create a text attribute that stores a list of applications from which a user can select a skill. This attribute supports Natural Language Processing (NLP) extraction and validation which allows the user to type the value in a response or in a user phrase.
To create an Attribute, click on Create Attribute on the Attributes tab on the Skill Builder page. Then follow the steps below.
When a new attribute is created, the Build & Publish process must be run. Until the attribute is published, it cannot be used in a skill or integration.
You can copy the identifier by using the copy button (next to the identifier section). This copies the context variable ({global.<attributeidentifier>}), which can be used to refer to the attribute in Integrations, Rulesets, Set Attributes, or Information Messages.
Define Attribute Details
The Attribute Details section of an Attribute includes the following key fields:
- Name: Specify the attribute's name that will appear in the Bot Builder UI. Spaces are allowed to support a friendly name.
- Identifier: This is the unique ID the system uses to refer to the attribute. This value is auto-generated but can be edited before the Attribute is created.
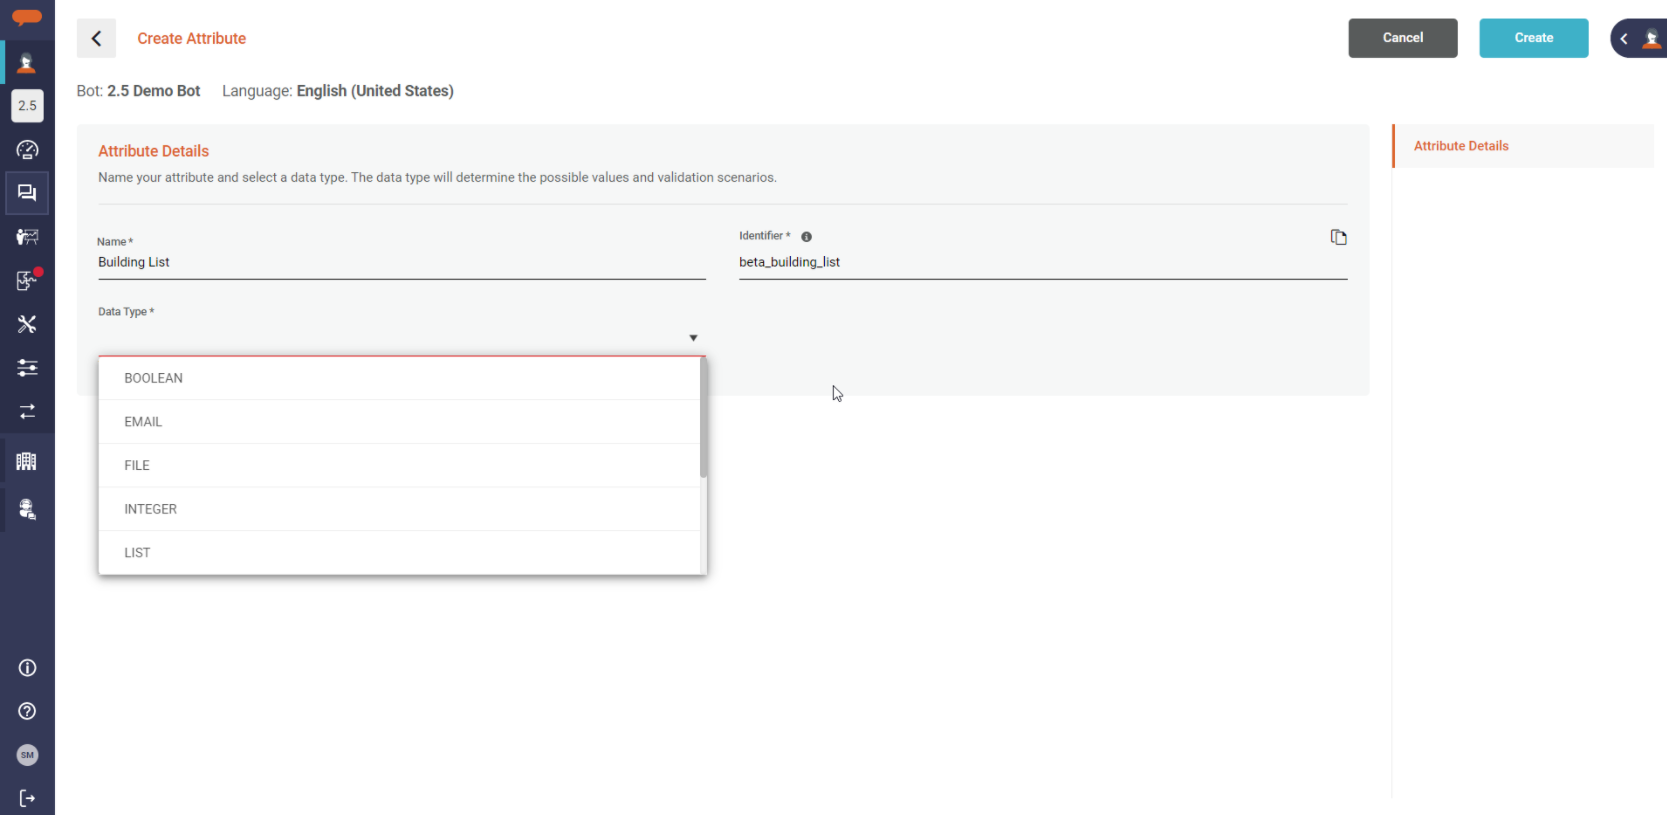
Data Type: Select the data type for your attribute. This determines the values that can be stored in the Attribute and how it will be used in skills. For example, an Attribute of Email will only allow text in the format of an email address name@company.com to be stored. An attribute of the "File" type will allow the user to upload a file such as an image, text file, zip file, MS office file, pdf, etc. Text Data Type attributes support NLP Extraction.
The following are the data types available in Luma VA: Boolean, Email, Number, Text, Time, Integer, List, Location, Long, File, JSON, and XML.- The attachment attribute does not allow executable files like exe, dll, vbs, jsp, apk, ipa, sh, bat, com, jar, so, sl, msi, o, swf, class, js, cgi, scr, pif, cmd, vxd,cpl
- For the attribute of type "File", NLP extraction is not supported.
- Global Attribute of type 'LIST', 'JSON' and 'XML' should not be used to gather information from the end-user during Skill execution as the end-user can provide only one input for a prompt. These attributes can be used to store or process an array of data received from the Integrations calls. You may use these attributes to store data/values in the conversation flow.
- Attribute type 'Location' is used to capture the user location in a skill. The attribute should be used in the skill if you want the user to select and provide their location. The Location attribute holds the Longitude and Lattitude associated to the user's location.
NLP Extraction
If the selected Data Type is Text, the NLP Extraction Method the field appears on the Attribute Details page. Using NLP Extraction allows the Attribute to pull the value from a user phrase when the skill is triggered, as well as take the user's input as a synonym and align it to a value. This provides a better user experience as it allows skipping prompts and moving the user through the skill conversation faster and easier. For example, if a user were to say 'reset my password for SF'. SF can be a synonym for the value Salesforce in the text Attribute ApplicationName. The skill skips the prompt asking the user for the name of the application and stores 'Salesforce' in the attribute.
There are two options for NLP Extraction Method:
- Value: Supports text values and synonyms for matching the user's input to the value. A user can enter any of the synonyms and it will be resolved to the actual value. This provides the user with a simple experience and makes them feel that the bot understands their terminology.
- Pattern Matching: Supports regular expressions to ensure the input matches the defined pattern. This is useful for phone numbers, employee IDs, and other values that match a specific format. There are many online resources to find common regular expressions or create your own. Regex101 and Rexegg are two helpful resources.
Toggle "Sync values as buttons" to copy the values from the Value and Synonyms section to the button and payload in Quick Replies & Cards in the User prompt section
On completing the details, click Next.
While executing a Skill, End-user can skip Static Prompt attributes using Skip command. Refer System Commands on Bot Settings more information on Skip Command in Luma.
If "Sync values as buttons" is selected, values in Value and Synonyms are added as button and payload in Quick Replies & Cards
Build User Prompts
After the attribute details are defined, populate the User Prompt section. Each attribute can have a unique prompt associated with it. This makes creating a skill easier, as a prompt can be created once and reused across skills where the Attribute is used.
The User Prompt section contains the following:
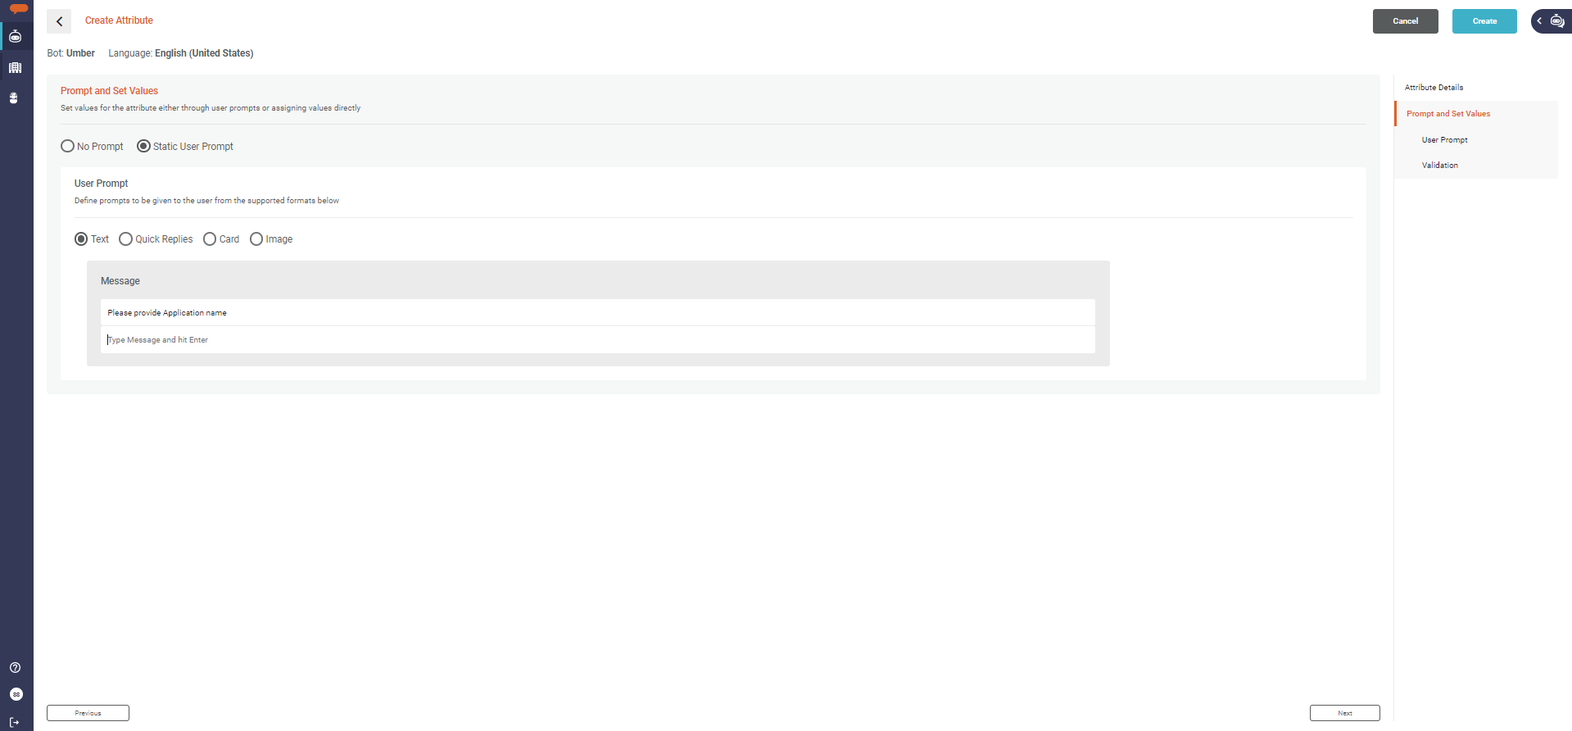
- Prompt the User: An attribute can have no prompt or a Static User Prompt. A No Prompt Attribute can be used for storing values that the system sets. While a Static User Prompt defines a prompt that the user will see and respond to.
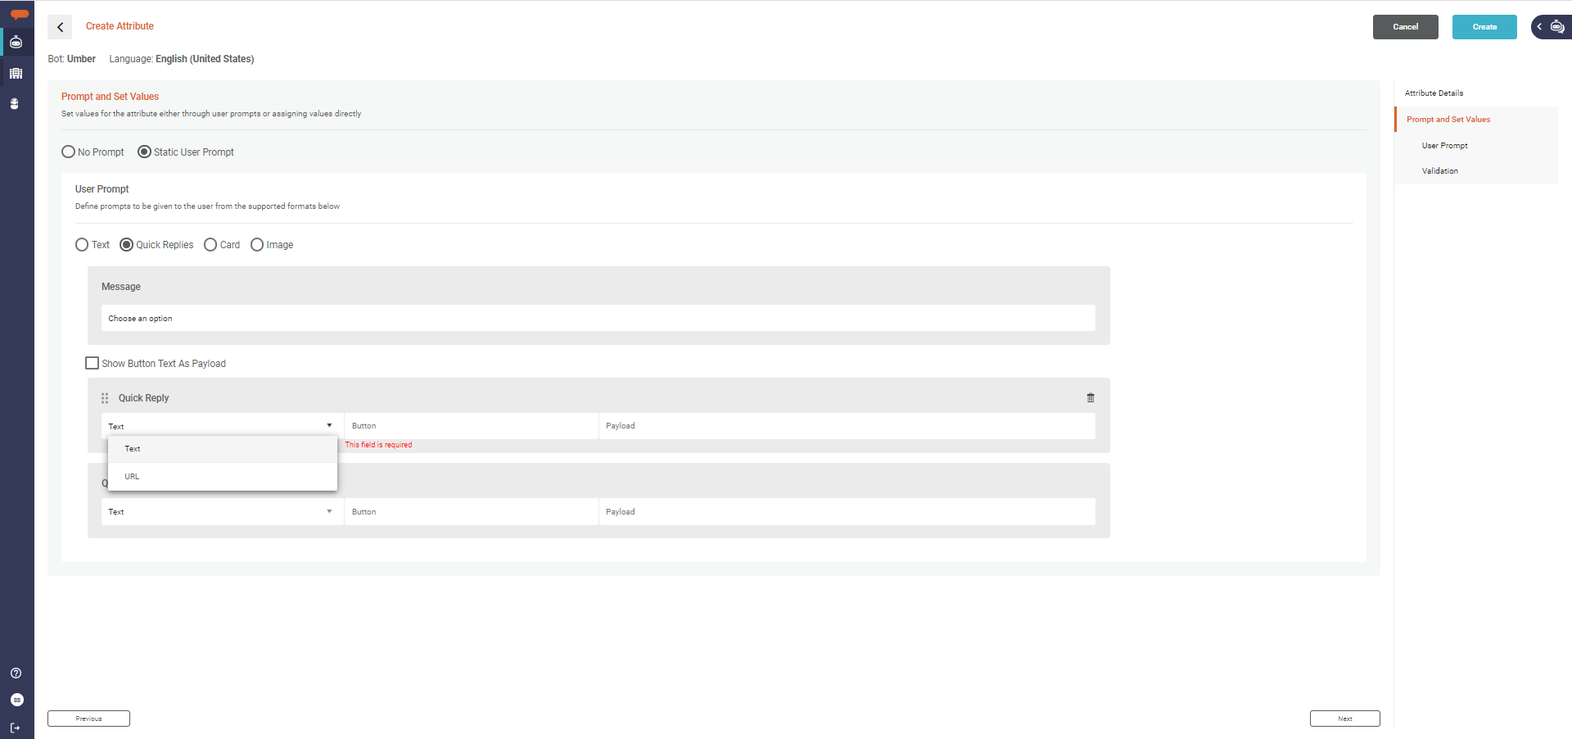
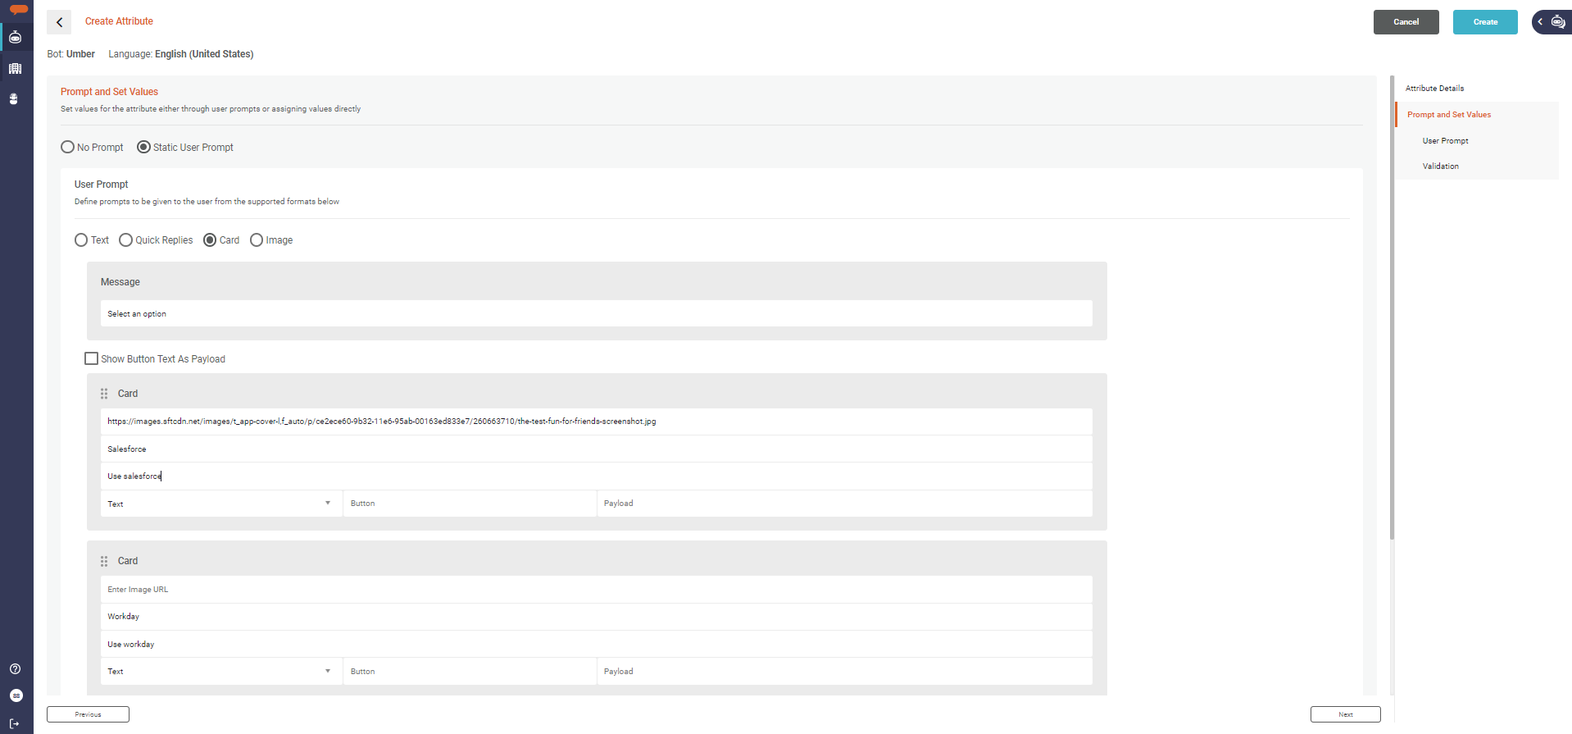
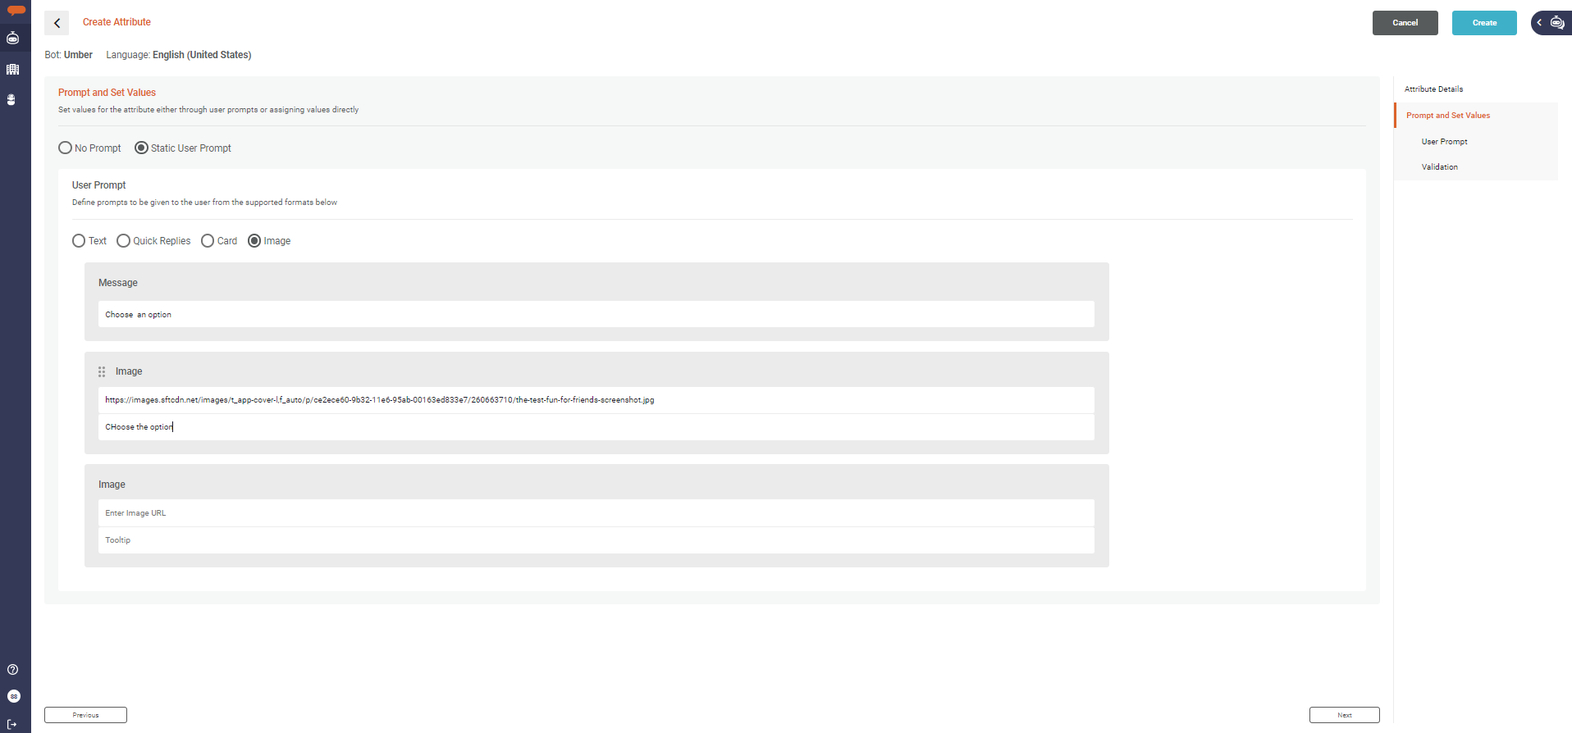
- User Prompt Type: A user prompt can be Text, Quick Replies, Card or Image. The text type shows an open-ended question to the user. Quick Replies shows a message and buttons where the user can select one to respond to the prompt. The Card shows a message to the user followed by a series of cards with a title, subtitle, and button. The image shows a message to the user along with the corresponding image and Tooltip.
Text: A text prompt contains a Message. This is what is shown to the user. Multiple Messages can be added to have variety in the prompt to make the system seem more natural. A Message is selected at random each time the prompt is triggered. The user's exact response to the text prompt is stored in the Attribute. If a user enters a synonym and the attribute uses NLP Extraction, then the value defined in the details section is used.
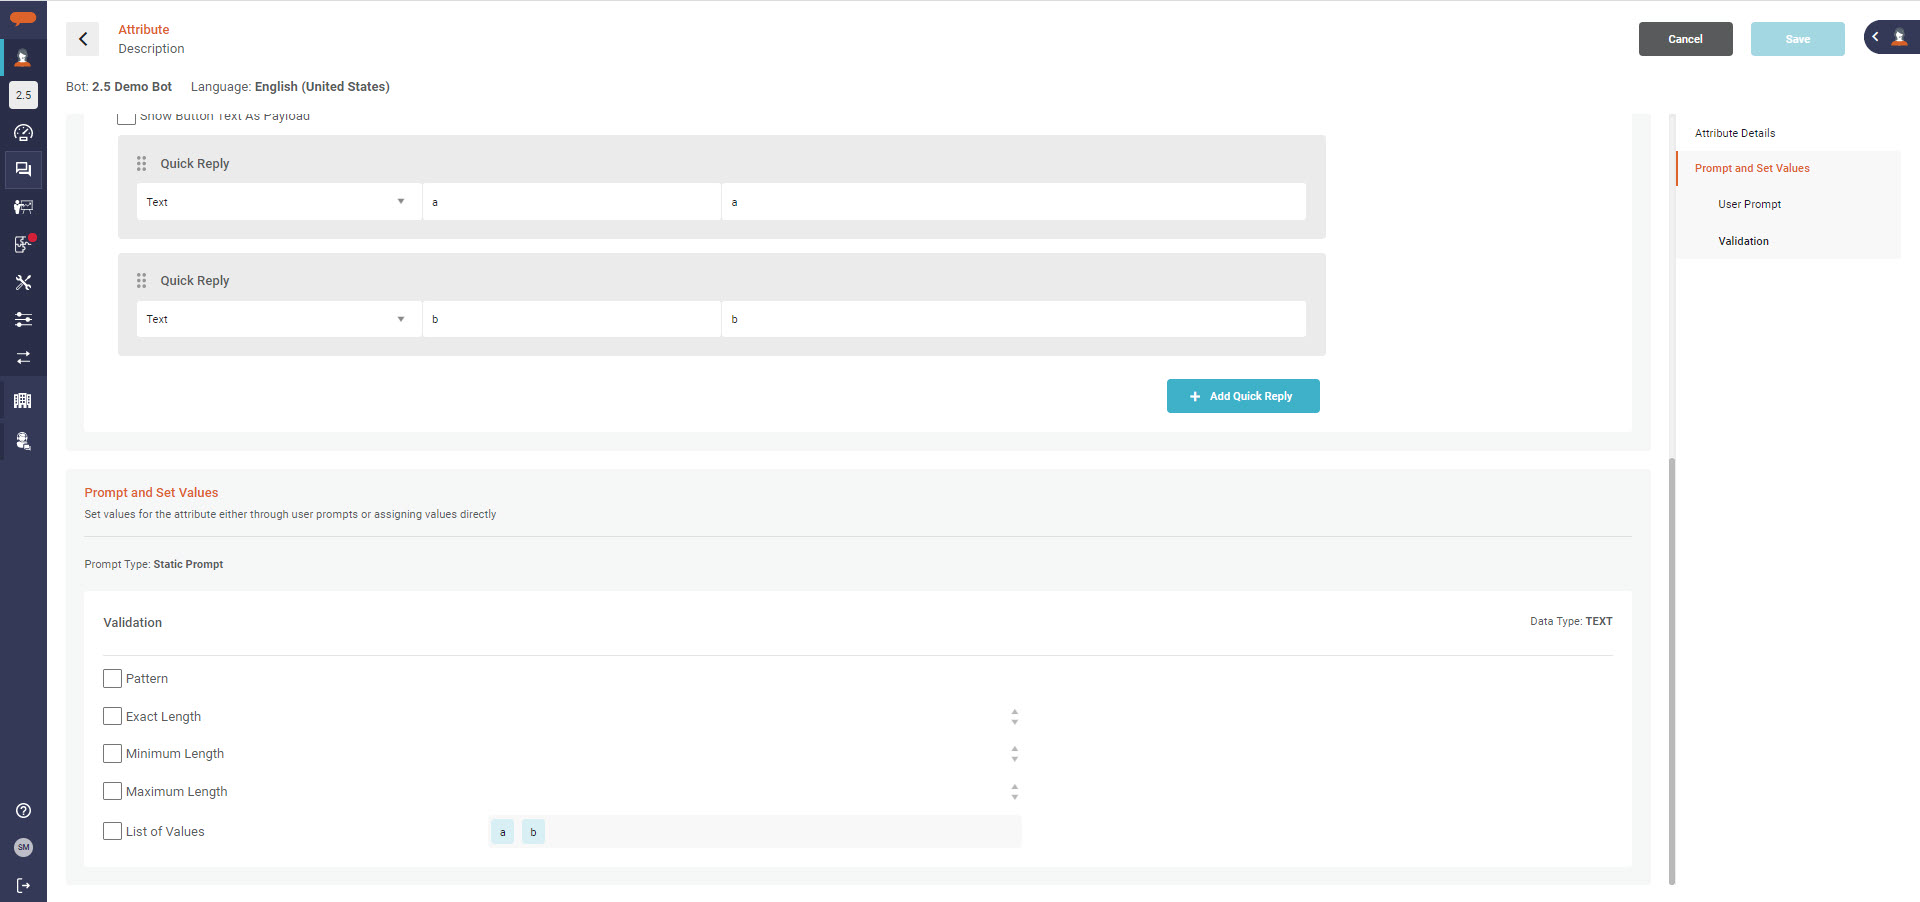
Quick Replies: Quick Replies have a single Message and multiple options shown as buttons. The user selects a single button. The payload for the button they clicked is stored in the Attribute. Quick Replies make responding to prompts easier as users are not confused with open-ended questions. Quick Replies also improve data validation.
Card: Cards are useful when more information should be provided to the user when making their decision. This can be used for selecting a conference room where the location or number of seats is important in their decision. A card prompt contains a message; and for each Card an Image URL, a title, sub-title, button, and payload. The user selects one of the card buttons and the payload is the value that will be stored in the Attribute.
Image: Similar to Cards, the Image option is useful when a visual representation of available options should be provided to the user. This option shows a message to the End-user along with the images and related Tooltips. When End-user selects the required image, the text in the tooltip is assigned to the attribute.
When Using the 'Quick Replies' and 'Card', the selected button payload is assigned to the attribute. Select 'Show button text as payload' when the value/payload is not human-readable and should not be displayed to the end user. Luma internally maintains the mapping between the button text and the payload. The button text is displayed to the user on the channel.
Ensure the button text is unique across all buttons when “Show button text as payload” is checked.” If the button text is not unique and is the same for all buttons, the mapping will hold only one entry which is the text mapped to the last button payload value.
Validate User Input
Note
- No Prompt Attributes do not have validation as there is no user input to validate.
- Validations are also not available for attributes of type List, JSON, and XML as these cannot be used to prompt the user for input.
Validation is the final section in creating an Attribute. The section ensures that the user's response to a prompt aligns with the required format. There are seven possible validation constraints that are available based on the Attribute's Data Type. If validation fails, the violation message will be shown to the user and shows them the prompt again. Multiple constraints can be used to ensure the input matches the proper format. If multiple constraints fail at the same time, all the associated violation messages will be shown. Violation Messages that call out the specific issue with the user input greatly improve the user's experience. For example, if the Minimum Length of a response is not met do not say "Your input did not meet the minimum length." Instead, say "Your input must be 3 or more characters".
The following table lists all constraints and the data types that they are applicable for.
Constraint | Description | Data Type | |||||||||||
|---|---|---|---|---|---|---|---|---|---|---|---|---|---|
| Boolean | Number | Text | Time | File | Integer | List | Long | Location | JSON | XML | |||
| Pattern | Use a regular expression to ensure the user's input follows an exact pattern. For example, US Phone Number 212-555-4444. | ||||||||||||
| Exact Length | The value must be the exact number of characters. For example, an employee ID must be 6 characters. | ||||||||||||
| Minimum Length | The value must be at least a certain number of characters. For example, the office code must be at least 3 characters. | ||||||||||||
| Maximum Length | The value must be no more than the defined number of characters. This is often used in conjunction with Minimum Length. For example, the office code cannot be more than 6 characters. | ||||||||||||
| Minimum | For numbers, the value must be at least equal to the provided number. For example, the number of attendees at the meeting must be 2 or higher. | ||||||||||||
| Maximum | For numbers, the value must not be greater than the provided number. This is often used in conjunction with Minimum Value. For example, the number of attendees at the meeting must not be more than 10. | ||||||||||||
| List | The provided value must be in the list. For example, the application must be in the corporate applications list. | ||||||||||||
| Script | The script processes the user-provided value and returns true or false or confirms if the attribute value is valid | ||||||||||||
On completing the validation, click Create to save your new Attribute.
Manage Attributes
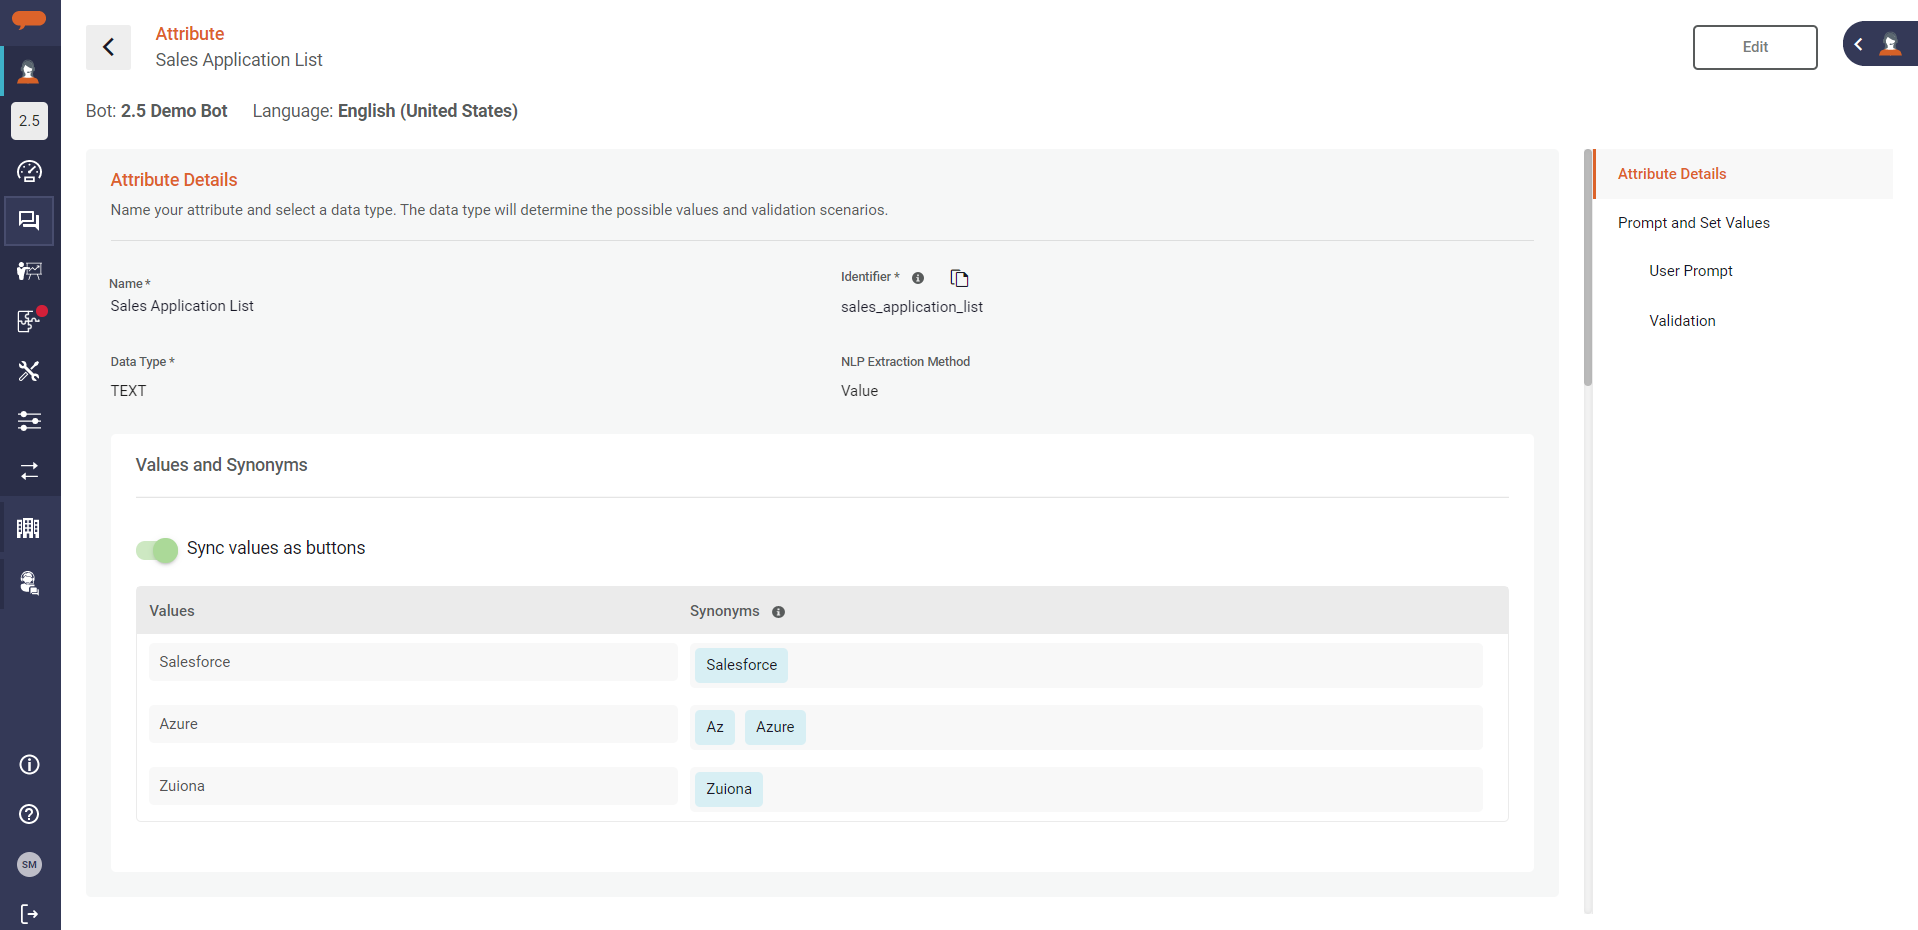
After an Attribute is created, you will see your Attribute in Read-Only mode. Click Edit to modify all sections of your Attribute on a single page. After initial creation, the Attribute's Identifier and Data Type cannot be changed. If you make any edits to an Attribute that is already used in a Skill, the changes will not apply to your production Bot until the Build & Publish Skills process is executed successfully.
Attributes cannot be deleted or set to inactive. If an Attribute is no longer needed, remove it from all associated Skills, it will not be seen by users during conversations.
Use Attributes in Skills
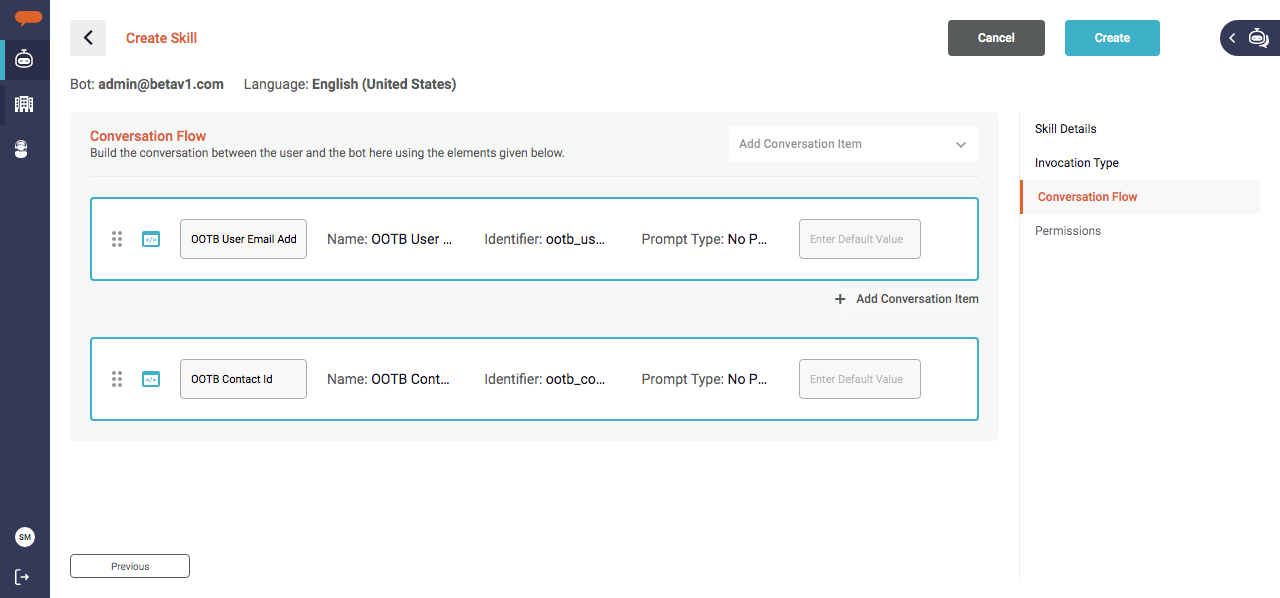
Attributes exist to help fulfill a user's request in a skill. Attributes are associated with skill in the Conversation Flow section. To learn more see Create Skills.
Using Location-Type Attribute
Location-type attributes are used to capture the user's location during skill execution. When a location attribute is added to a skill, the user is prompted to provide their location. Such skills with the location attribute are the best suited for Luma Mobile App, as the end-user can select the location using the Location picker tool.
There are multiple ways to use the location attribute in your skill:
Using the Location picker tool on the channel
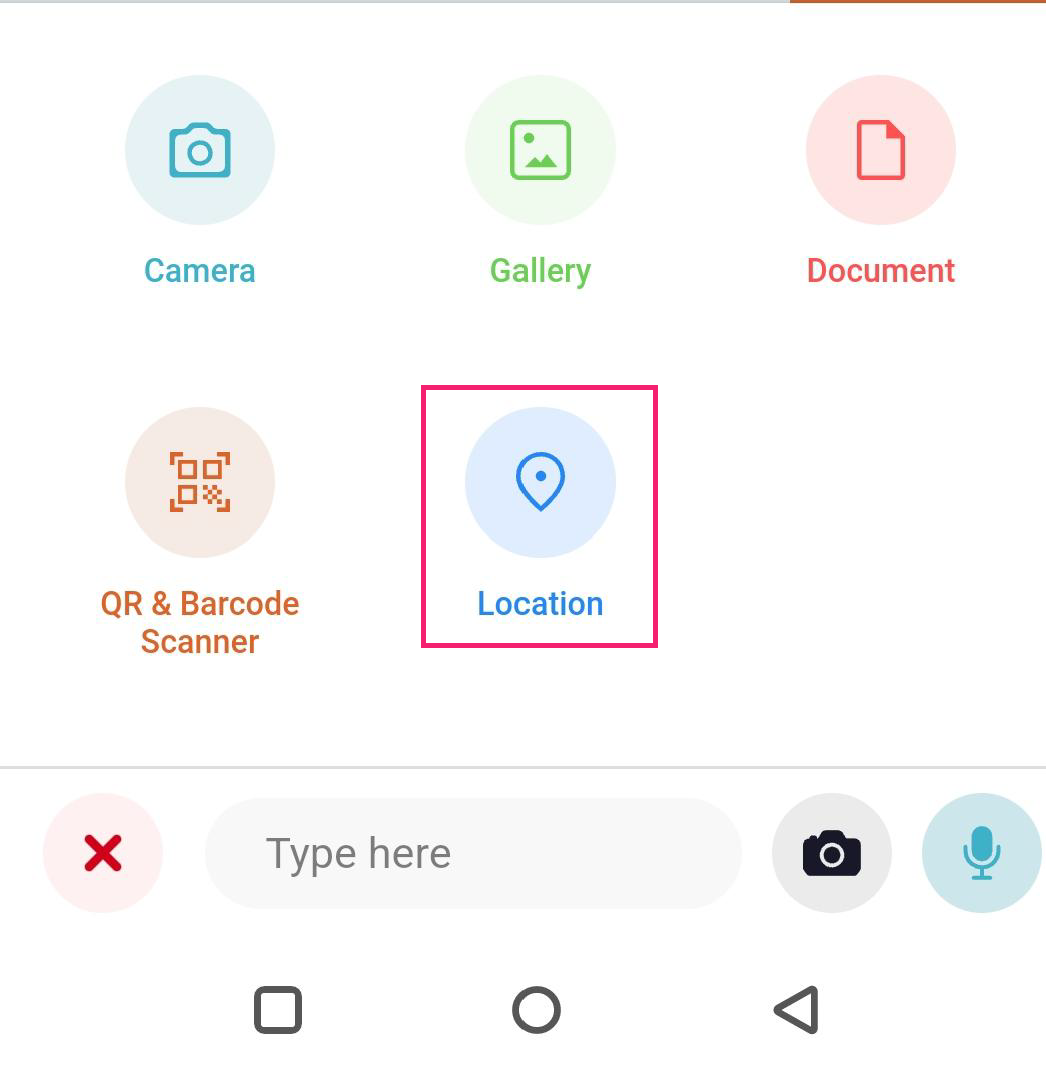
When you want the end-user to select and provide the location manually. While executing a skill, the end-user can use the location picker tool or Maps to search and select the location. The App automatically assigns the user's location (Longitude and Latitude) to the location attribute. The attribute can then be used in the next steps to continue the task.
On the conversation channel (Luma Mobile App), end-users use the location-picker tool to select the location.
Automatic User location selection- Using 'User Location' Event
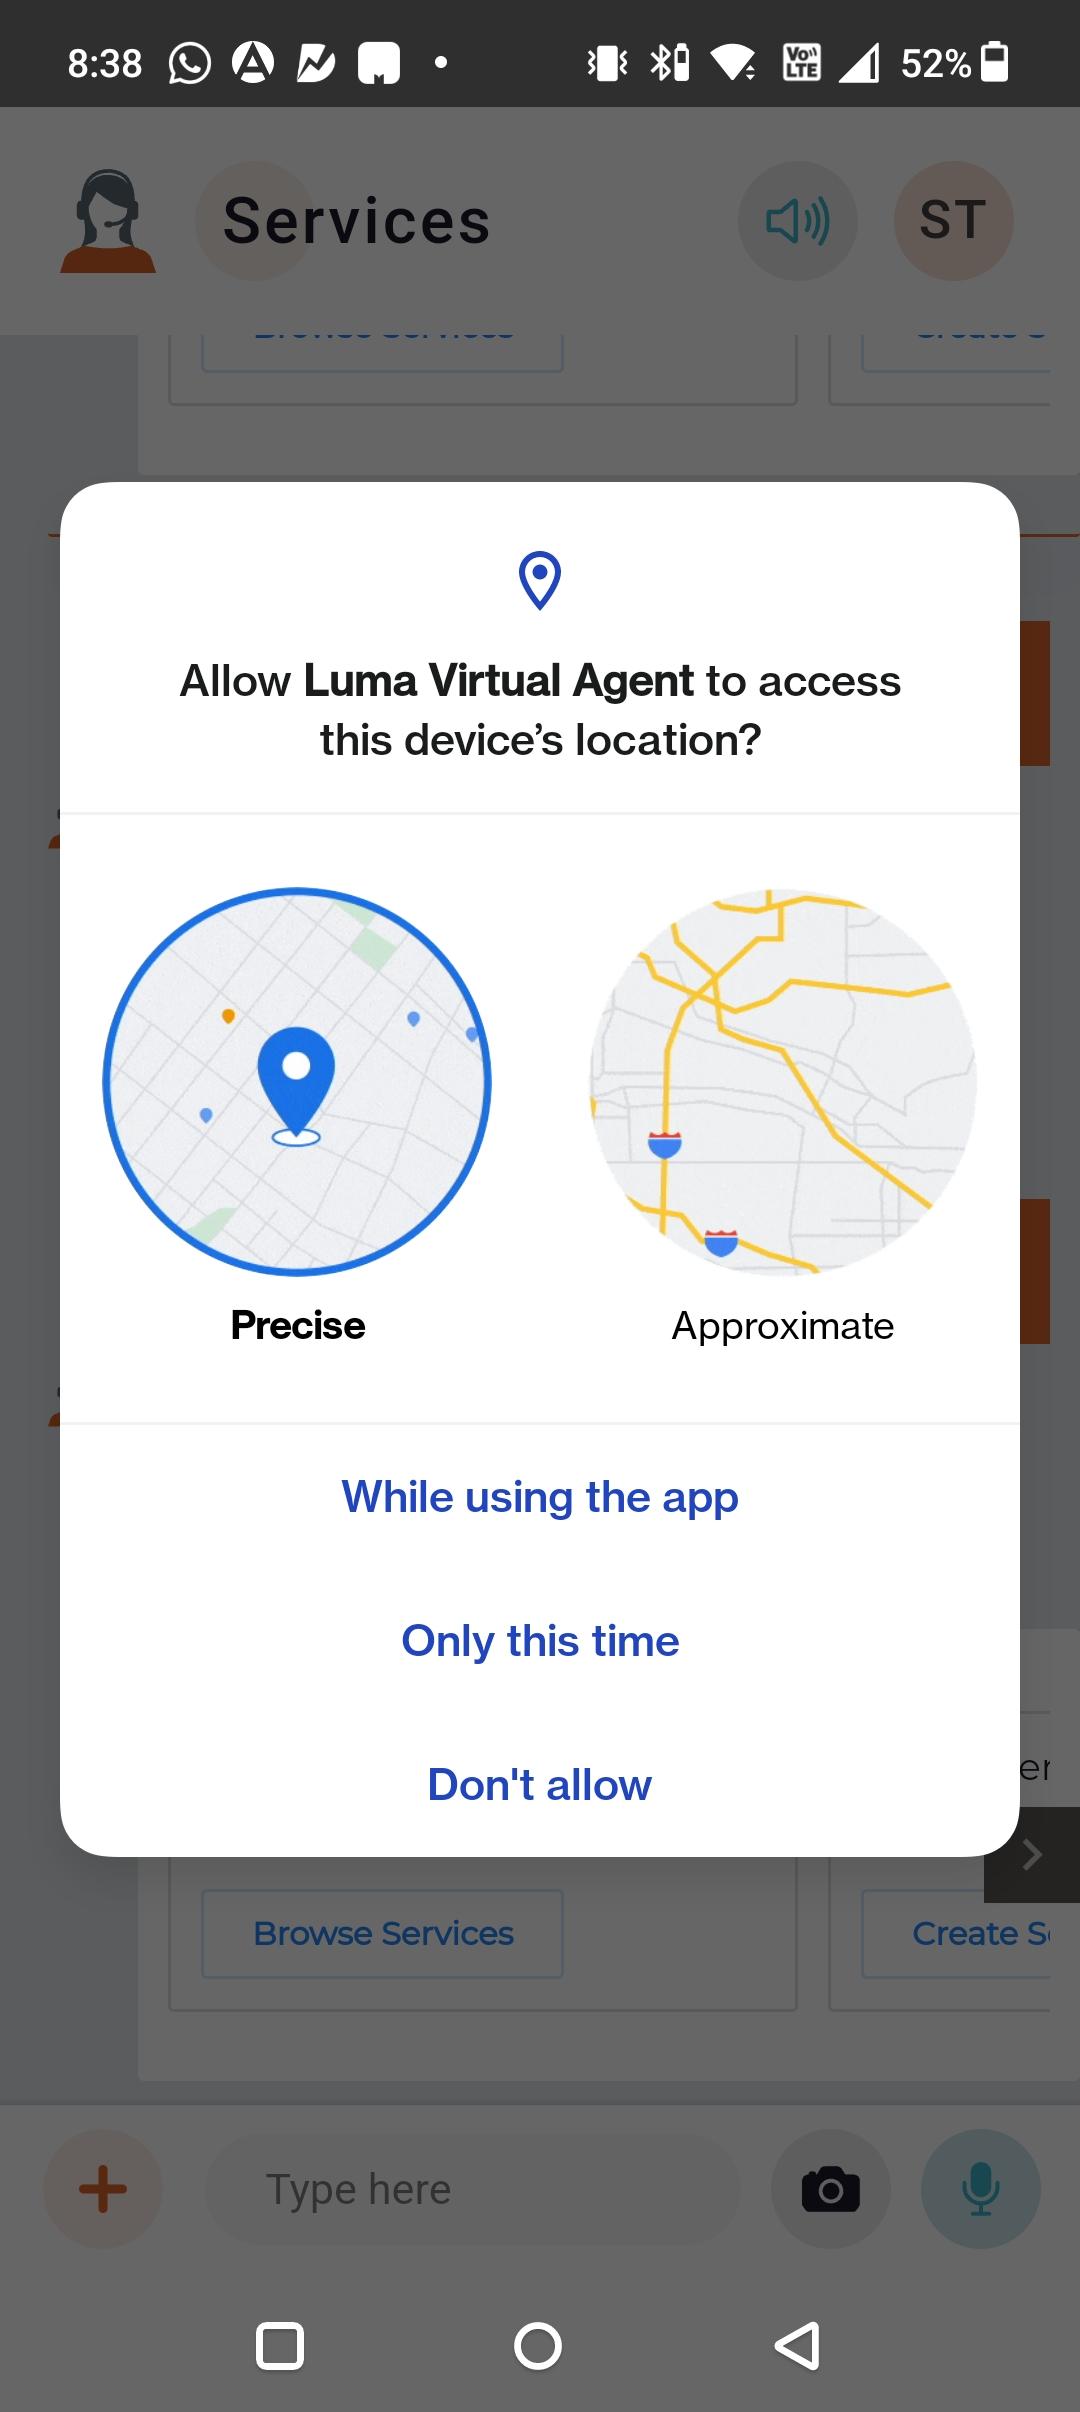
Use the option when you want Luma to pick the user's location automatically. This eliminates the need for the end-user to select the location manually. The user is prompted to provide permission for Luma to pick user's location. Once approved, the user's location (Longitude and Latitude) is automatically assigned to the location-type attribute. This is achieved by triggering the 'User Location' to fill the location attribute.
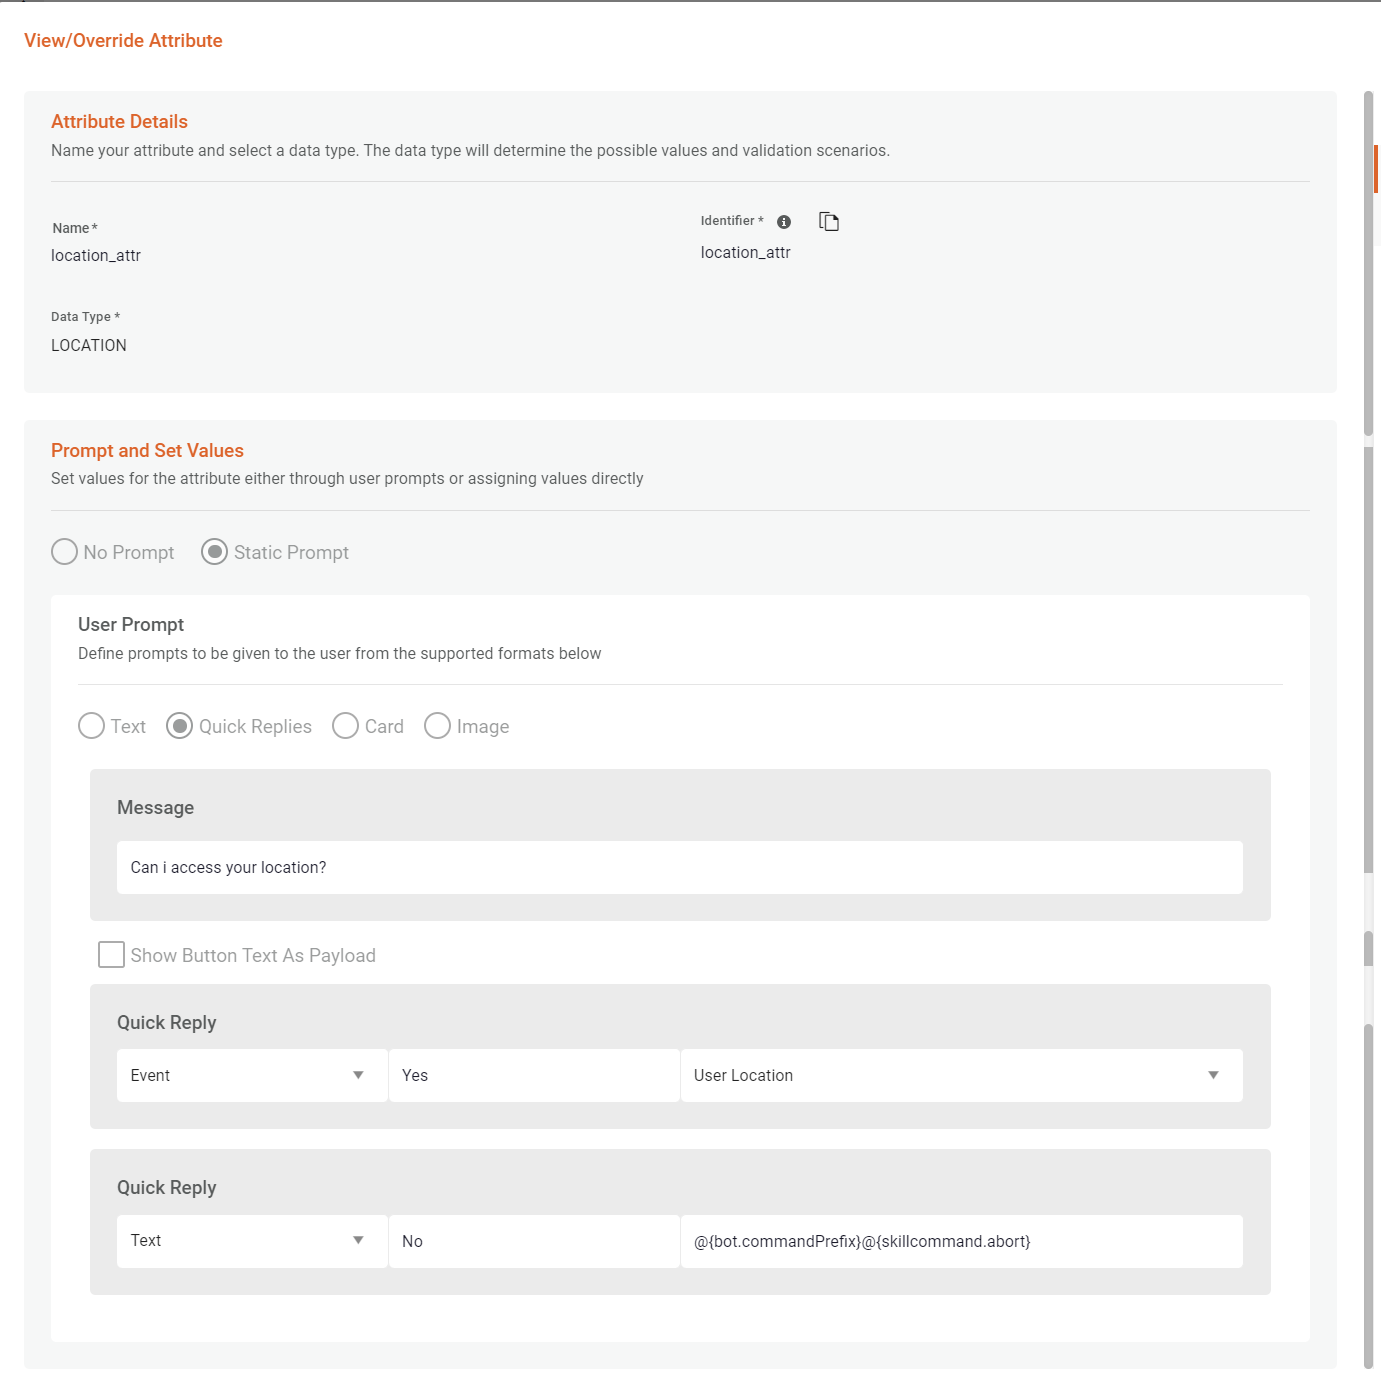
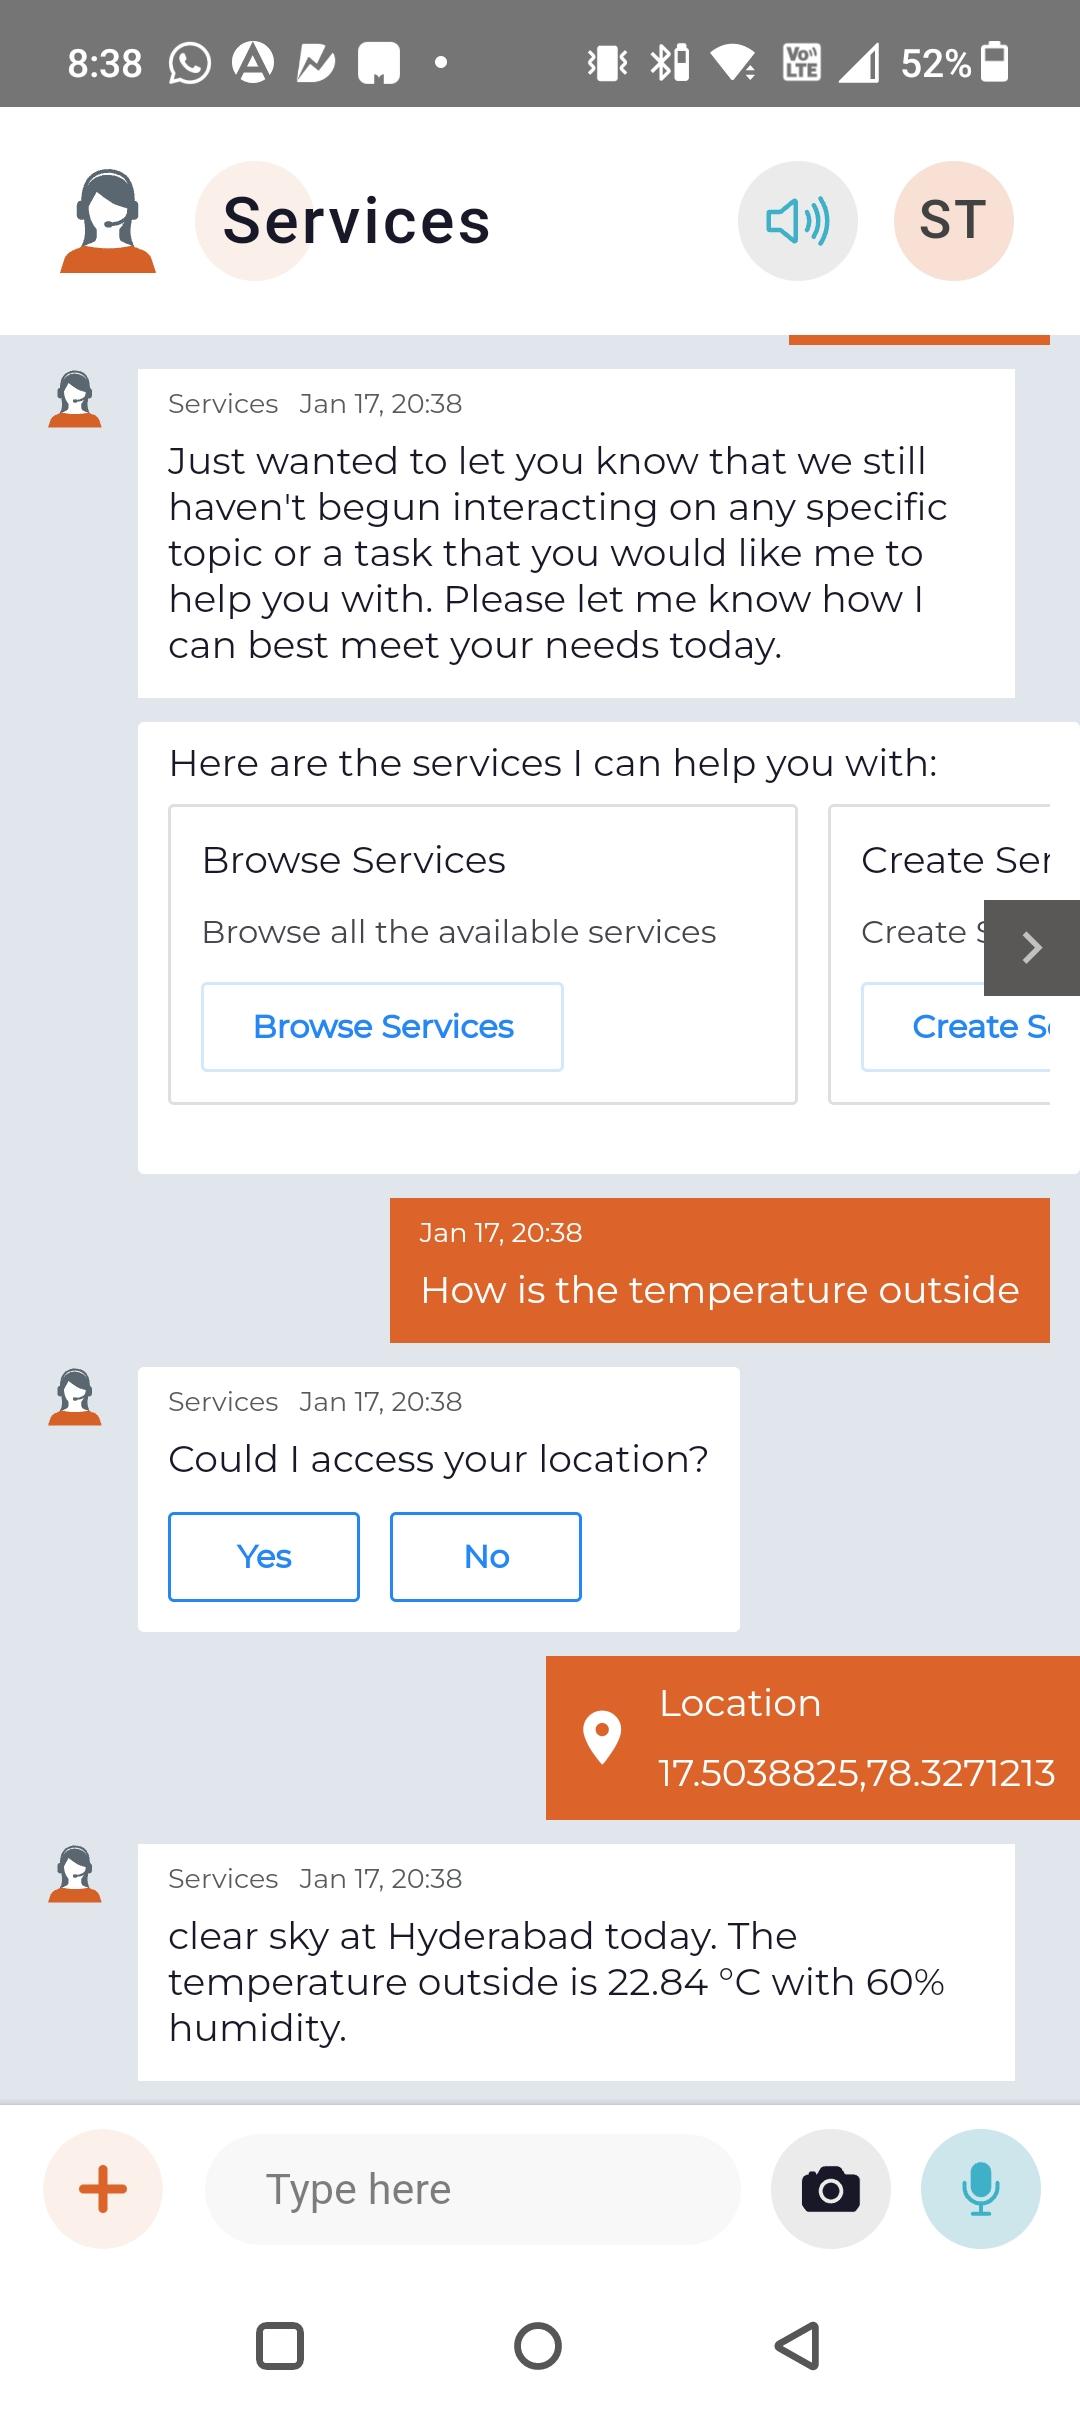
In the below example, the location attribute is configured to trigger the event 'User Location' based on the user response. The end-user is prompted to provide permission to access their location. On receiving permission, i.e., 'Yes' as a response, Luma automatically picks the user's location and assigns the value to the attribute. The attribute can then be referred to as any global attribute (syntax: {global.<attributeidentifier>}) in the next steps.
On the conversation, the user conversation looks like below:
NOTE: For Luma to access user location (manually or automatically), the Luma Mobile App requires Location permission. If permission is not provided, the user is prompted to provide the permission.
Assigning default value to the Location attribute
Location is a combination of Longitude and Latitude. A location type attribute also implicitly holds Longitude and Latitude information. To assign the location information manually, provide the information in following format.
When the Attribute is assigned value in the desired format, the following attributes are automatically filled.
- @{global.<attributeidentifier>.latitude}
- @{global.<attributeidentifier>.longitude}
In the above example, the values will be assigned as below:
- Attribute @{global.<attributeidentifier>.latitude} will be assigned 17.447203
- Attribute @{global.<attributeidentifier>.longitude} will be assigned 78.34873
You can now, use the attribute in the next steps such as Integrations, messages, Rules etc.
Related content
© 2019 Serviceaide 1-650-206-8988 http://www.serviceaide.com info@serviceaide.com
