Install and Use ADSync Utility
This article contains the following topic:
This article provides a quick overview of the procedures of installing, configuring, and running the ADSync utility. To integrate ADSync Utility with the Serviceaide Intelligent Service Management application, perform the tasks that are described in this article.
Prerequisites
- Create the organization structures of the records in Intelligent Service Management before you start using the ADSync Utility. In the absence of the organization structure, users are not mapped to their respective organizations.
- The latest version of Java (version 8 or later) is installed on the system where you install the ADSync Utility.
- The system has network connectivity with the Active Directory (You can install on the AD server itself).
Installation
Follow these steps:
- Download the ADSync utility from the Downloads section within Intelligent Service Management. Navigate to MANAGE> ADMINISTRATION> Tools> Downloads.
- Create an account on the Active Directory (AD) which can access and run queries on the active directory server.
- Unzip the ADSync folder.
- On the system where you unzip the ADSync Utility, modify the environment variable path. Navigate to My Computer> Advanced Settings> Environment Variables> Path.
Set the path to the install bin directory of the JRE installation.
Do not modify the folder structure under any circumstances.
See Get Started with ADSync Utility for more details.
Configuration
To configure the ADSync Utility, follow these steps:
Configure Files
ADSync utility includes three configuration files in the Install directory\AdsyncUtility\ad-user-sync\conf folder. The files are:
sync.properties:
This file contains your tenant information. Update the following parameters:
- LDAP GC and LDAP DC: These values are generally the same. Change these values to your AD server or the domain controller.
Example:
# Global Catalog Server
ldap.gc=ldap://localhost:3268
# Domain Controller Server
ldap.dc=ldap://localhost:389 - Authtoken and slicetoken: These values are auto-populated when you download the ADSync Utility. DO NOT edit these values. If you happen to edit these values by mistake, download the ADSync Utility again.
- action.url: The action.url is the URL to your application instance. This value is auto-populated when you download the ADSync Utility. DO NOT edit this value. If you happen to edit this value by mistake, download the ADSync Utility again.
Note: For large transactions, the support team can provide you with a direct URL to the application, to resolve timeout issues. Only in such cases, you can update this attribute manually. - LDAP Bind credentials= LDAP Bind credentials is the service account that you created in the AD.
- send.data: This parameter determines whether to stream data over to Intelligent Service Management or not. The value is set to Yes. However, you can set it to No while running the ADSync Utility for diagnostic purposes.
For more information about the sync.properties file, see Configure the ADSync Utility and look for sync.properties.
searchBase.list:
The application cycles through each Organization Unit (OU) and looks for users in accordance with the search criteria. Enter the DN of container that you want to sync.
Example:
OU=HR,DC=ForwardInc,DC=com
ADSync Utility syncs users from the HR organization to the application with the following search base.
If the file is empty, the utility pulls all the data from the LDAP server.
attribute_map.list:
This file is used to map fields from AD with the fields in Intelligent Service Management. Configure it by mapping the application attributes with their corresponding AD attributes, in the following format:
Intelligent Service Management attribute=AD attribute
For more information about these files and attributes, see Configure the ADSync Utility and look for attribute_map.list.
Configure SSL for ADSync
To enable an SSL environment for the ADSync Utility, perform the following steps:
- Click the View Site Information icon (the lock icon) next to the application URL in your browser address bar.
- Navigate to Certificate, Details, and click Copy to File.
- Click Next and set the format as .DER encoded binary X.509 (.CER).
- Click Next, enter the file name, and save the file.
- Click Next, verify the path, and click Finish.
- Copy the saved certificate file to the ADSync root (ad-user-sync\) location.
- Navigate to ad-user-sync\ location.
- Import the saved certificate file to the ADSync local keystore si, by running the following command from the ad-user-sync location:
Keytool –import –trustcacerts –alias aliasname –keystore si –file saved_certificate_file_name.cer- Use itmaas as password, when prompted for one.
- Alias name could be anything, for example, Intelligent Service Management-AD-connection.
- After the command runs successfully, a file name si is created in ad-user-sync location.
See Configure the ADSync Utility for detailed configuration information.
Running ADSync Utility
You can test the ADSync Utility without actually sending data to Intelligent Service Management. Set the send.data attribute in the sync.properties file to No.
Run the batch file from <install directory>\ADSyncUtility\ad-user-sync\script\sync.bat.
The output of the command is displayed in sync_data.log file at <install directory>\ADSyncUtility\ad-user-sync\sync\logs.
You can review these logs to verify if ADSync is working as expected. After the testing is over, reset the send.data attribute to Yes.
You can schedule the utility to run daily, using Microsoft Windows Task Scheduler.
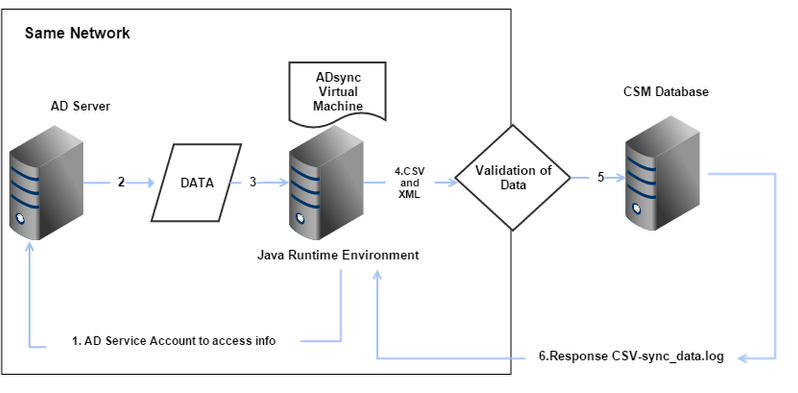
The following diagram explains how the ADSync Utility works:
See Get Started with ADSync Utility for more details.
Troubleshooting Information
Synchronization failures can be identified and addressed in the following documents:
- Sync data log file: After the synchronization is done, Intelligent Service Management generates an XML file that is written to <install directory>\sync\logs\sync_data.log.0. Any error during the synchronization can be seen here.
- Backup file: The backup file is generated at the following location:
<Install directory>\sync\backup
The backup file stores the changes that are written in the data after the last successful synchronization.
For more information about troubleshooting tips, see Troubleshoot ADSync Utility Errors.
© 2019 Serviceaide 1-650-206-8988 http://www.serviceaide.com info@serviceaide.com