Implement Single Sign-On
- Former user (Deleted)
- sneha.tripathi
- priti.hota (Deactivated)
Single Sign-On allows organizations to use their already defined domain authentication and not require users to create a unique username/password for Serviceaide Intelligent Service Management.
This article explains how to configure SAML-based authentication between Intelligent Service Management and your Identity Provider (IdP). This feature is tested with Microsoft Active Directory Federation Service (ADFS 3.0) and Novell Access Manager. However, you can also configure the SAML-based authentication on other IdPs such as OpenAM and PingFederate.
You need administrator privileges in Intelligent Service Management to perform the tasks that are listed in this article.
Overview
To enable Single Sign-On between Intelligent Service Management and your IdP, establish a federation between these two systems. Configurations are required in both Intelligent Service Management and the IdP server for establishing the federation.
To enable and configure Single Sign-On, perform the following tasks:
- Validate Prerequisites
- Export Identity Provider Certificates
- Configure SAML Single Sign-On in CSM
- Add CSM As a Trusted Service Provider in the Identity Provider
- Configure Identity Provider to Send User Identifier As Name ID
Note: User Identifier in Identity provider should match with the Name ID in ISM (Username)
Prerequisites
Before you start the configurations, ensure that the following conditions are met:
- Identity Provider server is configured and running.
- Token Signing Certificate is available.
- HTTPS/SSL is enabled on IIS server.
- Intelligent Service Management is installed on a server that is HTTPS/SSL enabled.
Note: Do not modify any parameters on the application server or database server. Contact Support for assistance in such changes.
Export Identity Provider Certificate
Federation servers use Public/Private Key pairs to add digital signature to all security tokens they produce. These keys validate the authenticity of the encrypted security token.
Intelligent Service Management uses Signing Certificates to secure communications and establish trust.
Export the Public Key portion of the Signing Certificate from the IdP. Save the Signing Certificate on a local system that is accessible to Intelligent Service Management. Use the XML Metadata of the certificate when configuring Single Sign-On in Intelligent Service Management.
Note: Store the Signing Certificate in a Base64 encoded file in ADFS 3.0 and PEM file in Novell Access Manager.
Follow these steps on Microsoft ADFS 3.0:
- Log in to the IdP server and navigate to Administrative Tools> ADFS 3.0 Management> Services> Certificates.
- Select the Signing Certificate under Token-Signing and click Copy to File.
The Export Wizard launches. - Click Next, select No do not export private key, and click Next.
- Export and save the file in Base64 Encoded X.509 (.CER) format.
If the export is successful, the certificate is saved at the location that you specified. You can open the certificate in any text editor, like Notepad.
Follow these steps on Novell Access Manager:
- Log in to Novell iManager Administration Console and navigate to Access Manager> Certificates.
- Open the Signing Certificate, click Export Public Certificate, and select PEM File.
- Save the file in PEM format at the desired location.
If the export is successful, the certificate is saved at the location that you specified. You can open the certificate in any text editor, like Notepad.
Configure SAML Single Sign-On in Intelligent Service Management
You can add multiple SAML single sign-on configurations to Intelligent Service Management. This allows a single Intelligent Service Management system to support different organizations that may have a different SSO/SAML setup. To enable Single Sign-On, configure Intelligent Service Management to trust assertions that are sent by the IdP.
Follow these steps:
- Navigate to MANAGE> ADMINISTRATION> Tools> Slice Configuration> Single Sign On.
- To add an SSO configuration, click the + icon and perform the following actions:
- Enter the domain name, IdP login URL, and the redirect URL for logout.
- Copy the entire text from your Signing Certificate and paste it into the Identity Provider Certificate text box.
- Enter the email domain in Email Domain Tags text field. The email domain helps decide the ticket URL for outbound communications and the logout URL of the logged in user. You can add multiple email domains separated by semicolon.
Note: When multiple SSO configurations are set up, you can have only one email domain tag as empty.
- Create an entry with default Authorization domain information to support Organizations or domains that do not use SSO.
Set Authorisation Domain to Default_<Slice number> and Email Domain Tags to specific domain or empty.
This ensures that default URL (Non SSO URL) is sent in any communication sent out by the system.
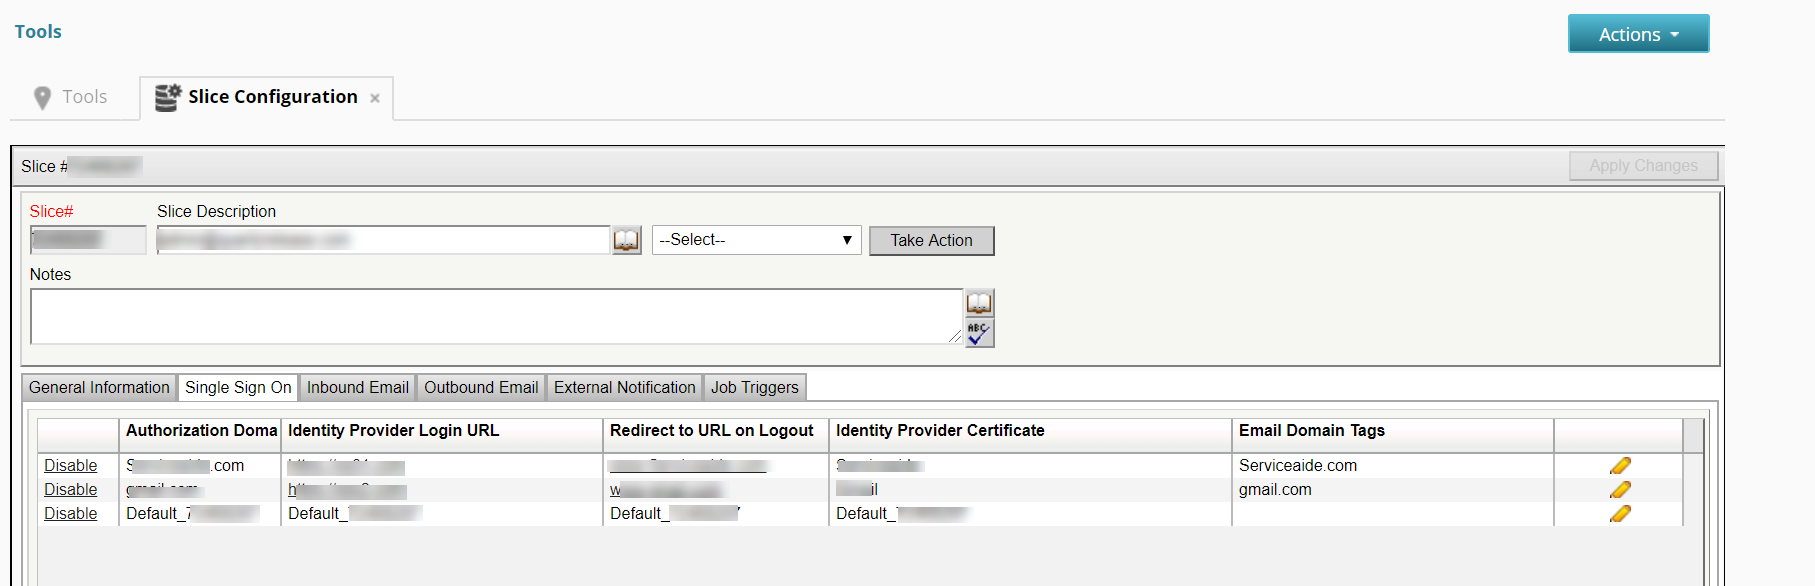
Note: Only one entry for default (Non SSO) URL should be created.
4. Save the SSO configuration To edit an SSO, click the pencil icon.
5. To enable or disable an SSO, click Enable or Disable according to your choice.
After the Single Sign-On is configured in Intelligent Service Management, the metadata becomes available online. The URL to the metadata file varies for different instances of the application. Consider the following examples:
- CSM3: https://csm3.serviceaide.com/NimsoftServiceDesk/servicedesk/sso/metadata/<domainname>
- CSMStaging: https://csmstaging.serviceaide.com/NimsoftServiceDesk/servicedesk/sso/metadata/<domainname>
You can download the metadata from this location and can save it as an XML file. Use the information in this XML file and add Intelligent Service Management as a trusted partner in your IdP.
Note: Contact the support team for the metadata URL applicable to your application instance.
Add Intelligent Service Management as Trusted Service Provider in the IdP
Add the metadata that is generated from Intelligent Service Management to your IdP to enable the SAML communication between them. For information about generating the metadata, see Configure SAML Single Sign-On in CSM.
Follow these steps on Microsoft ADFS 3.0:
- Log in to the IdP server and navigate to Administrative Tools> ADFS 3.0 Management> Relying Party Trusts> Add Relying Party Trust.
- Follow the instructions in the Add Relying Party Trust wizard to add the metadata.
Verify that the following conditions are met:
- The Permit all users to access this relying party option is selected.
- An entry for Intelligent Service Management is displayed in the Endpoints tab.
- The Secure Hash Algorithm (SHA) value under the Advanced tab is set to SHA-1.
- On the Finish page, select Open the Edit Claim Rules dialog for this relying party trust when the wizard closes. The Edit Claim Rules dialog helps you set the attributes for identifying a user.
- Add user identification attributes in the Edit Claim Rules dialog. For more information about claim rules, see Configure Identity Provider To Send User Identifier As Name ID.
Intelligent Service Management is added as a trusted service provider in your IdP.
Follow these steps on Novell Access Manager:
- Log in to Novell iManager Administration Console and navigate to Access Manager> Identity Servers> Servers.
- On the Servers tab, select a server cluster, and click Edit.
- Click SAML 2.0, New, Service Provider.
- Add a name for Intelligent Service Management service provider. In the Source field, you can either add the metadata URL or paste the text from the metadata file.
- Click Finish.
- Navigate to Access Manager, Identity Servers, and click Update All.
Intelligent Service Management is added as a trusted service provider in your IdP.
Configure Identity Provider to Send User Identifier as Name ID
After configuring your IdP and Intelligent Service Management to trust assertions, set up the attribute statement for SAML assertion. This attribute statement is used to identify a user. You can use a unique identifier to identify each user, like Principle Name, or Email ID.
Note: While using ADSync Utility, use the Name Identifier that is mapped to the username on Intelligent Service Management.
Follow these steps on Microsoft ADFS 3.0:
- Access the Edit Claim Rules dialog as instructed in Add CSM as Trusted Service Provider in the IdP.
- Click Issuance Transform Rules, Add Rules. Select the rule template Send LDAP Attributes as Claim and click Next.
- Configure the claim rule:
- Specify a name for the rule. For example, Send Principle as Name ID.
- Select the location for storing this rule. For example, Active Directory.
- Map the LDAP attributes to outgoing claim type. For example, LDAP Attribute - User Principle Name and Outgoing Claim Type - Name ID.
- Click Finish and confirm that the new rule is displayed in the Issuance Transform Rules tab.
- Click Apply and then click OK.
Single Sign-On is configured for Intelligent Service Management with ADFS 3.0 as the IdP.
Follow these steps on Novell Access Manager:
- Log in to Novell iManager Administration Console and navigate to Access Manager> Identity Servers> Shared Settings.
- Click New to create an Attribute Set. Enter a name for the attribute set, select a template, and click Next.
You are prompted to define attributes. - Click New. In the Add Attribute Mapping dialog, specify the Local Attribute, and if necessary the Remote Attribute. If you are using the Remote Attribute, also specify the Remote Namespace and Remote Format.
- Click Finish and then click OK.
- Click Configurations, Attributes.
- From the Attribute Set drop-down list, select the attribute set that you defined earlier.
- Select the attribute that you defined earlier in the Available area and move it to the Send with authentication area. Click Apply.
- Click Configuration, Authentication Response.
- From the Binding drop-down list, select Post.
- Enable the option button Unspecified. Select the attribute that you defined earlier from the drop-down list next to Unspecified.
- Click Apply.
- Navigate to Access Manager> Identity Servers.
- Click Update All.
Single Sign-On is configured for Intelligent Service Management with Novell Access Manager as the IdP.
Troubleshooting
Unable to Integrate SSO login
Symptom
When an SSO login is initiated, a server error is displayed.
Cause
Intelligent Service Management sends an encoded SAML request XML to the IDP, to process the SSO login. The encoded XML contains an attribute entityID, which is not a standard SAML request attribute, thus causing the error.
Solution
Verify the IDP log file for the following type of error pattern:
Request was invalid XML
com.pingidentity.common.util.xml.InvalidXmlException: Invalid XML - errors: [error: cvc-complex-type.3.2.1: Attribute not allowed (no wildcards allowed): entityID in element AuthnRequest@urn:oasis:names:tc:SAML:2.0:protocol]
- To remove the error, follow the steps:
- Navigate to MANAGE, ADMINISTRATION, Tools, Slice Configuration.
- Change the parameter INCLUDE_ENTITYID_IN_OUTGOING_SAML_REQUEST value to No to skip the inclusion of entityID attribute in the outgoing SAML requests.
Note: By default, the parameter value is set to True.
Related content
© 2019 Serviceaide 1-650-206-8988 http://www.serviceaide.com info@serviceaide.com