Conditional Branching
Overview
Conditional branching is the process of branching from one skill to the other. This is often useful when a user asks for a generic request and through the conversation parameters you want to direct them to a more specific request (skill). For example, a user asks Luma for a new computer. And through a prompt you identify that the user requires a new laptop, so you can direct them to a laptop order skill. Likewise you can branch to multiple skills and associate attributes according to the requirement.
Custom rules can be defined for each conversation parameter within a skill. These Rules contain conditions that are evaluated after the user responds to the parameter. The user can choose to continue with the current skill, exit the skill, and move to another skill. As an administrator/developer, you can add and edit prompts for custom skills. As a result, you can customize the response that Luma uses specific to your organization's requirements.
Scenario
This section describes a scenario wherein you can create conditional branching by linking one skill to the other:
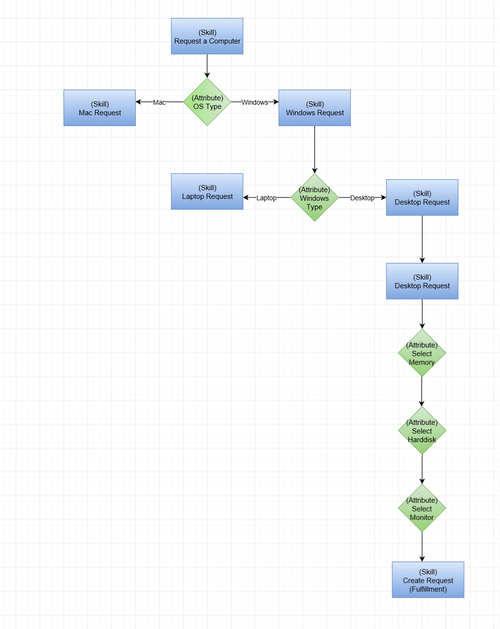
For example, you want to create a 'Request a Computer' skill for new employees. It will branch to several other skills such as Request for Mac Computer and Request for Windows Computer based on the (OS Type) condition in the Request a Computer Skill.
This process flow displays the parent skill and the subsequent skills that are linked to depict conditional branching.
The following section describes the process to add rules to the conversation parameter for each associated attribute.
Define Rules
A Rule is a set of conditions for an attribute in the process of executing a skill. The Fallback Rule is the course of action that you define if the set conditions all evaluate to False during the skill execution process. That implies ''If a particular condition is True, then execute the statement (skill)''. Else, apply the fallback rule.
Note
- You can define a maximum of five rules for each Conversation Parameter. For each rule, you can define up to ten conditions.
- You can branch a maximum of five skills for a Rule. For additional branching of skills you can request Support. A maximum of five additional skills are supported.
- On the Bot dashboard, click Skills. The list of skills appear on the Skills page.
- On the Skills page you can define a rule.
- To navigate to the Rules page, click Conversation Parameter> Select Attribute> Associate Attribute> Add.
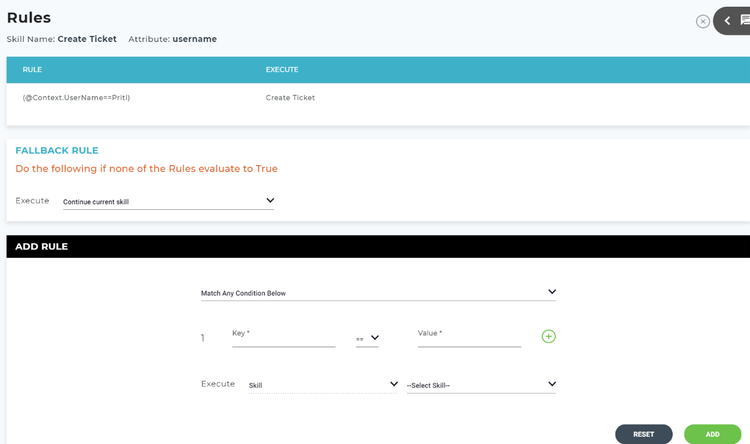
The Rules page appears.
You can define a rule in the Add Rule section.
In this section, we are explaining about a rule which we have already defined.
Rule: Displays the rule which you have defined and added. For example, you have defined this rule '@Context.Username = John' in the Add Rule section. The Rule column displays it as ('@Context.UserName'=='John')
Execute: Displays the skill that you have set to execute if the condition evaluates to True.
Actions
The following actions can be performed in this section. These icons are visible only if you hover over the column on the upper section.
- Edit: Click the icon to edit a rule.
- Delete: Click the icon to delete a rule.
- Move: Click the icons to move the selected row up and down, respectively. Using this you can set the rules in sequence. As a result, you can prioritize prompts according to your requirement to define a flow or to navigate to the specific skill.
Add Rules
To add a Rule, perform the following steps:
- Select one of the following options, if you want to create more than one conditions in a Rule:
- Match all conditions: While executing the skill, all the conditions specified here, are validated.
- Match any condition: While executing the skill, any one condition is validated.
- Define custom criteria: You can define your custom criteria based on the given conditions within the rule. You can enter only numbers, and, or, (,)
- For example, you have created 3 conditions to branch to a skill. You can define your custom criteria such as, to execute a skill, 1st and 2nd conditions must be validated or only the third condition must match. You can type it as (1 and 2) or 3.
2. Specify the key. Key is the attribute for which you want to define a condition. For example, @context.employeeid. When you type '@', you will be prompted with a list of conversation variables such as Context, Response, and so on. Likewise, you will also get prompts for the available attributes. For more information, see Conversation Variables.
3. Select the required operator. Following is the list of operators available:
(==, !=, <, >, <=, >=)
Note
All these operators can be used for numeric values, while == and != can only be used for text.
4. Specify the value that you want to define for the key. For example, if the Key is Username, Value is Priti.
5. Click the icon if you want to add another rule.
6. Select one of the following options from the Execute combo box:
- Skill: You can branch to another skill by selecting a skill from the Select Skill list. This executes the selected skill if none of the rules for the conversation parameter are true.
- Continue current skill: Continues with the current skill.
- Exit Skill: Exits the current skill.
- Transfer to Agent: The user is redirected to a live agent. Refer to the following section to learn more about Transfer to Agent.
7. Select the required skill from the Select Skill list. This skill will be executed if none of the rules which are added to the slot prompt is true.
8. Click Add to add the rule. This rule is displayed in the upper section.
Fallback Rule
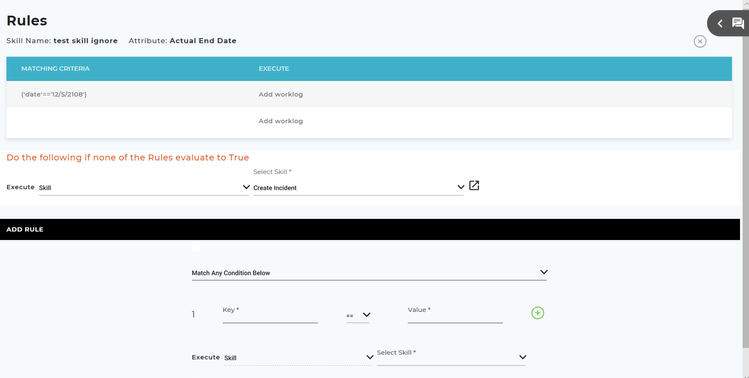
If none of the rules evaluate to true for a conversation parameter, the fallback rule will be applied. This defines what you want to happen in the skill when all Rules evaluate to False. For example an Application Name conversation parameter asks the user to select between Salesforce, SAP or Other. The rules define Salesforce and SAP skills to branch to but nothing for Other. So when the user selects Other the Fallback Rule is executed. The administrator may define that the skill they were using should continue and ask more questions to create a request in the Service Desk system.
Perform the following steps to define a fallback rule:
- Select one of the following options from the Execute combo box:
- Skill: You can branch to another skill by selecting a skill from the Select Skill list. This executes the selected skill if none of the rules for the conversation parameter are true.
- Continue current skill: Continues with the current skill.
- Exit Skill: Exits the current skill.
- Transfer to Agent: The user is redirected to a live agent. Refer to the following section to learn more about Transfer to Agent.
2. Select the required skill from the Select Skill list. This skill will be executed if none of the rules which are added to the slot prompt is true.
Click this icon to view the selected skill details in another browser tab.
Note
Since multiple skills are linked using conditional branching, if the user wants to import/export a specific skill from a list of associated skills, then all the skills, fulfillment actions, and the associated attributes linked can also be imported/exported as required. For more information, refer to Import Export Skills.
Transfer to Agent
A Skills Builder user can create a branch from an existing skill through a rule to the Transfer to Agent skill based on the user input. While executing a skill, the user will be redirected to an agent for assistance based on the settings in a Rule or the Fallback Rule.
Fallback Rule
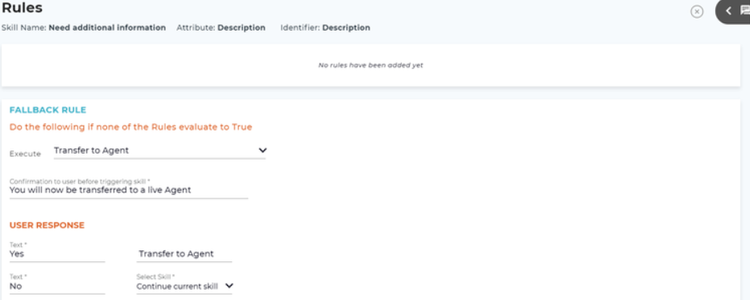
- In the Fallback Rule section, select Transfer to Agent from the Execute drop-down list.
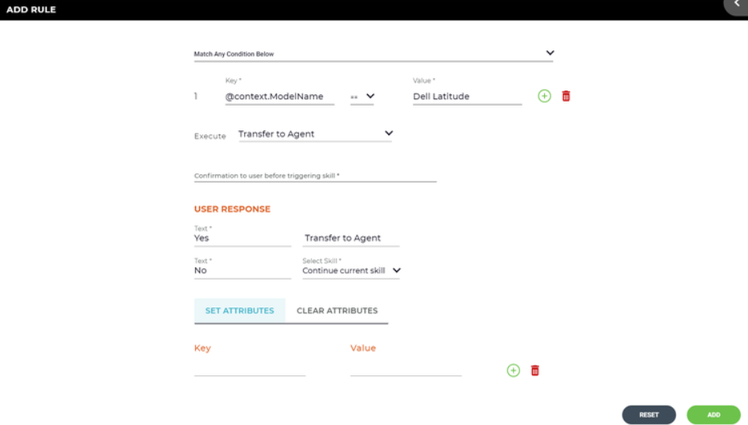
- In the User Response section, select Transfer to Agent as one of the responses. Based on the selected Response, you can set if the user must be redirected to the agent. The following image displays how you can set up the user response.
Add Rule
- In the Add Rule section, select Transfer to Agent from the Execute drop-down list.
- In the User Response section, select Transfer to Agent as one of the responses.
- Click Add to create the rule.
Set Fields/Clear Fields
Using these options the administrator can set different values other than which is captured in the previous skill and an option to reset all the captured values while branching. This option allows passing data from one skill to another to reduce the number of prompts for the user. This functionality provides the user the ability to clear a specific field value or all field values which you defined in the skill earlier and also set fresh values for fields according to the requirement.
While executing a skill through conditional branching, at some point, a user may need to go back to the main skill and specify few required fields. In such scenario, you can use the Set Fields option to specify the required data in the ticket. Using the Clear Fields option you can also clear values which are redundant.
For example, you create a parent skill as 'Request a Computer', additional skills such 'Request for desktop or laptop', followed by the values (attributes) for the specific desktop or laptop. Attributes such as model type and color of the monitor. But while executing the skill through conditional branching, you want to add a few more attributes such as memory size, monitor size, or some more specifications about the processor. At this level, you can specify the details in the skill using the set fields option to accommodate the additional requirements.
You can use Set fields/Clear fields in the Fallback Rule and Add Rule section.
Following are the benefits of the Set Fields/Clear Fields feature:
- Provides the ability to quickly set /reset all the captured values/information according to the requirement while branching skills.
- Reduces the number of prompts for the user
Set Fields
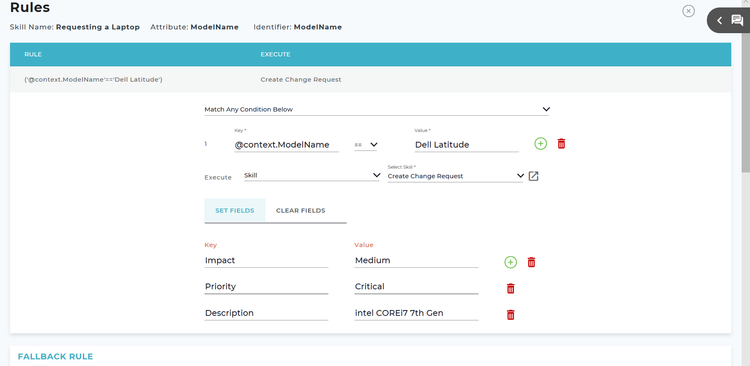
In the following example, the Rule is: if the Model name = Dell Latitude, then execute the 'Change request' skill with the following details specified in the Set Fields tab.
Perform the following steps to set fields:
- Specify the key. Key is the field associated to a skill. For example, Description, Details, and Priority.
- Specify the value for the key that you want to add to the skill. For example, if the Key name is Description, the Value can contain description such as the specifications of a computer (OS, memory size, screen size and so on).
- Click the icon to add another key. You can add multiple keys.
- Click the icon to delete a key.
You can choose one of the following options to clear fields that you have set:
- None: By default, this option is selected. This option is selected when there are no fields to be cleared.
- Clear All Fields: Clears information of all the fields (Set Fields) defined for the current skill.
- Clear Specific Fields: Clears information of specific fields which you want. You can specify the key/s, information of which you want to clear.
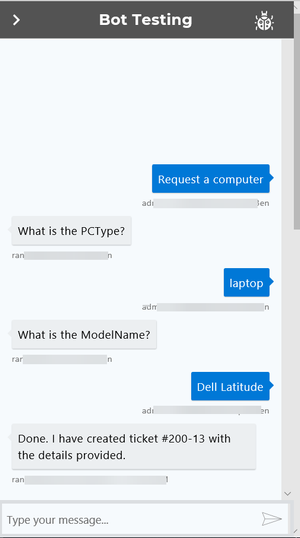
Based on the above example, the following image describes the skill execution in Luma.
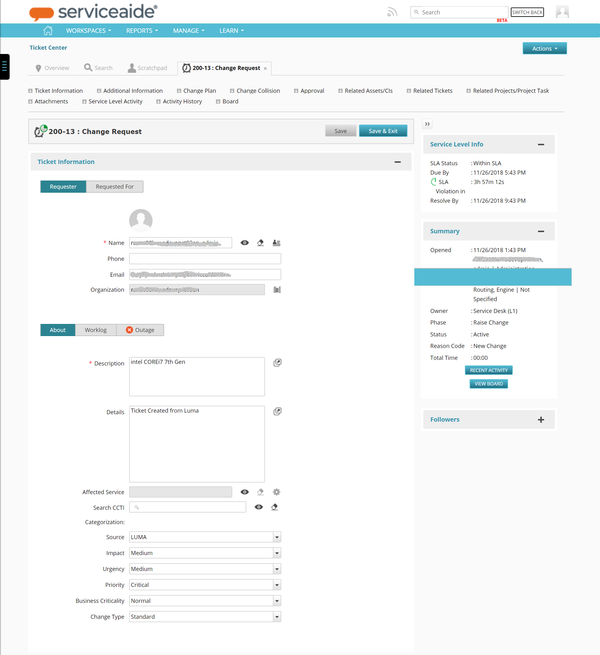
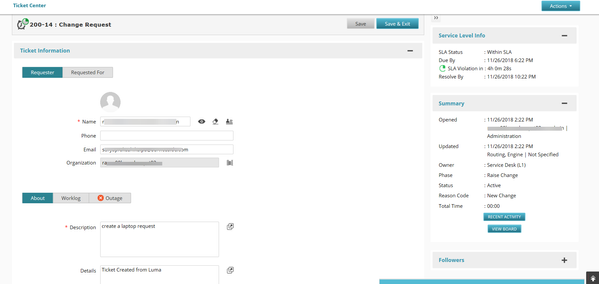
As an example, here is the ticket created in an ITSM system such as Intelligent Service Management System (ISM).
The Keys and Values which we have added in the Set Fields tab are reflected in this Change Request based on the example.
Clear Fields
The following image displays how the Clear Fields option functions.
In the earlier example we specified the following information:
| Key | Value |
|---|---|
| Description | intel Core i7 7th Gen |
Now, to clear field/s perform the following steps:
- Select the Clear Specific Fields option.
- Specify one of the Keys in the Key field such as Description or Impact.
- Close the Rules window.
- Click Save.
The information will be cleared from the key which you specified earlier. Following image displays the ticket information in ISM.
The above change request is created and the information is cleared from the Description field.
The following video explains how conditional branching can be set up and the associated actions.
Related content
© 2019 Serviceaide 1-650-206-8988 http://www.serviceaide.com info@serviceaide.com
