Automated Follow-up Skill
- Reena Wadekar (Deactivated)
- haritha.kothapalem (Unlicensed)
- Prudhvi Praveen Uppuluri (Deactivated)
This article deals with the following areas of follow-up:
The Follow-up process is a key feature available in Luma which eliminates manual and mundane tasks by automating the process to following up with various stakeholders. Follow-up can be done in various instances, for example, following up for pending approval, following up on pending customer information, or following up to close a resolved ticket. You can set the follow-up frequency and also the process Luma needs to perform in case the stakeholder does not respond to the follow-up messages.
Note
Before Luma can send a follow-up message to a user, that user must have interacted or registered with Luma. This is easily achieved by having the user send a message to Luma.
Follow-up messages are grouped together based on the type of follow-up event. For example, if multiple approvals are required by the user they will be grouped into a single follow-up message but other follow-ups will be sent in different messages.
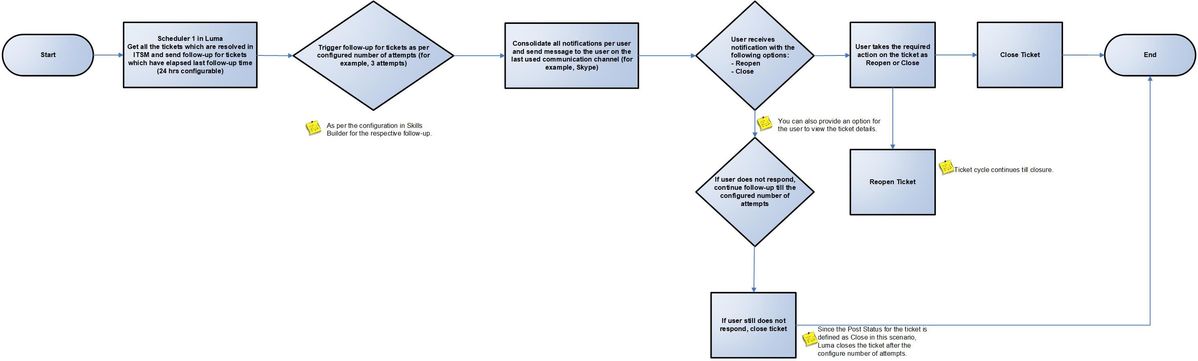
As a follow-up process, Luma gathers all the resolved tickets from ISM and stores them in the database based on the scheduler configuration to poll the ISM system. There are two schedulers built in the Luma platform. The first scheduler periodically pulls the data from the configured underlying subsystems every 30 minutes. The second scheduler runs every 10 minutes to perform the follow-up for the data pulled from the configured subsystems. These schedulers consolidate all the notifications by users and also checks if the user is registered in Luma or not. If the user is registered with Luma, then a notification will be sent to the last used communication channel of the user for 3 (configurable) attempts, with a follow-up frequency of 24 hours (configurable). If the user does not respond to the follow-up requests, then Luma takes the configured Post Status action on the ticket.
A Tenant Administrator may also configure a default channel for the Follow up notifications. Once the default channel is set, all Follow-ups are sent to the specified channel. In case, a user is not registered on the channel, notifications are delivered on Last Used communication channel.
You may get in touch with Serviceaide Support team to configure the default channel for your Tenant.
Following is an overview of the Resolve to Closure scenario, where Luma follows up on all the 'Resolved' status tickets from ITSM. If we configure the number of attempts as 3, Luma follows up with the user thrice. After 3 attempts, if the Post Status is defined as Close, then Luma closes the ticket.
The following out-of-the-box (OOTB) follow-up skills are pre-configured in ISM and by default are an inactive state:
- Follow-up on Pending Approval
- Follow-up on Pending customer information
- Follow-up on Resolution to closure
For SDM, only Follow-up on Resolution to closure is available OOTB, the rest can be configured as custom follow-up skills. To turn off the follow-up process for non-Luma users, a config parameter "followup.only.luma.users" is available. Turning the parameter value to True (default value is True) will turn off the follow-up process if the user is not registered with Luma for that ticket.
Following are the benefits of automated follow-ups:
- Accelerate Pending Approvals
- Validate if a Resolved ticket can be closed
- Ask for an update on a ticket related to a ticket pending on the customer
- Create state-based follow-ups for your custom processes
- Reduces the effort spent by Analysts/Support Agents in consistently following up on the tickets at various stages
To enable follow-up skills, do the following:
- You need to raise a support ticket with tenant details and the configured email in the bot.
Tenant details include Tenant Name, Tenant ID and the email address configured in MS Bot Framework. - Support team will enable the follow-up for the tenant with a default polling interval of 24 hrs and 3 follow-up attempts on the primary channel. To enable the follow-up or to change frequency of follow-up (in case of demo only) support/ops has to follow steps in followup_config.sql.
The following options are available for configuration:
- record_status_id 1 (0- Disable and 1- Enable)
- followup_attempts_on_primary_channel 3 (Default value)
- followup_attempts_on_secondary_channel 1 (Default value)
- followup_frequency 1440 (Default value)
- bot_email_id - Need to provide the email address (Configured in MS Bot Framework)
The Skills Builder has the following pre-configured follow-up skills, and you can add additional customized follow-up skills as required.
Pending Approval Follow-up: Luma can follow-up on the pending tickets for approval by fetching all the ‘Pending for Approval’ tickets. It can also fetch all the pending approvers for a ticket ID from a given ticket list. Luma follows up only in the last communicated channel instead of email. You are prompted to take any of the following actions from the communication channel, such as Skype for Business:
- Approve: In case the ticket needs to be approved
- Reject: In case the ticket needs to be rejected with rejection details
- Need more info: In case additional details are required to process the ticket
Create an Automated Follow-up Skill
To create a new automated follow-up skill, do the following:
- On the Bots Dashboard, click the more options
 icon and select Bot Configuration.
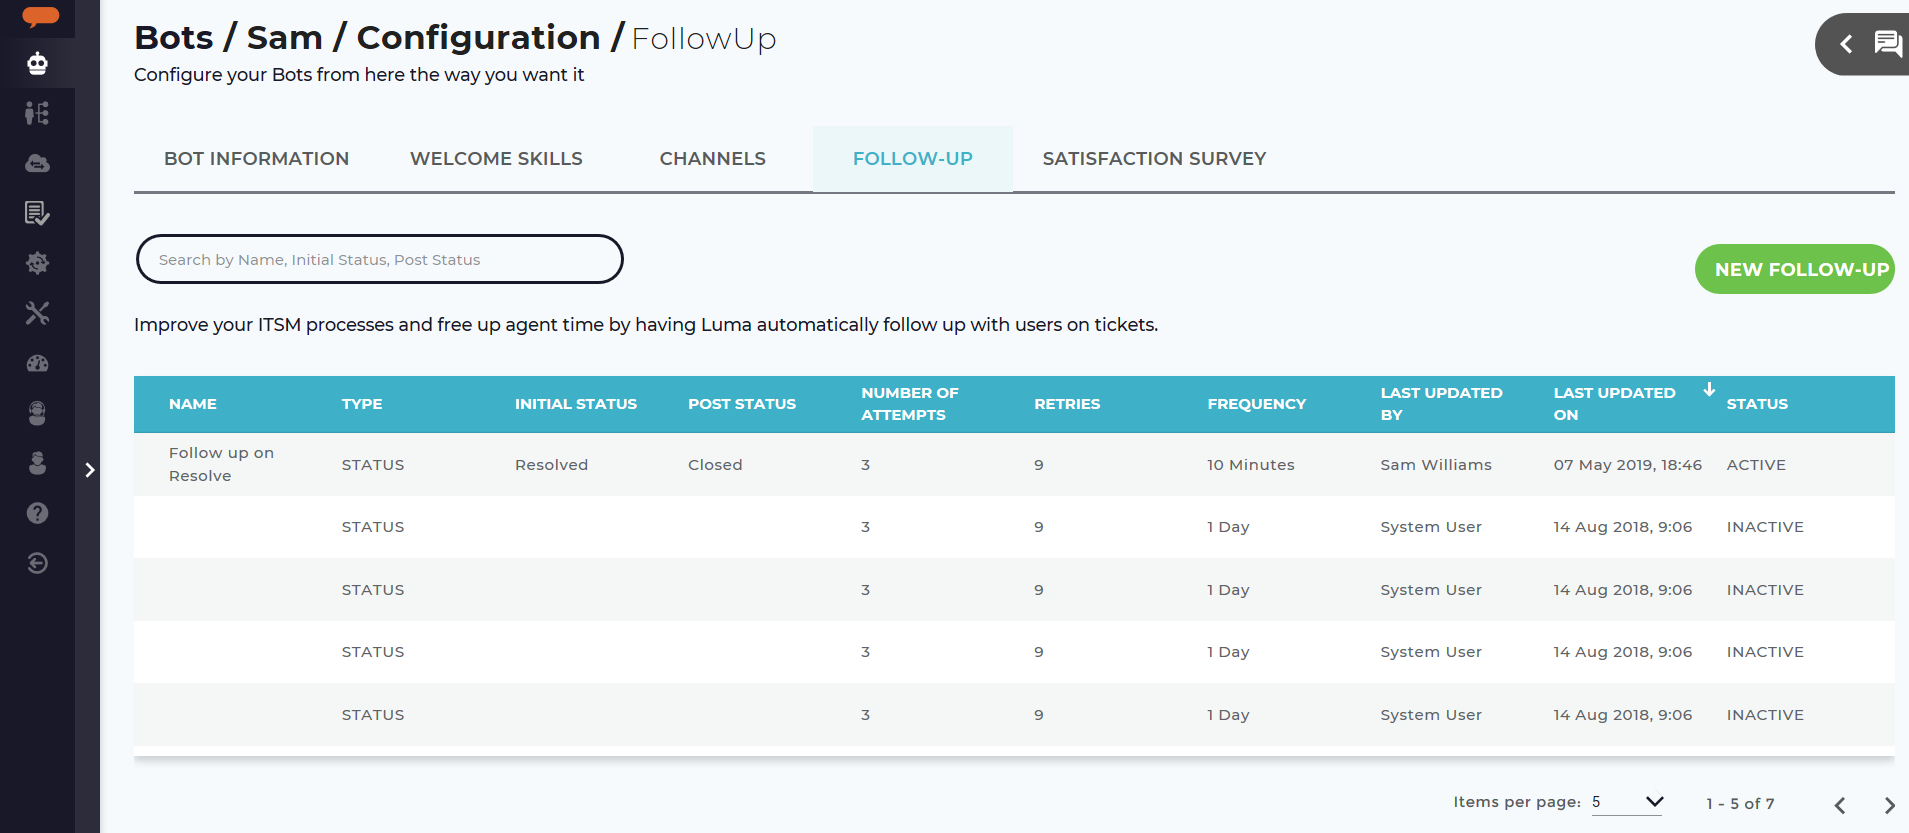
The Bot Configuration page appears with Bot Information, Welcome Skills, Channels, Follow-up and Satisfaction Survey tabs. - Click the Follow-up tab to view the list of created follow-ups as shown below.
- Click New Follow-up to create a new follow-up skill.
The New Follow-up page appears as shown below.
- Enter the new follow-up Name. For example, Follow up on pending items.
- By default, system automatically displays the Type of follow-up as Status.
Set the follow-up Status as Active or Inactive using the toggle button.
Active: It is used to ensure the Follow up configuration is Active.
Inactive: It is used to ensure the Follow up configuration is Inactive.
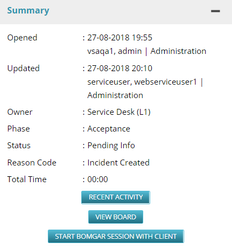
Enter the Initial Status of the ticket for the follow-up skill. This field must align to your connected Service Desk system and an existing ticket status, for example, Pending Info, Pending Approval and more. This field triggers the start of the follow-up process. For more details on the ticket management process, refer Modify the Status of a Ticket. Following is an example of the ITSM ticket, which shows the Status as Pending Info.
Note
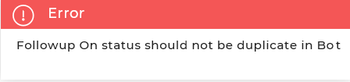
Ensure that the Initial Status is unique, as multiple follow-up skills for the same Initial Status cannot be created. The following error appears if you try creating duplicate follow-ups with the same values.
- Enter the Post Status of the ticket if required. Post Status makes the follow-up to go into a loop. If Post Status is blank, the follow-up cycle keeps repeating, that is, if the ticket status remains the same, Skills Builder continues to pick the ticket in subsequent attempts.
Enter the Number of attempts on user's primary chat channel.
This value determines the number of times Luma reaches out to the customer on the last channel they used to communicate with Luma. For example, if the value was set to 3, Luma will reach out to the user three times on Slack, which is the channel they last used Luma with. The allowed values are only between 1 to 10. By default, system automatically displays the value as 3, which can be changed.Enter the Number of retries on the active channel.
Note
If a user is active in a conversation on their primary chat channel, Luma will wait and try again later. This setting defines how many times Luma should retry during each attempt. The allowed values are only between 1 to 9. By default, Luma will retry three times, which can be changed.
Enter the Follow Up Frequency and select the frequency duration from the drop-down list.
Note
The follow-up frequency defines the time between follow-up attempts. Once per day is a best practice. The allowed values are between 1 to 5 days. By default, system automatically displays the value as 1 day, which can be changed to Hours and Minutes. If you select Hours, you can select the frequency duration between 1 to 120 Hrs. If you select Minutes, you can define the frequency duration between 10 to 72000 Mins.
- Select the Add Worklog check box to add the worklog details.
Enter the Worklog Text details.
Note
Worklog Text field appears only if Add Worklog check box is selected. If this check box is selected, the work log text will be logged to the ticket each time a follow-up is made. It can be used for auditing purposes.
- In the Card Message section, enter the follow-up skill Message Text.
The message text informs the user about the tickets they need to act upon when a follow-up is made. You can configure the text for the user, along with the actions to be taken during the follow-up attempts. - Enter the follow-up skill Title and Sub Title.
- Select the follow-up skill Option Type as Text or URL from the drop-down list and enter the Option Title and Option Response. If you select URL, you can provide the URL to a page, while text allows you to provide the follow-up text for the Skills Builder. For example, you can select the Option Type as URL, specify the Option Title as View Ticket and the Option Response as @config.csm_app_url#ticket/@resp.items.ticket_identifier. This provides the Self-service user with a URL to view the ticket.
If you select the Option Type as Text, specify the Option Title as Add Comments and Option Response as Add comments for @resp.items.ticket_identifier; this allows you to add comments for a given ticket. - Click Save to save the new follow-up skill, else click Cancel to discard the process.
Search and Edit Follow-up Skill
To search an existing follow-up skill, enter the Name, Initial Status or Post Status in the search box and press Enter. The skills matching the search criteria appear.
You can select the number of items to be viewed per page, for example, 10. Click the arrows to navigate to the next and previous pages.
Note
Luma even supports partial keywords and displays the matching skills.
To edit an existing follow-up skill, click the skill and make the required changes. Click Save to save the edits.
During the chat conversation in a channel, the follow-up ticket cards are displayed in a batch of 10 without pagination.
Related content
© 2019 Serviceaide 1-650-206-8988 http://www.serviceaide.com info@serviceaide.com