Native Discovery
- Former user (Deleted)
- Felipe Romaniuc (Unlicensed)
- Former user (Deleted)
This article includes the following topics:
Native Discovery
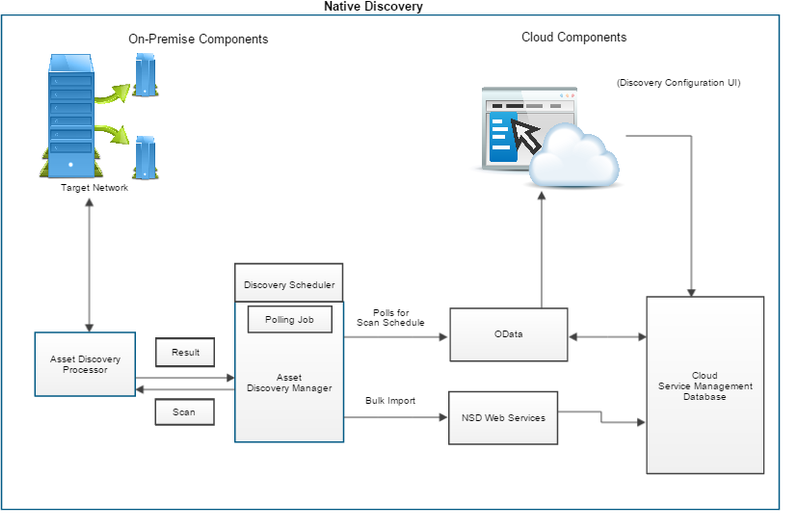
Using the native discovery feature, you can discover IT assets in the target network. The solution requires an on-premise infrastructure to scan the target network. The following on-premise components are required for discovery to function:
Asset Discovery Manager Installer
Download and install this on-premise component for Asset Discovery. Asset Discovery Manager establishes the communication channel and sends the discovered assets from your on-premise network to Intelligent Service Management. The Discovery Manager sends the discovered assets to the application server using the built-in bulk import functionality.
By default, Asset Discovery Processor comes with Asset Discovery Manager.
Note: You can configure a maximum of 5 active Asset Discovery Managers per slice. You can link multiple Asset Discovery Processors to multiple Asset Discovery Managers. A maximum of 3 active Asset Discovery Configurations per Asset Discovery Manager can be configured.
The Asset Discovery Manager components have the following important features:
- Discover the assets on the specified IP address range and the credentials that are provided for the target servers.
- Asset Discovery Manager distributes the IP addresses to the various processors reporting to the Asset Discovery Manager.
- If the credentials are not provided for target servers, only the basic attributes are discovered. For example, host name, IP address.
- Using the correct credentials, Asset Discovery Manger can perform a deep discovery of the assets. As a result it fetches detailed information corresponding to hardware, installed applications, and the virtual environment.
- The virtual environment discovery identifies the guest and host relationships for various virtual environments like VMware, ESX, and Hyper-V.
- Asset Discovery Manager sends the discovered assets to the application server using the built-in bulk import functionality.
Note: Install and configure the Asset Discovery Manager on the on-premise server for the Asset Discovery Processor to work.
Asset Discovery Processor Installer
Download and install this on-premise component for Asset Discovery. Asset Discovery Processor scans your target network and performs asset discovery. It communicates and sends the discovered assets to Asset Discovery Manager.
Asset Discovery Processor scans your target network and performs asset discovery. It communicates and sends the discovered assets to Asset Discovery Manager. The Asset Discovery Processor has the following important features:
- Accept a range of IP addresses from Asset Discovery Manager.
- Ping each of the target IP address and verify if it is available.
- Perform a detailed discovery of each target IP addresses using various protocols. For example, SNMP, WMI and SSH
- Queries various virtualization technologies and identify guest and host relationships. For example, Microsoft SCVMM, VMware, Redhat Enterprise Virtualization
- Enable multiple thread runs which allow multiple IP discoveries to occur in parallel. Number of threads can be configured in <Processor Install Path>\config\discovery.properties by changing the batch.partition.consumers parameter. Restart the Asset Discovery Processor Windows service for the parameters to take effect.
Note: Multiple Discovery Processors can be installed reporting to single Discovery Manager for load balancing while discovering large subnets.
The details for the Asset Discovery Manager installation are also required to install the Asset Discovery Processor. If you change ports while installing the Asset Discovery Manager, provide the same information while installing the Asset Discovery Processor.
You can install Discovery processors on multiple on- premise servers. Each of the installed Asset Discovery Processors is registered to a single Asset Discovery Manager. Once the assets are discovered, the Asset Discovery Processor pushes all the gathered information to the Asset Discovery Manager. Asset Discovery Manager sends all the asset information from on-premise server to the Intelligent Service Management using the built-in bulk import functionality. The turnaround time for a discovery scan depends on your environment. For example, network latency, endpoint response time, hardware, and the accuracy of the credentials that are supplied to discovery. To avoid network latency, install Asset Discovery Processor in the target network. Subtenancy is not supported for discovery-related functionality.
Prerequisites for Native Discovery
To set up native discovery, install and configure the following components on the on-premise server:
- Asset Discovery Manager
- Asset Discovery Processor
Recommendations
To set up and run native discovery, consider the following recommendations:
- Installation: Install the Asset Discovery Manager(combined with Asset Discovery Processor) on the dedicated server.
Note: You can install these on-premise components on a physical server, or a Virtual Machine(VM). - System Requirements: To scan and discover more than 10,000 assets, you would require more than one Asset Discovery Processors. You will not require any additional Asset Discovery Processors if your assets are less than 10,000.
- The system requirements to install Asset Discovery Manager and each Asset Discovery Processor are:
- OS Platforms
Windows Server 2008, Windows Server 2008 R2, Windows Server 2012, Windows Server 2012 R2 - Hardware requirements:
8-GB RAM
2 Quad core CPUs with 2+ GHz speed - Scan Time: The turnaround time for a discovery scan depends on your environment. For example, network latency, endpoint response time, hardware, and the accuracy of the credentials that are supplied to discovery. The endpoints result in different timings that are based on your environment.
- OS Platforms
Native Discovery: Installation
To deploy native discovery, install the following on-premise components:
Asset Discovery Manager
By default one Asset Discovery Processor is installed with the Asset Discovery Manager. The Asset Discovery Manager has dependency on third-party software’s like Couch DB and Active MQ. When you run the setup file, all the prerequisite third-party softwares are installed. The Asset Discovery Manager balances the work load between the Asset Discovery Processors. The turnaround time for a discovery scan depends on your environment. For example, network latency, endpoint response time, hardware, and the accuracy of the credentials that are supplied to discovery.
Follow these steps:
- Navigate to MANAGE> ADMINISTRATION> Tools> Common> Downloads, and click Asset Connector/Asset Discovery Manager Installer - Windows [353 MB]. A zip file containing the Asset Discovery Manager is downloaded.
- Unzip the downloaded file and navigate to the directory where the files are extracted.
- Double-click the clouditsm-assetconnector-installer- windows-64bit .exe file. The Installation wizard appears.
- Select a Destination Folder for the Asset Discovery Manager and click Next. Installer populates the default installation location of the Asset Discovery Manager. You can also select a custom location.
- Specify the following details:
Application URL: Specify the URL for the application.(Ex.: https://csm*.serviceaide.com)* is the number of your tenant instance)
Admin Username: Specify the application Admin User ID.
Admin Password: Specify the application Admin Password. - Discovery Repository Port: Specify the port number of the CouchDB, used by the asset discovery repository. This port is prepopulated, however you can edit it and can specify the value as appropriate.
- Specify the following Asset Discovery Configuration Details and click Next. The following port is prepopulated with default values, however you can edit them and can specify the values as appropriate.
Messaging Service Port: Specify the port number of the ActiveMQ, used by the asset discovery manager.
Processor Service Port: Specify the port, which Asset Discovery Processor Windows service uses.
Note: Make a note of the details that are specified for the Asset Discovery Manager installation. The same details are required to install the Asset Discovery Processor. - Verify the information about the Pre-Installation Summary screen and click Install.
- Click Finish to complete the Installation.
Upon the successful installation, the Asset Discovery Manager registers the following windows services:
- Active MQ Service
- Apache Couch DB Service
- Asset Discovery Manager Service
- Asset Discovery Processor Service
Upgrade Instructions
When you upgrade to the latest release of the Intelligent Service Management application, you must also upgrade the Asset Discovery Manager installer. The application will prompt you upgrade the Asset Discovery Manager and Asset Discovery Processor. If the installer is not upgraded discovery will not work because of compatibility issues.
After the upgrade is complete the existing Discovery Configuration from the previous release is retained however it shows as inactive. This configuration is named as Default Configuration. You have to manually re-activate it by navigating to MANAGE, ADMINISTRATION, Tools, Asset, Asset Discovery Configurations.
Consider the following recommendations before upgrading the Asset Discovery Manager Installer:
- Verify that the Asset Discovery Manager is already installed.
- Verify that no discovery job is running before starting the upgrade process.
To upgrade the Asset Discovery Manager:
- Navigate to MANAGE> ADMINISTRATION> Tools> Common> Downloads, and click Asset Connector/Asset Discovery Manager Installer - Windows [353 MB].
- Verify that the Asset Discovery Manager is already installed for your slice. The installer identifies that an Asset Discovery Manager is already installed and prompts you to upgrade.
- Click OK to start the upgrade process.
The Asset Discovery Processor is now bundled with Asset Discovery Manager Installer. Verify that the windows services for both the Asset Discovery Manager and the Asset Discovery Processor are up and running.
Due to the upgrade, the existing Asset Discovery Manager's & Asset Discovery Processor's behaviour does not change. The upgrade only replaces some existing jar files and introduces any new configuration changes. During the upgrade process the Asset Discovery Manager is in Inactive state. However once the upgrade is successful the Asset Discovery Manager becomes Active.
Note: Asset Discovery Processor is also installed on same system after the Asset Discovery Manager is upgraded.
Asset Discovery Processor
By default one Asset Discovery Processor is installed with the Asset Discovery Manager. To scan more than 10,000 assets, install more Asset Discovery Processors in the target network.
The Asset Discovery Processor scans the target network and performs the actual discovery. The Asset Discovery Processor sends the discovered information to the Asset Discovery Manager. To avoid network latency, install the Asset Discovery Processor in the target network. Ensure all the installed Asset Discovery Processors point to Asset Discovery Manager components configured for that slice. One Asset Discovery Processor can scan up to 10000 assets.
Follow these steps:
- Navigate to MANAGE> ADMINISTRATION> Tools> Common> Downloads, and click Asset Connector/Asset Discovery Manager Installer - Windows [353 MB].
- Navigate to the downloads directory and double-click the clouditsm-assetdiscoveryprocessor-installer- 1.0.0-windows-32bit.exe file. The Asset Discovery Processor is downloaded.
The Installation wizard opens. - Select a Destination Folder for the Asset Discovery Processor and Click Next.
Note: Installer populates the default installation location of Asset Discovery Processor. You can also select a custom location if necessary. - Specify the following details:
Manager Host Name: Specify the name of the server on which the Asset Discovery Manager is installed.
The following ports are prepopulated, however you can edit them and can specify the values as appropriate.
Discovery Repository Port: Specify the discovery port details, as provided while installing the Asset Discovery Manager.
Messaging Service Port: Specify the messaging service port details, as provided while installing the Asset Discovery Manager.
Processor Service Port: Specify the port, which Asset Discovery Processor Windows service uses.
Note: Ensure that the details specified for the Asset Discovery Processor match with the ports configured on Asset Discovery Manager. - Click Next.
- Verify the information about the Pre-Installation Summary screen and click Install.
- Click Finish to complete the installation.
Upon the successful installation, Asset Discovery Processor service is registered as a Windows service. The service then runs on the user specified port and reports to Asset Discovery Manager.
Upgrade Instructions
When you upgrade to the latest release of the application, you must also upgrade the Asset Discovery Processor. The application will prompt you upgrade the Asset Discovery Manager and Asset Discovery Processor. If the installer is not upgraded discovery will not work because of compatibility issues.
After the upgrade is complete the existing Discovery Configuration from the previous release is retained however it shows as inactive. This configuration is named as Default Configuration. You have to manually re-activate it by navigating to MANAGE, ADMINISTRATION, Tools, Asset, Asset Discovery Configurations.
Consider the following recommendations before upgrading the Asset Discovery Processor:
- Verify that the Asset Discovery Processor is already installed.
- Verify that no discovery job is running before starting the upgrade process.
To upgrade the Asset Discovery Processor:
- Navigate to MANAGE> ADMINISTRATION> Tools> Common> Downloads, and click Asset Connector/Asset Discovery Manager Installer - Windows [353 MB].
- Verify that the Asset Discovery processor is already installed. The installer identifies that an Asset Processor is already installed and prompts you to upgrade.
- Click OK to start the upgrade process.
After the upgrade process is complete verify that Asset Discovery Processor windows service is up and running.
Native Discovery: Configuration
Native discovery scans the target network that is based on the input IP range. Native discovery also provides options to discover installed application and virtual environment details. Provide the admin/root credentials of the target network on the Native Discovery configurations page. If the specified credentials are invalid, only basic discovery happens and the host name and the IP address are discovered. To perform a deep discovery, ensure that you provide credentials that have the system administrator privileges.
Note: A maximum of three active Asset Discovery Configurations per Asset Discovery Manager can be configured.
Follow these steps:
Navigate to MANAGE> ADMINISTRATION> Tools> Asset> Asset Discovery Configurations> New Configuration.
Specify the General Information.
Specify the Configuration Name.
Specify the Discovery Type. Select the Native Discovery option from the Asset Discovery drop-down list.
Select the Asset Connector for this configuration.
Specify the Organisation to which the discovered assets are assigned.
- Check the Override Organisation box, to update the organization of all the assets that are discovered using this discovery configuration.
Specify the Network Properties.
- Specify the Discovery Range, by providing the IP address range over which you would like to run discovery.
To specify the scope of Discovery, use wild-card entries. For example, if you use the subnet 172.24.*.*, the subnets from 172.24.1.0 to 172.24.255.255 are scanned. You can specify the value of the subnet mask using the CIDR Notation(/24 represents 255). For example, 172.24.*.* expands from 172.24.0.1 to 172.24.255.255. Optionally, can take bulk actions on IP Ranges. For more information, see Native Discovery#Take Bulk Actions on IP Ranges.
- Specify the Discovery Range, by providing the IP address range over which you would like to run discovery.
Select the Discovery Profiles.
Installed Applications: Enable this option to discover installed applications in the target network.
Virtual Environments: Enable this option discover guest – host relationships for various virtual environments.- Specify the Credentials for the following environment:
Important: Provide the admin/root credentials of the target network on the Native Discovery configurations page. - Specify the Login Attempts. Specify the number of login attempts on the target server with the Credentials provided for discovery. Set the login attempts value at least one less than the account lockout policy threshold in the Target network. Note: Your account administrator sets the account lockout value.
Windows: Specify the User Name and Password for the Windows server or the root/admin credentials to access the network. You can add credentials for multiple Windows-based resources.
Linux/Unix: Specify the User Name and Password for the Linux/Unix server instance. You can add credentials for multiple Linux/Unix based resources.
Virtual: Specify the User Name and Password for the Virtual resources. Select the Configuration Name and the Port on which the virtual resource is hosted.
SNMP V3: Specify the SNMP V3 authentication details as follows:- Click the SNMP V3 tab and specify the SNMP Community name.
- Click Add User, the add user pop-up appears.
- Specify the User Name.
- Select the Authentication Protocol.
- Specify the Authentication Password.
- Verify the Authentication Password.
- Select the Privacy Protocol.
- Specify the Privacy Passphrase.
- Verify the Privacy Passphrase.
- Add the Description.
- Click Save and Exit.
- Set the recurrence schedule by specify the following values:
Start date/time: Specify the time at which the scan is scheduled to start.
End date/time: Specify the time at which the scan ends.
Repeat on: Specify the time at which the scan must be repeated.
Note: Default polling interval is two hours. The scheduled job takes up to a maximum of two hours to start from the scheduled time. - Click Save.
Note: The recurrence scheduler lets you schedule and start the native discovery process. When creating a recurrence schedule, you can schedule the discovery process to repeat at a specific interval. You can schedule the discovery scan to repeat on a daily or weekly basis.
You have successfully saved the Discovery Configuration for Native Discovery.
Take Bulk Actions on IP Ranges
Bulk actions are workflow actions, and can be applied to multiple objects simultaneously. You can take a bulk action when you want to apply the same action on more than one object. You can take the following bulk actions on IP Ranges:
- Exclude: This action allows you to exclude the IP Ranges without deleting them from the Discovery Range section. Excluded IP Ranges are not discovered by Native Discovery.
- Include: This action allows you to include the IP Ranges in the Discovery Range section. The IP ranges marked Included are discovered by Native Discovery.
- Delete IP Range(s): This action allows you to delete single or multiple IP ranges from the Discovery Range section.
Configuration for the Target Network
To scan and discover assets, set the following configuration on the target network:
- WMI Discovery- Ensure the firewall on the target network is allowing WMI traffic.
Note: WMI listens on a static port but sends reply’s on a dynamic port. - Application Discovery- Discovery uses the Remote Registry option on Windows to query installed software. Installed software information is fetched when the Remote registry Windows service is enabled on the target machines being discovered.
- SSH Configuration- Navigate to the command prompt and enter vi/etc/ssh/sshd_config and confirm that password authentication is set to Yes. Ensure that the SSH daemon is running.
- Virtualization- To discover assets on a XEN Server, ensure that the XEN tools are installed on the target server. Install the VMware tools on the target servers for ESX Virtualization.
- Classification- Configure SNMP V1 and V3 on the target server. If the authentication ports are dynamic, the default configuration for SNMP is not retained on the target server.
- Ping- Enable the inbound and the outbound ICMP traffic.
Platforms Supported for Native Discovery
Native discovery can discover the assets compatible with the following platforms:
Operating Systems:
- AIX
- HPUX
- Linux
- Solaris
- Windows
- z/Linux
Virtualization:
- VMWare ESXi
Note: Native discovery of MAC assets will perform a “basic” discovery which simply identifies the asset was discovered, but it won’t perform the deeper discovery like Windows and Unix (via WMI and SSH respectively) to get more details (ex. memory, OS, processor, software installed, etc…)
Discovery Status
To access the Asset Discovery Status tab, navigate to MANAGE> ADMINISTRATION> Asset> Asset Discovery Status . Schedule a discovery scan, navigate to the Asset Discovery Status. After you schedule a discovery scan, you can verify its status from the application.
A discovery status provides details of the scan and displays:
- The total number of newly discovered assets.
- The total number assets fetched by basic discovery.
- The total number of assets fetched by deep discovery.
A discovery job can take the following statuses:
- Started: This status indicates that a discovery scan has been triggered.
- Running: This status indicates that the target network is being scanned.
- Discovery Interrupted: This status indicates that the discovery was interrupted while the scan was in progress. For more information, verify the log files on the server where Asset Discovery Manager is installed.
- Discovery Completed: This status indicates that the discovery scan is completed.
- Import in Progress: This status indicates that the import of the discovered assets, to cloud asset repository, is in progress.
- Partially Imported: This status indicates that some of the discovered assets were not imported on to the cloud asset repository. For more information, verify the log files on the server where Asset Discovery Manager is installed.
- Finished: This status indicates that the discovery scan and import are completed.
- Failed: This status indicates that discovery scan or import has failed. For more information, verify the log files on the server where Asset Discovery Manager is installed.
Delete a Discovery Status
To delete a discovery status:
- Navigate to MANAGE> ADMINISTRATION> Asset> Asset Discovery Status.
- Select the job discovery statuses and click Bulk Actions, Delete.
The selected statuses are deleted.
Discovered Assets
To view the list of discovered assets, navigate to the Asset Center. The Asset Center has the following badges to help you view the assets:
- All Assets
- Total Physical Assets
- Total Virtual Assets
- Total Discovered Assets
The assets inherit the properties or attributes from the model, such as the categorization, manufacturer, and other attributes. For all the discovered assets the default categorization is Hardware Asset. You can change the default categorization to classify the assets correctly. For example, Hardware Server or Hardware Workstation. To change the default classification navigate to MANAGE> ADMINISTRATION> Tools> Asset> Models, update the CCTI to the appropriate classification.
For more information, see Asset Management, Manage Models, and Manage Manufacturers.
If you provide the valid credentials, the application performs a deep discovery, fetches hardware and software the attributes, and populates the asset repository.
Hardware
The following hardware attributes are fetched as part of discovery:
- Serial Number
- Host Name
- MAC Address
- IPv4 Address
- IPv6 Address
- Operating System
- Type
- Model
- Manufacturer
- DNS Name
- Processor Count
- Processor Speed
- Processor Type
- Disk Space in GB
- Disk Used Space in GB
- Total Memory in GB
- Memory Slots in Use
- Total Memory Slots
- CPU Core Count
Software
Discovery fetches only the high-level information about the software such as the Software Name, Publisher, and Version information. Discovery uses the following mechanisms to fetch installed software information about different operating systems.
Windows
HKLM\Software\Microsoft\Windows\CurrentVersion\Uninstall
Linux
rpm -qa --qf '%{NAME};%{VERSION};%{DIRNAMES};%{INSTALLTIME};%{VENDOR};%{ARCH}::'
AIX
lslpp -l -c -q all
lslpp -hc -q all
HP-UX
swlist -v -l product -a directory -a install_date -a architecture -a revision -a title -a is_patch | egrep -v 'vendor|product|^#'
Solaris
pkginfo -c application -l | egrep 'PKGINST|NAME|ARCH|VERSION|BASEDIR|VENDOR|INSTDATE'
Related content
© 2019 Serviceaide 1-650-206-8988 http://www.serviceaide.com info@serviceaide.com